I’m Nathan. I’ve been an HVAC technician for over 10 years, and this exact complaint is one I hear all the time:
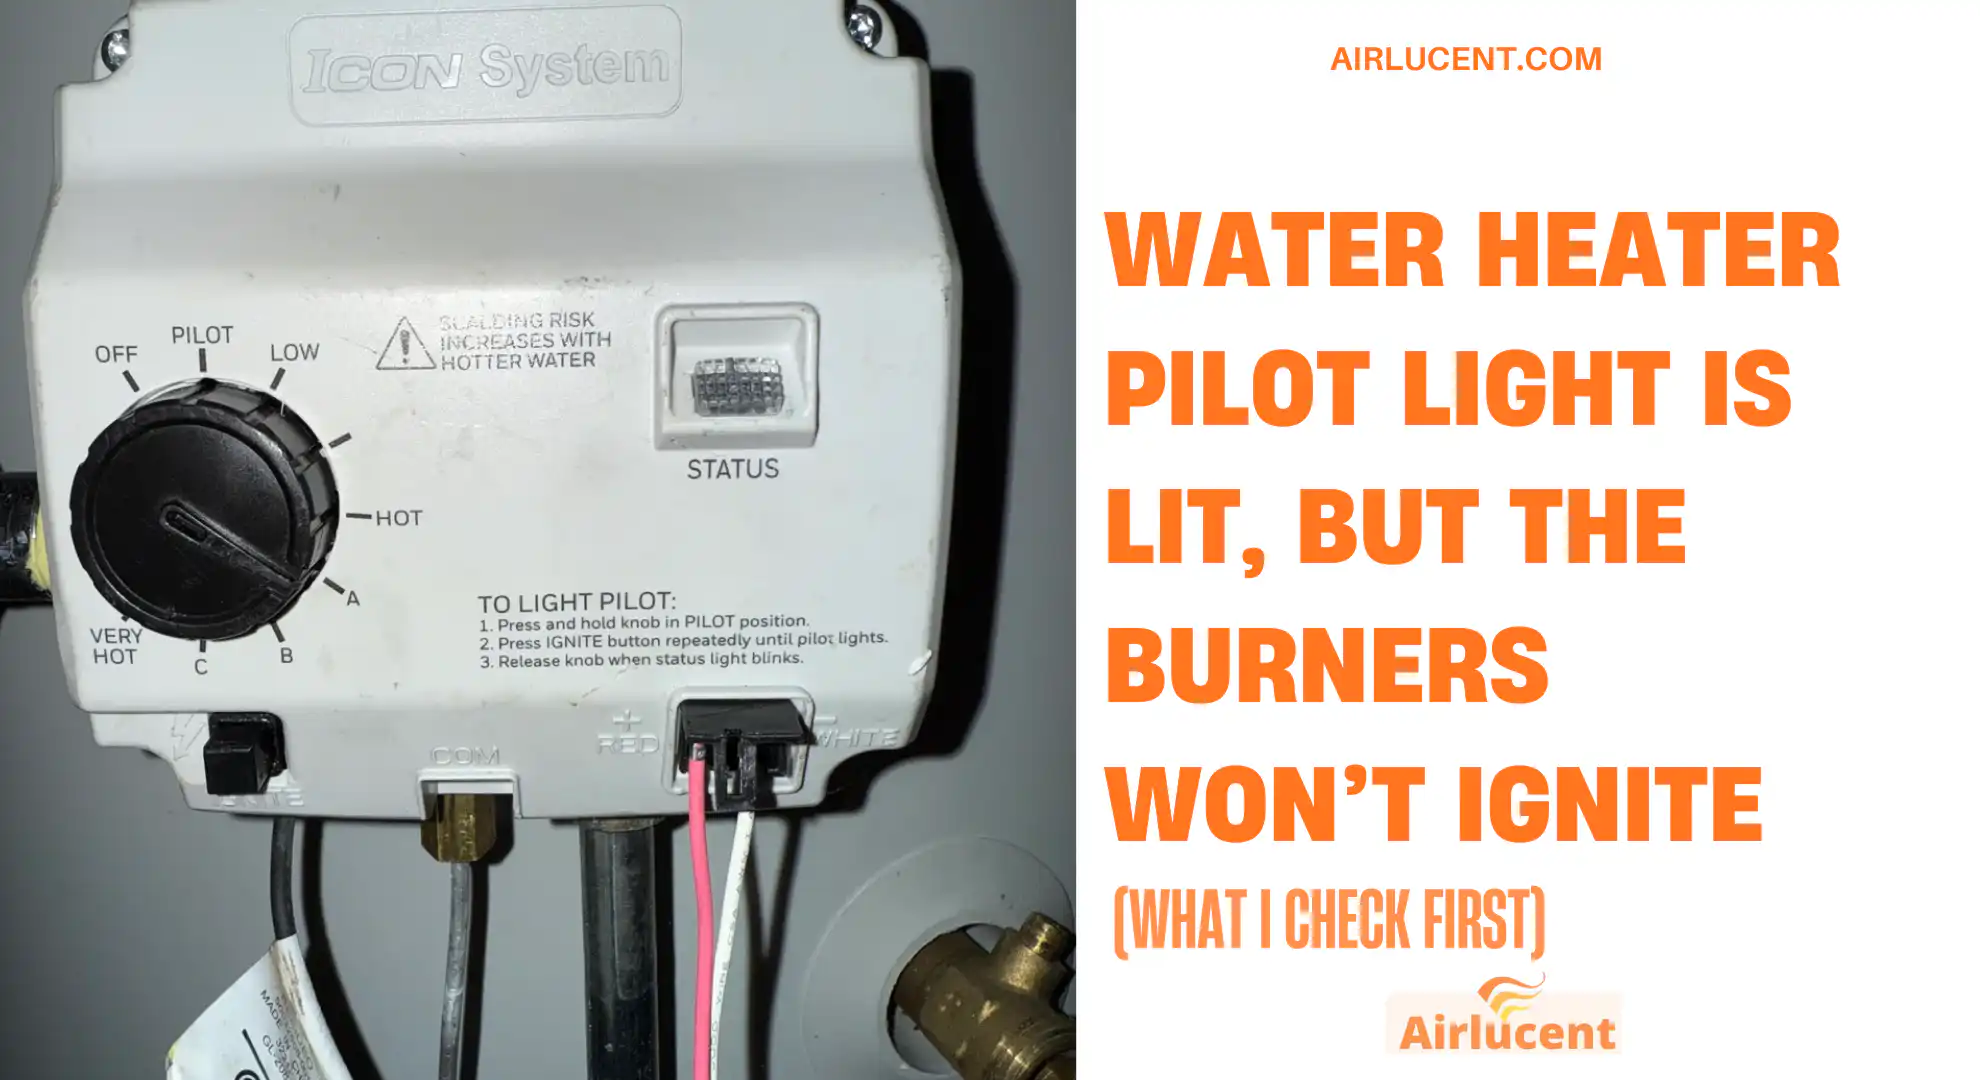
You look in the sight glass, the pilot flame is clearly on, but the main burner never kicks on. No roar, no flame spread, and the water stays lukewarm.
Most of the time, the problem is not the pilot itself. It is one of the safety or control parts that decides whether the gas valve is allowed to open for the main burner.
Below is the same process I use in the field to diagnose it quickly and safely.
- Quick Answer (Most Common Causes)
- How the System Works (So the Fix Makes Sense)
- Step 1: Make Sure the Heater Is Actually Calling for Heat
- Step 2: Look at the Pilot Flame (This Tells Me a Lot)
- Step 3: Check the Thermocouple or Thermopile (Most Common Repair)
- Thermocouple and Thermopile Test Readings (Helpful Table)
- Step 4: Clean the Pilot Orifice and Pilot Tube (Weak Flame Fix)
- Step 5: Inspect and Clean the Main Burner and Burner Orifice
- Step 6: Check FVIR Air Intake and Thermal Cutoff (Very Common on Newer Heaters)
- Step 7: Confirm Gas Supply Problems Are Not the Real Issue
- Step 8: When It’s the Gas Control Valve (And How to Recognize It)
- Fast Troubleshooting Checklist
- Common Symptoms and What They Usually Mean
- What I Recommend Replacing vs Repairing (Realistic Guidance)
- FAQ
- Final Thoughts (From My Experience)
Quick Answer (Most Common Causes)
If your water heater pilot light is lit but the burner will not ignite, the most common causes are:
- The temperature dial is not actually calling for heat
- The pilot orifice or pilot tube is partially clogged (weak yellow flame)
- The burner or burner orifice is dirty or restricted
- FVIR air intake is clogged or the thermal cutoff has tripped (common on newer units)
- The gas control valve is failing internally
How the System Works (So the Fix Makes Sense)
A standing pilot gas water heater has three basic “permissions” that must happen before the main burner lights:
- The tank thermostat must call for heat (water temp is below the dial setting)
- The safety sensor must prove flame (thermocouple or thermopile is hot enough)
- The gas control valve must open and send gas to the main burner
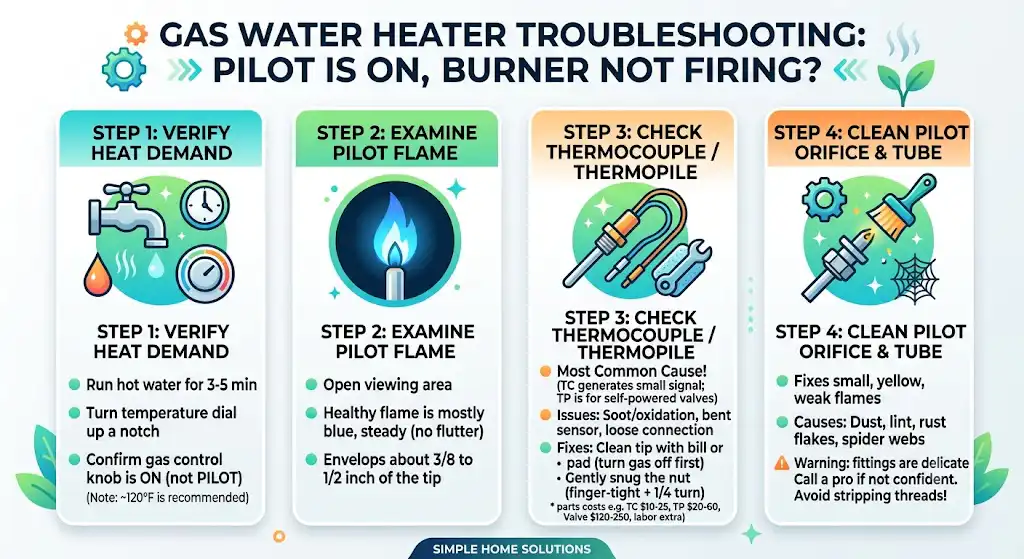
Step 1: Make Sure the Heater Is Actually Calling for Heat
This is the most overlooked cause, and it is also the easiest one.
What I do:
- Run a hot water faucet for 3 to 5 minutes
- Go back to the heater and turn the temperature dial up a notch or two
- Confirm the gas control knob is set to ON, not PILOT
If the tank water is already at or above the setpoint, the burner will not come on even though the pilot is perfect.
Recommended temperature
Most homeowners are best served around 120 F for a balance of comfort and burn risk reduction.
Step 2: Look at the Pilot Flame (This Tells Me a Lot)
Open the burner viewing area and look closely at the pilot.
A healthy pilot flame usually looks like:
- Mostly blue
- Steady (not fluttering wildly)
- Strong enough to wrap around the sensor tip
What I want to see on the thermocouple or thermopile:
The flame should engulf about 3/8 to 1/2 inch of the tip.
Step 3: Check the Thermocouple or Thermopile (Most Common Repair)
This is the number one cause I find in service calls where the pilot is on but the main burner will not fire.
Thermocouple vs thermopile (quick difference)
- Thermocouple: common on older standing pilot heaters. Generates a small millivolt signal.
- Thermopile: common on many “self powered” gas valves. Looks similar but usually has two wires and generates more power.
Common issues I see:
- Sensor is slightly bent away from the flame
- Soot or oxidation on the sensor tip
- Loose connection at the gas control valve
- Part is simply worn out (very common once the heater is older)
Easy checks you can do
- Confirm the sensor tip is in the pilot flame correctly
- Check the thermocouple nut at the gas valve
- Snug it up gently: finger tight, then about a quarter turn more
- Do not crank it down hard
Cleaning (safe DIY)
If the sensor looks dirty:
- Turn the gas control to OFF and wait a few minutes
- Lightly rub the sensor with a clean bill or a non aggressive pad (Scotchbrite style)
- Reassemble and try again
In the field, I have seen a simple cleaning restore operation immediately when the sensor was just insulated by buildup.
Thermocouple and Thermopile Test Readings (Helpful Table)
If you own a multimeter, these ranges can help you confirm what is failing.
| Thermocouple | Proves pilot flame | Millivolts DC output | Very low or unstable output, burner never opens |
| Thermopile | Proves flame and powers gas valve | Higher millivolts output than thermocouple | Drops too low under load, main valve will not open |
Typical part costs (what homeowners usually pay for the part only)
| Thermocouple | 10 to 25 |
| Thermopile | 20 to 60 |
| Gas control valve | 120 to 250 |
Labor varies by region, access, and condition of the heater.
Step 4: Clean the Pilot Orifice and Pilot Tube (Weak Flame Fix)
If your pilot flame is small, yellow, or barely touching the sensor, the sensor cannot do its job.
What causes this most often:
- Dust and lint
- Rust flakes
- Spider webs in the pilot assembly (it happens more than people think)
What you can do safely:
- Turn the gas control to OFF
- Let it sit 5 to 10 minutes
- Clean the air intake area and the burner compartment area
- If you are comfortable removing the pilot tube, this is where many people choose to call a pro because the fittings can be delicate and cross threading is easy
My honest advice after doing this for a decade: if you are not already confident working around small gas fittings, this is a good stopping point and a fair service call. A stripped pilot fitting can turn a small issue into a bigger repair.
Step 5: Inspect and Clean the Main Burner and Burner Orifice
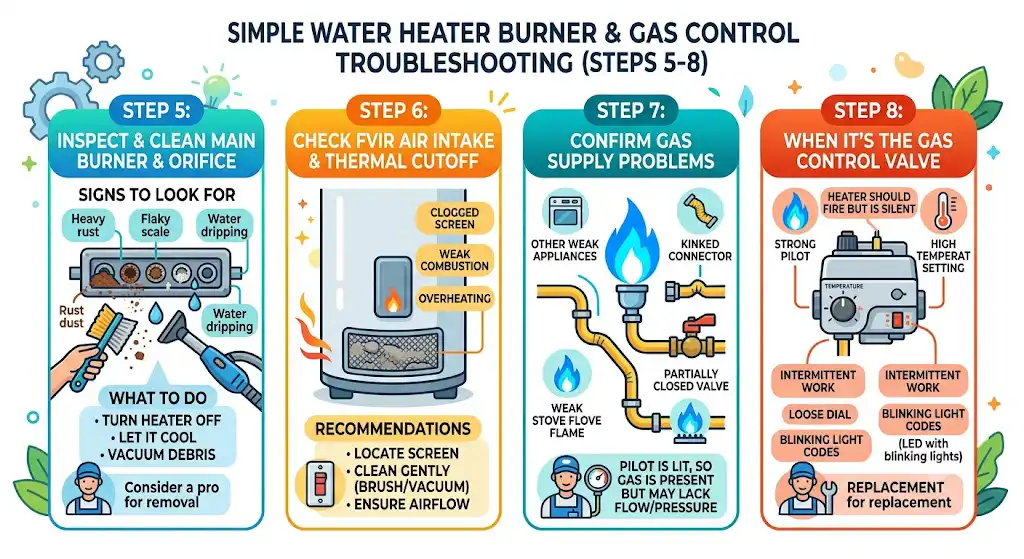
Sometimes the pilot is fine, but the main burner cannot light because gas is not flowing correctly through the burner orifice or the burner ports are clogged.
Signs I look for:
- Heavy rust dust in the burner chamber
- Flaky scale on burner ports
- Evidence of water dripping onto the burner (from a leak above)
What you can do:
- Turn the heater OFF
- Let everything cool
- Vacuum loose debris around the burner area (do not disturb the pilot assembly if you are not comfortable)
- If the burner needs removal for cleaning, many homeowners prefer a technician because reassembly and leak checks matter
Step 6: Check FVIR Air Intake and Thermal Cutoff (Very Common on Newer Heaters)
Many modern water heaters are FVIR models (flammable vapor ignition resistant). They restrict combustion air and include safety devices.
If the FVIR intake screen is clogged:
- The burner may not ignite
- The unit may “act weird” with weak combustion
- Overheating can trip a safety cutoff
What I recommend:
- Locate the intake screen (often at the bottom base)
- Clean lint and dust gently with a brush and vacuum
- Make sure the heater has enough room for airflow, especially in closets
Some models also have a resettable thermal switch. If it is tripped, the heater may prevent burner operation. If you find a tripped safety repeatedly, do not keep resetting it. Something is causing overheating or poor airflow and it needs correction.
Step 7: Confirm Gas Supply Problems Are Not the Real Issue
If the pilot is lit, you do have gas. But you might not have enough gas pressure or flow for the main burner.
Clues:
- Other gas appliances are weak or cutting out
- You recently had gas work done
- A flexible connector is kinked or partially crushed
- The shutoff valve is not fully open
If you suspect pressure issues, this is usually a utility or licensed technician situation.
Step 8: When It’s the Gas Control Valve (And How to Recognize It)
If you have:
- A strong blue pilot flame
- A clean, properly positioned thermocouple or thermopile
- The temperature is turned up and the tank is cold
- The burner still never receives gas
Then the gas control valve is a serious suspect.
What failure looks like in real homes:
- The heater “should” fire but stays silent
- It may work intermittently for days, then stop
- You may notice the dial feels loose or inconsistent
- Some units throw a status code via blinking lights (if your valve has an LED)
Gas control valve replacement is not a casual DIY for most homeowners. It often involves draining the tank and correctly sealing gas connections. If you are not licensed or experienced, this is where I recommend calling a pro.
Fast Troubleshooting Checklist
Use this as a quick path before you go deep:
- No gas smell, safe area
- Control knob is ON and temp dial is higher than current water temp
- Pilot flame is strong blue and heating the sensor tip
- Thermocouple or thermopile connection is snug
- Clean sensor tip lightly
- Clean FVIR intake screen and confirm airflow
- If all looks good, suspect gas control valve or a restriction that needs disassembly
Common Symptoms and What They Usually Mean
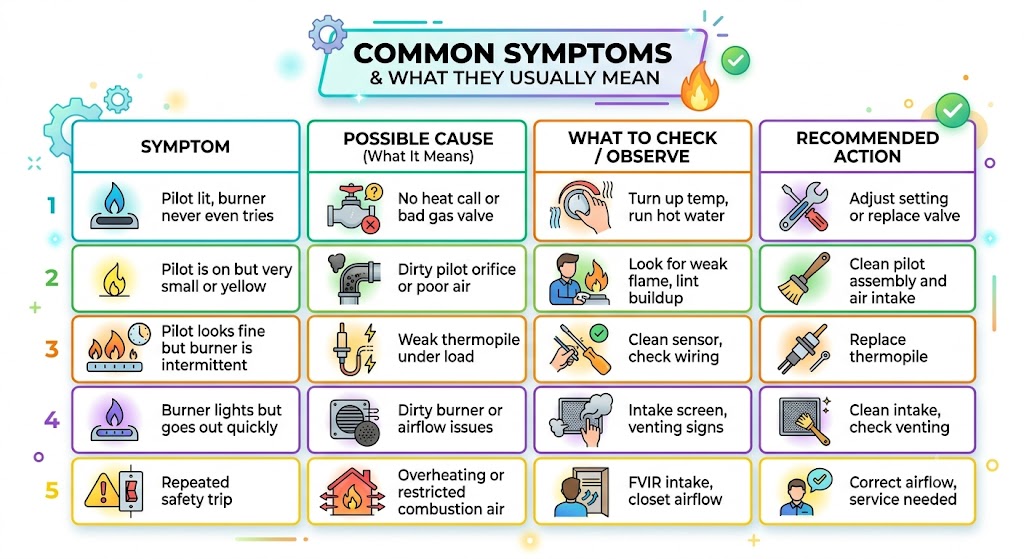
| Pilot lit, burner never even tries | No heat call or bad gas valve | Turn up temp, run hot water | Adjust setting or replace valve |
| Pilot is on but very small or yellow | Dirty pilot orifice or poor air | Look for weak flame, lint buildup | Clean pilot assembly and air intake |
| Pilot looks fine but burner is intermittent | Weak thermopile under load | Clean sensor, check wiring | Replace thermopile |
| Burner lights but goes out quickly | Dirty burner or airflow issues | Intake screen, venting signs | Clean intake, check venting |
| Repeated safety trip | Overheating or restricted combustion air | FVIR intake, closet airflow | Correct airflow, service needed |
What I Recommend Replacing vs Repairing (Realistic Guidance)
I try to keep homeowners from throwing parts at the problem.
Usually worth repairing
- Thermocouple or thermopile
- Pilot assembly cleaning
- Burner cleaning
- Air intake cleaning
Think about replacement if:
- Your water heater is around 8 to 12 years old and the tank is showing corrosion, leaking, or heavy sediment issues
- You are stacking expensive repairs (gas valve plus other issues)
- Performance has been declining for a while
FAQ
Can a dirty thermocouple prevent the burner from lighting even if the pilot stays on?
Yes. I see this often. The pilot can stay lit but the sensor signal can be weak or inconsistent, which can prevent the main valve from opening.
If I turn the temperature up and nothing happens, what does that tell me?
If the tank is definitely not hot and the dial is turned up, I start focusing on:
pilot flame strength and sensor positioning
thermocouple or thermopile output
FVIR airflow restrictions
gas control valve failure
Final Thoughts (From My Experience)
When the pilot light is lit but the burner will not ignite, you are usually dealing with a safety proof issue, a weak pilot flame problem, or a gas control valve that is not opening when it should.