
I’m Nathan. I’ve worked as an HVAC technician for over 10 years, and I can tell you this from experience: a “simple” low thermostat battery is one of the most common reasons homeowners lose heat or AC at the worst possible time.
The good news is that changing the battery in most Honeywell thermostats takes 2 to 5 minutes, and you usually don’t need any special tools. In this guide, I’ll walk you through the exact steps, show you how to identify your model, and help you troubleshoot if it still doesn’t work afterward.
Why changing the batteries matters more than most people think
When the batteries get weak, your Honeywell thermostat may still “look” like it’s working, but behind the scenes it can start acting up.
Here’s what I see in the field when batteries are low:
- Blank or dim display (classic)
- Low battery warning that won’t go away
- Erratic temperature readings (room feels different than the screen says)
- Short cycling (system turns on/off too often)
- No heat / no AC call even though settings look correct
Just as important, a thermostat that doesn’t control your HVAC correctly can waste energy. The U.S. Department of Energy commonly cites that proper thermostat use (like correct setback scheduling) can save around 10 percent a year on heating and cooling. A thermostat that’s glitching from low power can work against you.
Signs your Honeywell thermostat needs a battery change
Low battery warning
Most battery-powered Honeywell units will display Low Battery, Replace Battery, or a small battery icon. Don’t ignore it. I’ve seen plenty of thermostats hold on for days, then die overnight.
Dim or blank screen
If the screen is fading, flickering, or going blank when the system kicks on, batteries are usually at the end.
Your system stops responding
If you raise the temperature and nothing happens (and you know the furnace or AC is fine), the thermostat may not be sending a clean call due to low battery.
Step 1: Identify your Honeywell thermostat model (fast)
You don’t need the original box.
Here’s how I do it on service calls:
- Look at the front for a series name like FocusPRO, VisionPRO, T-Series, Home.
- Pull the thermostat off the wall plate (gently).
- Look on the back label for a model number like TH6110D, RTH6580, TH8320, etc.
That model number tells you exactly what batteries it takes and where they’re located.
Honeywell thermostat battery types and where they’re located (most common series)
This table covers what homeowners most commonly have on the wall.
Battery location cheat sheet
| PRO 1000 / PRO 2000 | 2 AAA | On back (after removing from wall plate) | Very common in rentals and basic installs |
| PRO 3000 | 2 AA | On back (after removing from wall plate) | Often has a larger display than PRO 2000 |
| PRO 4000 | 2 AA (common) | Usually a slide-out tray/drawer at the bottom | Many homeowners miss the battery drawer |
| FocusPRO 5000 | 2 AA | On back (after removing from wall plate) | Popular non-programmable/programmable |
| FocusPRO 6000 | 2 AA | On back (after removing from wall plate) | Common programmable model |
| VisionPRO 8000 / similar | Often AAA (commonly 3) | On back (after removing from wall plate) | Higher-end Honeywell screens |
| Honeywell Home Wi-Fi models (many RTH models) | AA or AAA (varies) | On back or battery compartment | Some are hardwired with battery backup |
Tip from my own routine: if you’re standing at the thermostat and don’t see an obvious battery door, assume you’ll either slide out a bottom tray or pull the thermostat off the wall plate.
What you need before you start
Batteries
- Use new alkaline batteries (AA or AAA depending on model).
- I generally recommend name-brand alkaline because cheap batteries are more likely to leak.
- I usually avoid rechargeables in thermostats because some rechargeables hold a slightly different voltage profile, which can cause early low-battery warnings.
Tools (usually optional)
- A small flat screwdriver (only if batteries are tight or there’s a release tab)
- Soft cloth (handy if you want to clean dust or residue)
Safety: should you turn off power first?
Most battery changes are safe with the thermostat “live,” but as a tech, here’s what I tell homeowners:
- If your thermostat is battery-only, there’s no real shock risk at the thermostat.
- If it’s hardwired, you’re still dealing with low-voltage control wiring, but you can blow a fuse on the furnace control board if you short wires accidentally.
Best practice:
- Set thermostat to Off
- If you want to be extra safe, switch off power to the furnace/air handler at the breaker or service switch.
How to change the battery in Honeywell thermostats (detailed steps)

Step 1: Remove the thermostat from the wall plate
Most Honeywell thermostats are a snap-on design.
How I remove them without cracking anything:
- Place fingers near the bottom edge.
- Gently pull outward.
- If it feels stuck, don’t force it. Look for side tabs or a bottom release.
Step 2: Find the battery compartment
You’ll typically see:
- Batteries directly on the back of the thermostat, or
- A slide-out battery tray (common on some PRO models)
Step 3: Take out old batteries
Pay attention to orientation.
If the battery is stuck:
- Use a small flat screwdriver carefully to lever it out (don’t gouge the metal contacts).
If you see white/green crust (corrosion):
- Stop and clean it gently with a dry cloth.
- If corrosion is heavy, the thermostat may be damaged and unreliable.
Step 4: Install new batteries (match + and -)
Insert the new batteries according to the markings in the compartment.
Step 5: Reattach the thermostat and test
- Snap it back onto the wall plate.
- Turn system back on.
- Test heating or cooling by changing the set temperature a few degrees.
Model-specific instructions (the part that saves you time)
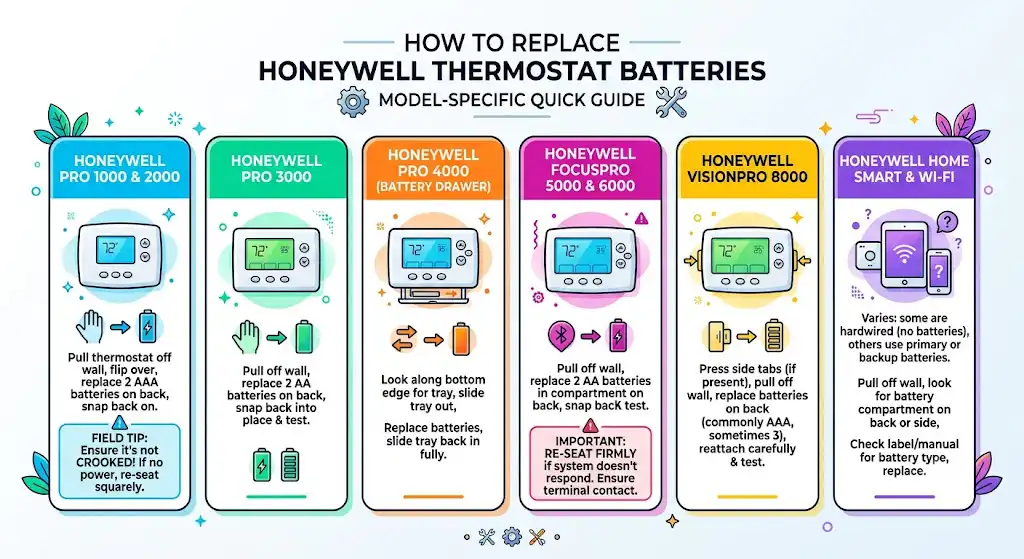
Honeywell PRO 1000 and PRO 2000 (common basic models)
- Pull the thermostat straight off the wall plate.
- Flip it over.
- Replace 2 AAA batteries on the back.
- Snap it back on.
My field tip: these are the ones homeowners often reinstall slightly crooked. If it doesn’t power up, pull it back off and re-seat it squarely.
Honeywell PRO 3000
- Pull thermostat off the wall plate.
- Replace 2 AA batteries on the back.
- Snap it back into place and test.
Honeywell PRO 4000 (often has a battery drawer)
Many PRO 4000-style units use a slide-out battery tray.
- Look along the bottom edge for a small pull-out tray.
- Slide the tray out.
- Replace the batteries.
- Slide tray back in until it seats fully.
Honeywell FocusPRO 5000 and 6000
- Pull the thermostat off the wall plate.
- Battery compartment is on the back.
- Replace 2 AA batteries.
- Snap it back on and test.
Important: If your system doesn’t respond after, the thermostat may not be making contact with the wall plate terminals. Re-seat it firmly.
Honeywell VisionPRO 8000 (and similar higher-end screens)
- Press side tabs if present, then pull thermostat off wall plate.
- Replace batteries on the back (commonly AAA, sometimes 3).
- Reattach carefully and test.
Honeywell Home smart and Wi-Fi thermostats
This depends heavily on the exact model:
- Some are hardwired and may not require battery changes at all.
- Others use batteries as primary power or as backup.
What I recommend:
- Pull the thermostat off the wall.
- Look for a battery compartment on the back or side.
- Replace with the exact battery type listed on the label/manual.
Will I lose my schedule/programs when I change batteries?
Sometimes.
In my experience:
- Many Honeywell thermostats hold memory long enough for a normal battery swap.
- If you take too long, some models may reset scheduling or time.
What you can do:
- Have the new batteries open and ready before you pull the old ones.
- Take a quick photo of your settings (schedule, time, system type) before swapping.
Troubleshooting after replacing the batteries (what I’d check next)
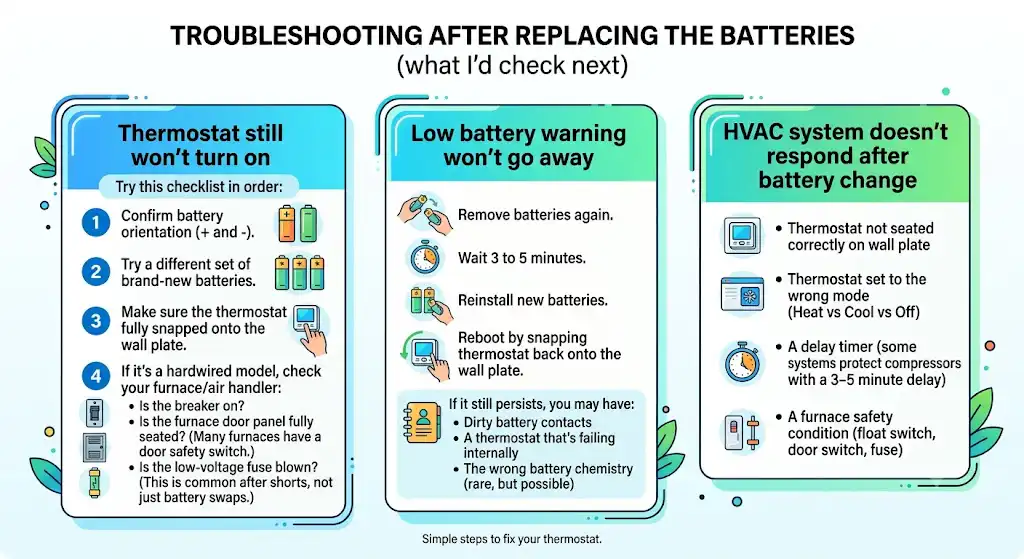
Thermostat still won’t turn on
Try this checklist in order:
- Confirm battery orientation (+ and -).
- Try a different set of brand-new batteries.
- Make sure the thermostat is fully snapped onto the wall plate.
- If it’s a hardwired model, check your furnace/air handler:
- Is the breaker on?
- Is the furnace door panel fully seated? (Many furnaces have a door safety switch.)
- Is the low-voltage fuse blown? (This is common after shorts, not just battery swaps.)
Low battery warning won’t go away
- Remove batteries again.
- Wait 3 to 5 minutes.
- Reinstall new batteries.
- Reboot by snapping thermostat back onto the wall plate.
If it still persists, you may have:
- Dirty battery contacts
- A thermostat that’s failing internally
- The wrong battery chemistry (rare, but possible)
HVAC system doesn’t respond after battery change
Most common causes I see:
- Thermostat not seated correctly on wall plate
- Thermostat set to the wrong mode (Heat vs Cool vs Off)
- A delay timer (some systems protect compressors with a 3–5 minute delay)
- A furnace safety condition (float switch, door switch, fuse)
My maintenance tips (what I tell homeowners after 10 years in HVAC)
Replace batteries on a schedule
Even if it isn’t warning you yet, I like a simple habit:
- Replace thermostat batteries once per year
- Great times to do it: start of heating season or cooling season
Keep the thermostat clean
Dust buildup can cause:
- Sticky buttons
- Poor screen visibility
- Extra wear on contacts when you remove/reinstall
Use a dry, soft cloth. Avoid spraying cleaners directly on it.
Don’t ignore a leaking battery
Battery leakage can permanently damage the terminals. If you see corrosion more than once, replacement of the thermostat is often the most reliable fix.
Battery replacement comparison table (real-world expectations)
This is a practical reference based on what I commonly see installed and serviced.
| Basic Honeywell PRO models | Battery powered | Replace about yearly | Low battery icon, dim screen, then blank |
| Mid-level programmable Honeywell | Battery powered | Often yearly to 2 years | Low battery warning, settings may reset |
| Wi-Fi Honeywell Home models | Hardwired or battery (model-dependent) | Some use backup batteries | Reboots, Wi-Fi disconnects, warning icon |
| Hardwired thermostat with C-wire | Powered by HVAC transformer | Often no batteries | If it dies, it’s usually power/control related |
FAQs
How often should I change the batteries in my Honeywell thermostat?
I recommend once a year as preventive maintenance. If you get a low battery warning, change them right away.
Can I change the batteries without turning off power?
Usually yes, especially on battery-only units. But I prefer you switch the thermostat to Off, and if you’re unsure, shut off HVAC power at the breaker to avoid accidental shorts on hardwired models.
The screen is blank even with new batteries. Now what?
Check orientation, try a second set of brand-new batteries, and make sure the thermostat is fully seated on the wall plate. If it’s still blank, you may have a wall plate connection issue or a power issue at the HVAC equipment.
Should I use rechargeable batteries?
I typically do not recommend rechargeables for thermostats. Stick with alkaline for more consistent performance.
Final thoughts
Changing the battery in a Honeywell thermostat is usually quick and easy, but it has a big impact. When your thermostat has strong, stable power, it controls your HVAC system more reliably, keeps comfort consistent, and helps avoid those surprise no-heat or no-AC moments.