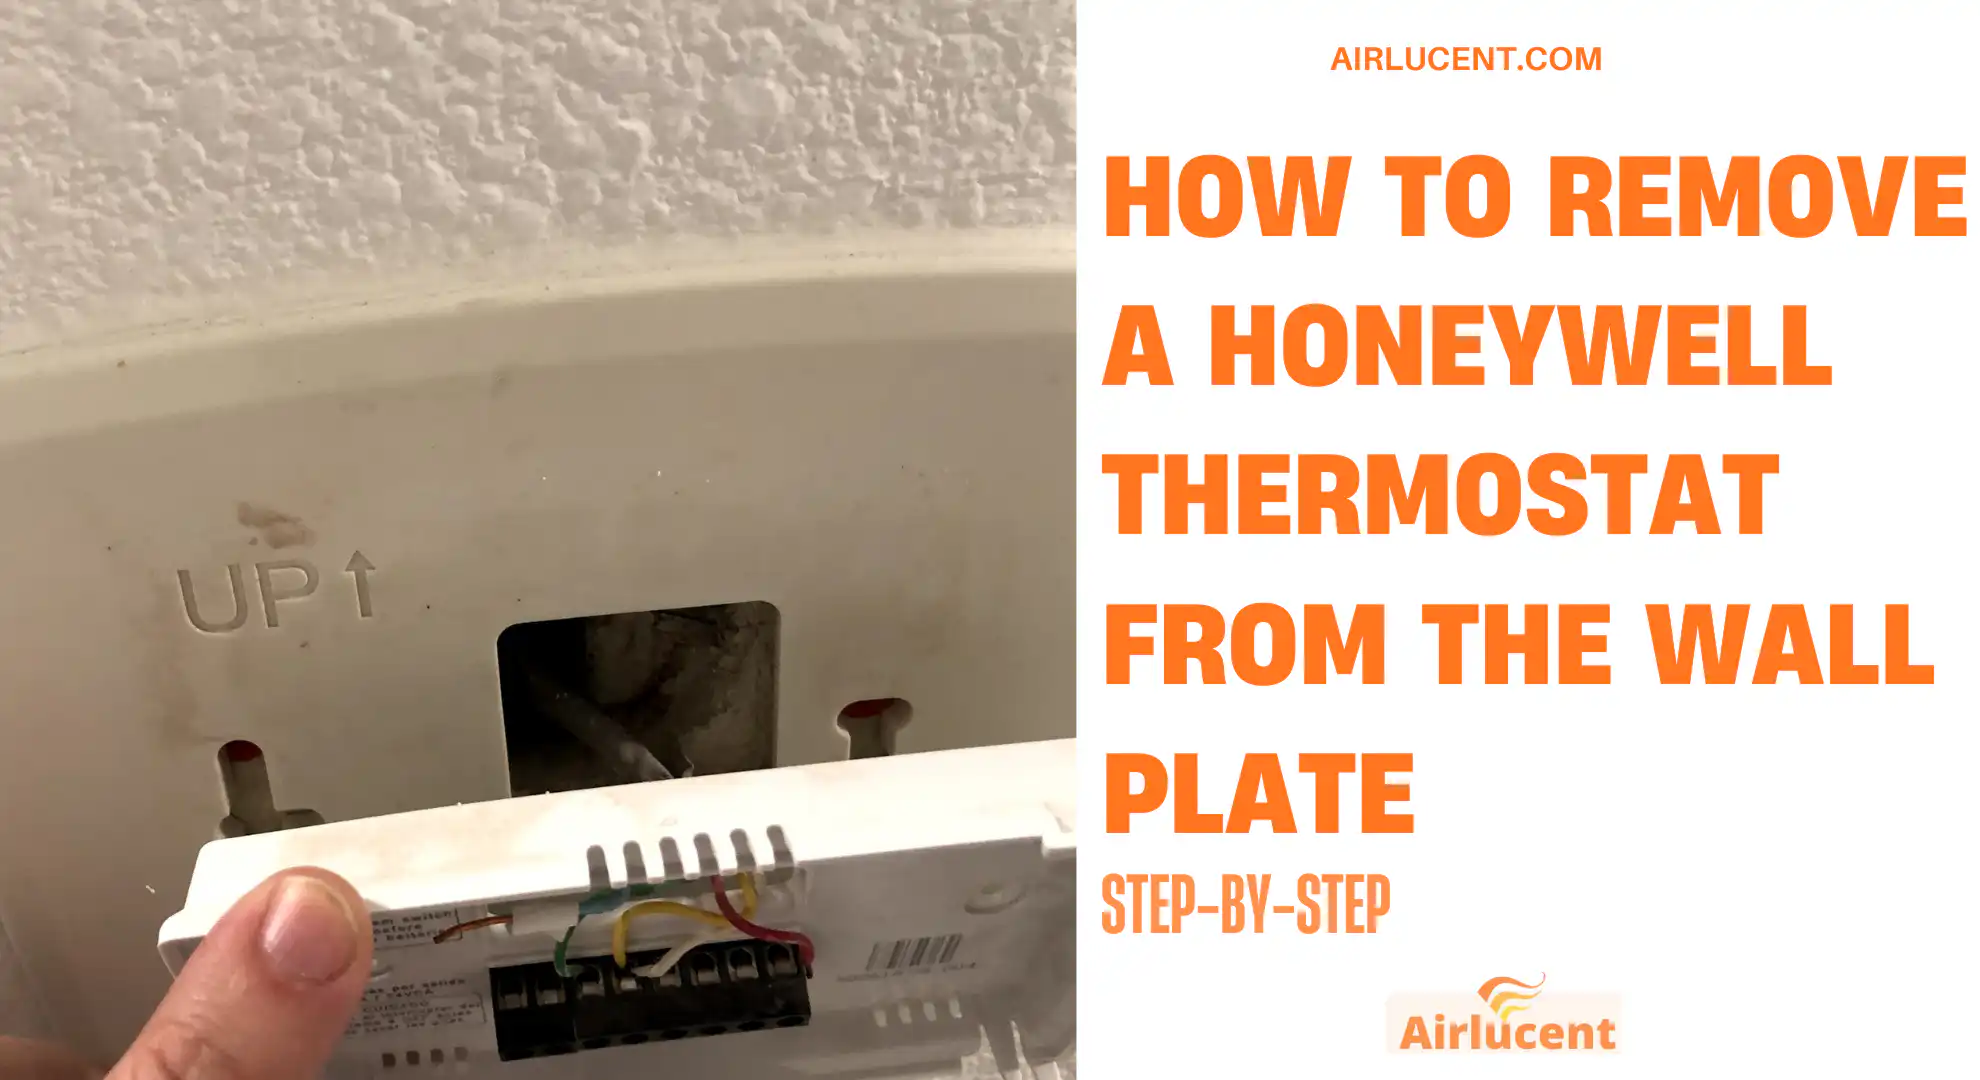
Hi, I’m Nathan. I’ve worked as an HVAC technician for over 10 years, and I’ve removed and replaced a lot of Honeywell thermostats in real homes, not just on paper. The good news is this is usually a simple job you can do in 10 to 30 minutes with basic tools.
The key is doing it safely and keeping your wires organized so your new thermostat goes in without headaches.
- Quick safety note before you start
- Tools and supplies I recommend
- Before you remove anything: turn off HVAC power (important)
- Know what you’re looking at: basic thermostat wiring
- How to remove a Honeywell thermostat from the wall plate
- Step 2: Watch out for mercury if it’s an older thermostat
- Step 3: Take a clear photo of the wiring before touching anything
- Step 4: Label each wire (do not rely on color alone)
- Step 5: Disconnect the wires without losing them in the wall
- Step 6: Remove the Honeywell wall plate (base) from the wall
- What to do with the wires after removal (so installation is easy)
- Common problems I see and how you can avoid them
- When should you stop and call an HVAC professional
- Quick reference: thermostat terminals
- FAQs (real questions I get on service calls)
- My simple removal checklist (print this mentally)
Quick safety note before you start
Most thermostats use 24 volt low voltage control wiring, but you can still cause problems if you short wires together. I’ve seen plenty of homeowners accidentally blow the furnace control fuse or transformer by letting the R wire touch C or metal.
If you’re not comfortable working around electrical equipment, or you open the wall and find damaged wiring, call a licensed HVAC pro.
Tools and supplies I recommend
You don’t need much. Here’s what I keep on hand when I’m removing a Honeywell thermostat:
| Phillips screwdriver | Removes wall plate screws on most models |
| Small flathead screwdriver | Helps with terminal screws or push-tab terminals |
| Masking tape and a marker | Label wires so you don’t mix them up |
| Phone camera | Fastest way to capture a wiring reference photo |
| Non-contact voltage tester (optional but smart) | Extra confirmation power is off |
| Pencil (optional) | Marking wall holes if you’re patching later |
Before you remove anything: turn off HVAC power (important)
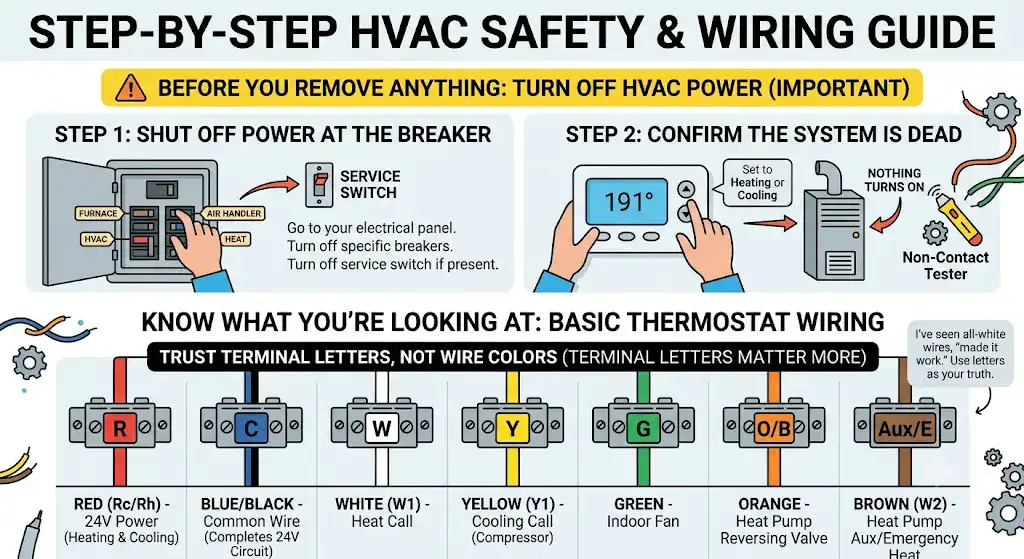
Step 1: Shut off power at the breaker
- Go to your electrical panel.
- Turn off the breaker labeled Furnace, Air Handler, HVAC, or sometimes Heat.
- If your system has a service switch near the furnace (looks like a light switch), turn that off too.
Step 2: Confirm the system is dead
- Set the thermostat to call for heating or cooling (raise or lower the temperature).
- Nothing should turn on.
- If you have a non-contact tester, you can test around the furnace/air handler wiring area for extra peace of mind.
Know what you’re looking at: basic thermostat wiring
Common thermostat wire colors (industry standard, but not guaranteed)
I want you to understand one thing clearly: colors are common, but the terminal letters matter more than color. I’ve opened walls where someone used all white wires and “made it work.”
Use the terminal letters as your truth.
| Red | R or Rc/Rh | 24V power (heating and/or cooling power) |
| Blue or Black | C | Common wire (completes 24V circuit) |
| White | W or W1 | Heat call |
| Yellow | Y or Y1 | Cooling call (compressor) |
| Green | G | Indoor fan |
| Orange | O/B | Heat pump reversing valve |
| Brown | Aux/E or W2 | Heat pump auxiliary heat or emergency heat |
How to remove a Honeywell thermostat from the wall plate
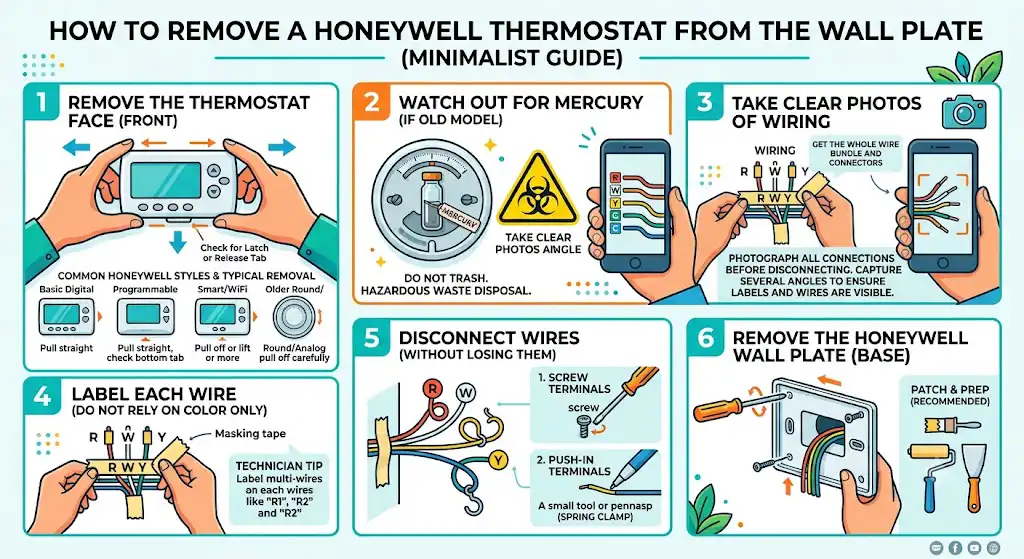
Step 1: Remove the thermostat face (the part you see)
Most Honeywell thermostats separate into two parts:
- The face/display (front)
- The wall plate/base (mounted to the wall with screws)
Most common removal method
- Place one hand on each side of the thermostat.
- Pull the thermostat straight toward you.
If it doesn’t come off easily, don’t force it until it cracks. Some models release differently.
If it feels stuck: check for a latch or release tab
Some Honeywell models have a small latch on the bottom or side. You may need to:
- Press the tab with your finger, or
- Use a small flathead screwdriver gently
Common Honeywell styles and how they typically come off
| Basic digital (non-WiFi) | Heat/cool, simple scheduling | Pull straight off |
| Programmable | Schedules, bigger display | Pull straight off, sometimes bottom tab |
| Smart/WiFi (some models) | App control, WiFi | Pull off or lift then pull (varies) |
| Older round/analog | Very old systems | Pull off, but handle carefully (may contain mercury) |
Step 2: Watch out for mercury if it’s an older thermostat
If your thermostat is older (often a round or rectangular mechanical style) it may contain a small glass mercury vial.
- Do not throw it in the trash.
- Do not break it.
- Contact your local waste authority for household hazardous waste drop-off instructions.
This isn’t me being dramatic. Mercury contamination is a real environmental and health issue.
Step 3: Take a clear photo of the wiring before touching anything
This is one of the best habits I can teach you.
- Take a photo straight-on of the terminals and wire letters.
- Take a second photo from a slight angle (sometimes letters hide behind wires).
If anything gets confusing later, this photo saves you.
Step 4: Label each wire (do not rely on color alone)
Use masking tape and write the terminal letter on each wire:
- “R”
- “W”
- “Y”
- “G”
- “C”
- “O/B”
- etc.
My technician tip
If you have multiple wires on the same terminal (it happens), label them clearly like:
- “R1”
- “R2”
and photograph it again.
Step 5: Disconnect the wires without losing them in the wall
This is where people get annoyed because the wires slip back into the wall cavity.
How to avoid losing wires
- As you remove each wire, bend it into a gentle hook.
- Or tape the wire bundle to the wall temporarily.
Two common terminal types you’ll see
1. Screw terminals
- Loosen the screw slightly.
- Pull the wire out.
2. Push-in terminals (spring clamp)
- There’s usually a tiny release slot/button.
- Press it with a small screwdriver or pen tip.
- Pull the wire out gently.
Be careful not to rip your labels off while you’re working.
Step 6: Remove the Honeywell wall plate (base) from the wall
Once wires are free:
- Remove the mounting screws holding the wall plate.
- Pull the wall plate away.
- Feed the wire bundle through the opening.
Optional but recommended: patch and prep
If your new thermostat base is a different size, you may want to:
- Remove old drywall anchors.
- Patch holes
- Touch up paint
A clean wall makes the finished install look professional.
What to do with the wires after removal (so installation is easy)
Once the old thermostat is off, leave the wires:
- Labeled
- Spread out
- Not able to slip into the wall
If the hole is big and drafty, you can gently stuff a little paper towel behind the wires temporarily. (Don’t pack insulation tight into the wall cavity.)
Common problems I see and how you can avoid them
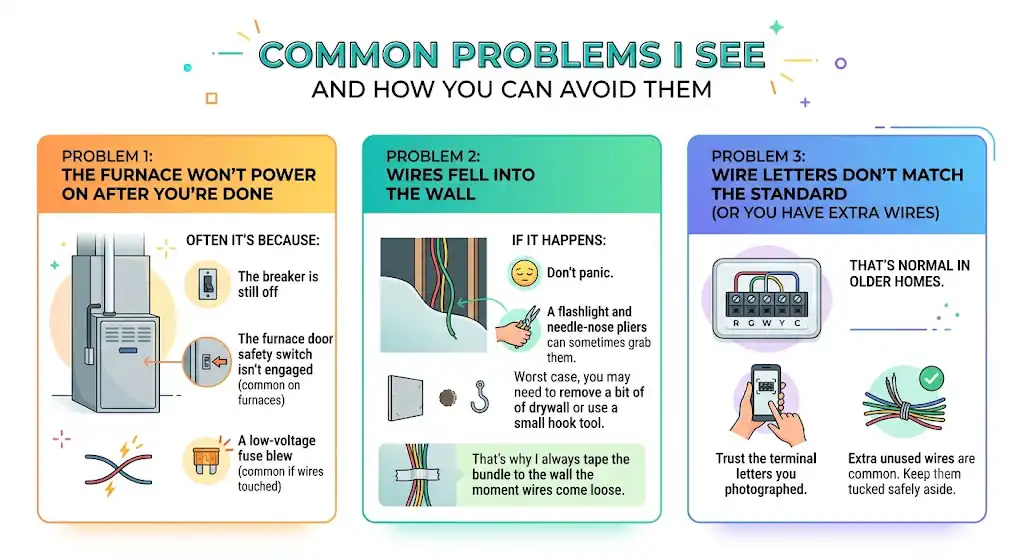
Problem 1: The furnace won’t power on after you’re done
Often it’s because:
- The breaker is still off
- The furnace door safety switch isn’t engaged (common on furnaces)
- A low-voltage fuse blew (common if wires touched)
Problem 2: Wires fell into the wall
If it happens:
- Don’t panic.
- A flashlight and needle-nose pliers can sometimes grab them.
- Worst case, you may need to remove a bit of drywall or use a small hook tool.
That’s why I always tape the bundle to the wall the moment wires come loose.
Problem 3: Wire letters don’t match the standard (or you have extra wires)
That’s normal in older homes.
- Trust the terminal letters you photographed.
- Extra unused wires are common. Keep them tucked safely aside.
When should you stop and call an HVAC professional
I’m all for DIY when it’s safe, but I’ll be honest with you. Call a pro if:
- You see burn marks, melted wire insulation, or corrosion.
- Your system is a heat pump and you’re unsure about O/B and Aux/E wiring
- You have multiple transformers or unusual wiring
- Your thermostat wiring is missing a C wire and your new smart thermostat requires one (there are options, but you want it done correctly)
Quick reference: thermostat terminals
| R / Rc / Rh | Power | Supplies 24V control power |
| C | Common | Completes the 24V circuit |
| W / W1 | Heat | Furnace or boiler runs |
| Y / Y1 | Cool | Outdoor unit (compressor) runs |
| G | Fan | Indoor blower runs |
| O/B | Heat pump | Switches between heat and cool mode |
| Aux/E | Backup heat | Electric heat strips or secondary heat source |
FAQs (real questions I get on service calls)
Do I really have to shut off power if it’s only 24 volts?
Yes. Low voltage can still short and damage components. Turning power off prevents nuisance damage and keeps you safer.
Can I just yank the thermostat off the wall?
The front usually pulls off, but don’t “rip” it. If it resists, look for a latch. Broken plastic clips are one of the most common DIY mistakes I see.
What should I do with the old thermostat?
If it might contain mercury, dispose of it through a proper hazardous waste program.
If it’s modern (no mercury), follow your local e-waste rules.
My simple removal checklist (print this mentally)
- Turn off the HVAC breaker and confirm system won’t run
- Pull the thermostat face off carefully
- Take photos of wiring
- Label every wire by terminal letter
- Disconnect wires and keep them from falling into wall
- Unscrew and remove wall plate
- Patch/clean wall if needed