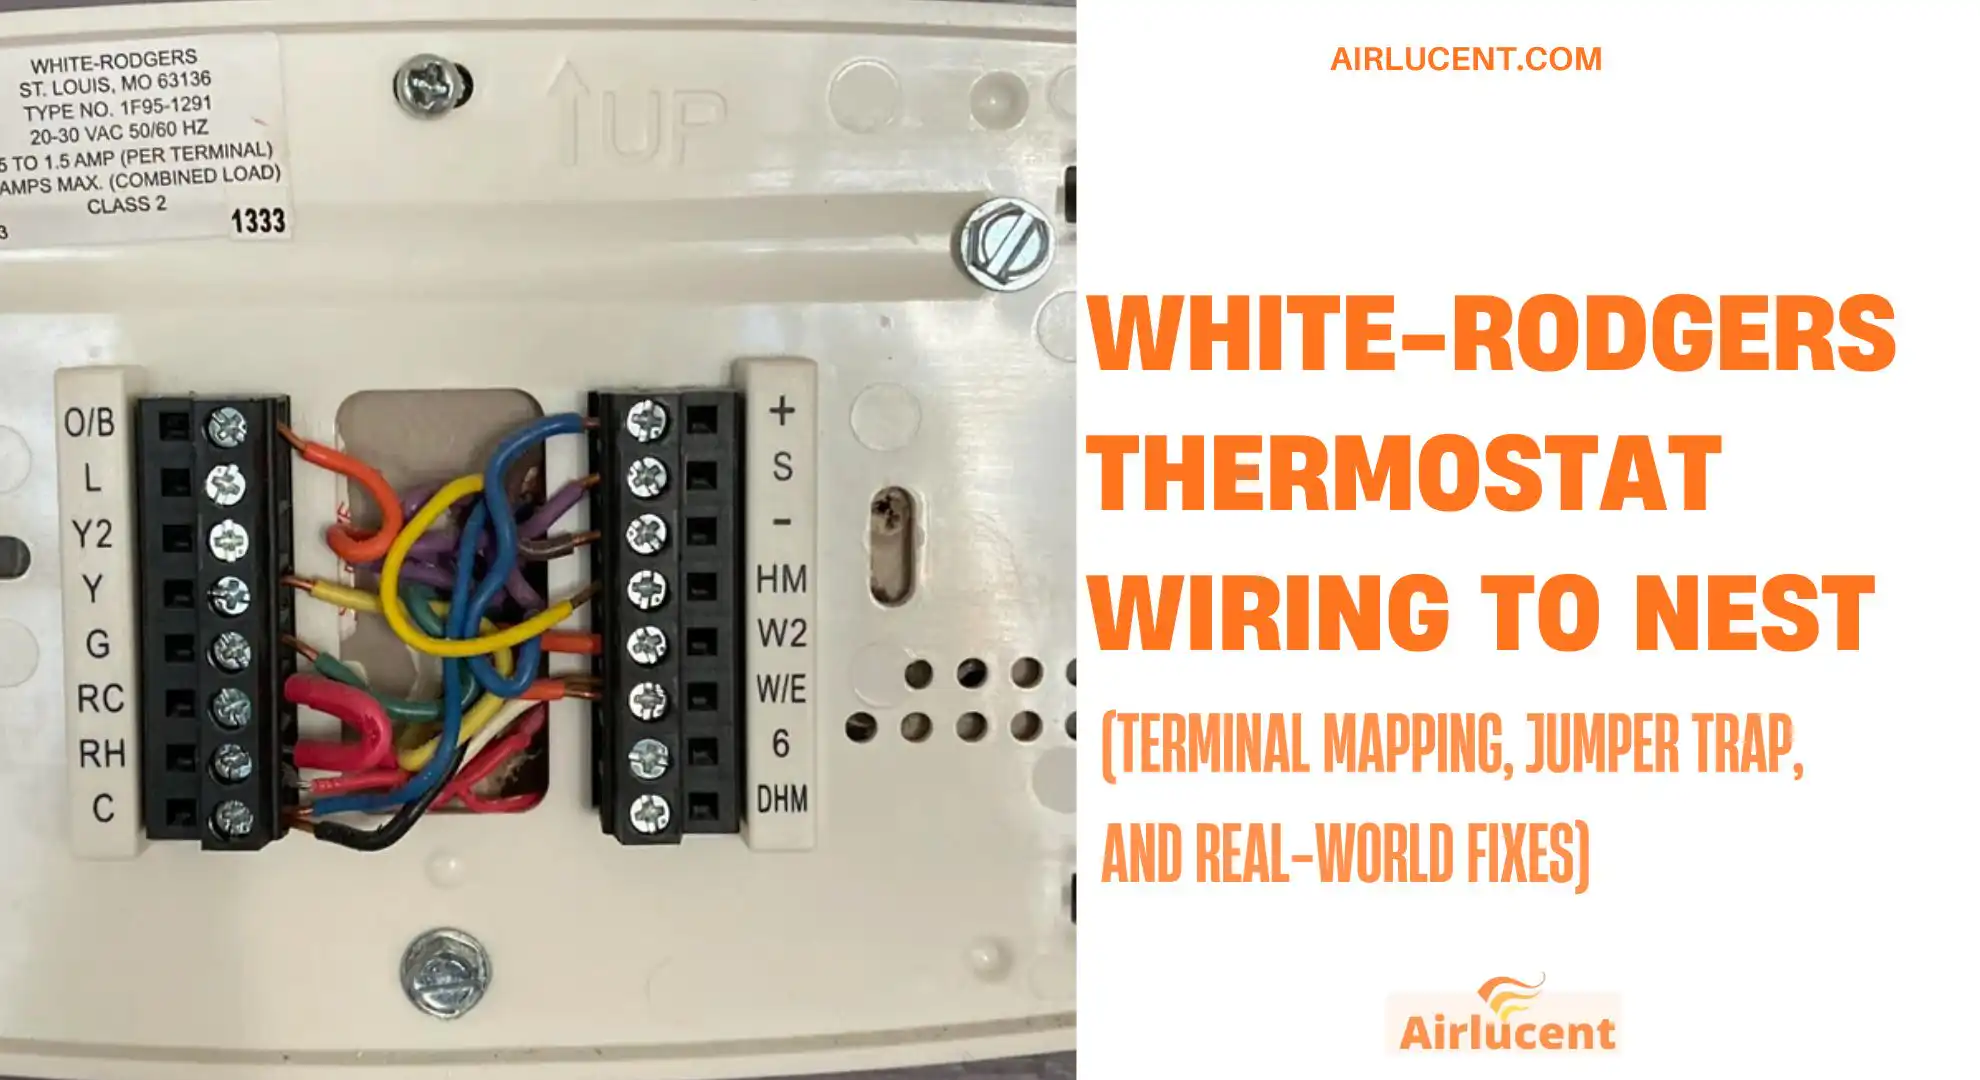
I’m Nathan. I’ve been an HVAC technician for over 10 years, and one of the most common thermostat swaps I get asked about is going from an older White-Rodgers thermostat to a Google Nest. It’s usually straightforward, but White-Rodgers has one quirky detail that trips up a lot of homeowners: the Rc Rh jumper situation, often done with a small loose red jumper wire.
In this guide, I’m going to walk you through the wiring map, how to avoid the jumper trap, what to do if your terminals do not match modern letters, and how to handle missing C-wire issues so your Nest stays powered reliably.
- Safety first (do this every time)
- TL;DR wiring cheat sheet (most common situations)
- White-Rodgers to Nest terminal mapping (modern lettered bases)
- The White-Rodgers jumper trap (this is where people mess up)
- Step-by-step: how to swap White-Rodgers wiring to Nest (my exact process)
- If your White-Rodgers terminals do not match modern letters (legacy bases)
- Mercury White-Rodgers thermostats (how to remove them safely)
- Wiring by wire count (real-world scenarios)
- No C-wire: what I recommend (so your Nest stays stable)
- Rc vs Rh: how to tell if you have one transformer or two (simple decision guide)
- Common problems after wiring (and what I do to fix them)
- Know when to stop and call a pro
- FAQ
Safety first (do this every time)
- Turn off power at the breaker to your furnace air handler and your AC (if it’s on a separate breaker).
- Confirm the old thermostat screen is dark, or that the system is not running.
- Only work on low-voltage thermostat wiring (typically 24V AC). If you see thick wires with wire nuts, that may be line voltage (120V or 240V). Stop and call a pro
TL;DR wiring cheat sheet (most common situations)
| Modern White-Rodgers terminals labeled Rc, Rh, C, W, Y, G, O or B | Standard 24V HVAC wiring | Match letters to the Nest terminals using the table below |
| A small red jumper wire between Rh and Rc | Single transformer system | Leave the jumper on the old thermostat. Nest bridges internally |
| Two separate wires on Rh and Rc and no jumper | Two transformers (separate heat and cool power) | Put each wire on Nest Rh and Nest Rc. Never jumper them |
| Only R and W wires (2-wire) | Heat-only, no C-wire | Nest may need a Power Connector or a new C-wire for reliability |
| Terminals labeled with numbers or odd letters like M H V F | Legacy White-Rodgers labeling | Do not guess. Trace wires at the furnace control board |
White-Rodgers to Nest terminal mapping (modern lettered bases)
If your White-Rodgers base has standard terminal letters, this is the cleanest swap you’ll ever do. Ignore wire colors. Match the terminal letters.
Terminal mapping table
| R (single R) | Rc or Rh | 24V power (Nest bridges internally if needed) |
| Rc | Rc | 24V power for cooling transformer or cooling side |
| Rh | Rh | 24V power for heating transformer or heating side |
| C | C | Common wire (constant power for Nest) |
| W or W1 | W1 | Heat call |
| Y or Y1 | Y1 | Cooling call (compressor) |
| G | G | Indoor fan |
| O or B or O/B | O/B | Heat pump reversing valve |
| Aux or W2 | W2/Aux (or Nest star depending on model) | Heat pump auxiliary heat or second stage heat |
Quick reality check from the field
In most homes I service, Rc and Rh are actually the same 24V feed (single transformer), and the old thermostat either had:
- A jumper between Rc and Rh, or
- Only one R terminal
Nest is designed for this and usually does not need an external jumper.
The White-Rodgers jumper trap (this is where people mess up)
Here’s the White-Rodgers-specific problem I see a lot: some White-Rodgers thermostats used a separate small red jumper wire that the installer was supposed to connect between Rh and Rc. It’s not always a built-in metal bridge like you see on some other brands.
If you see a jumper between Rh and Rc
That typically means you have a single transformer system and the thermostat needed both sides powered.
What you do:
- Leave that jumper wire on the old thermostat.
- Do not move it to Nest.
- Nest internally bridges Rh and Rc when appropriate, and most Nest bases will not accept two wires jammed into one connector anyway.
If you see two wires, one on Rh and one on Rc, and no jumper
That often means two transformers (one for heat and one for cooling).
What you do:
- Put the Rh wire into Nest Rh.
- Put the Rc wire into Nest Rc.
- Do not add a jumper between them.
Why I’m strict about this: If you force a connection between two out-of-phase transformers, you can create a short across them. Best case you blow a fuse on the control board. Worst case you damage a transformer.
Step-by-step: how to swap White-Rodgers wiring to Nest (my exact process)
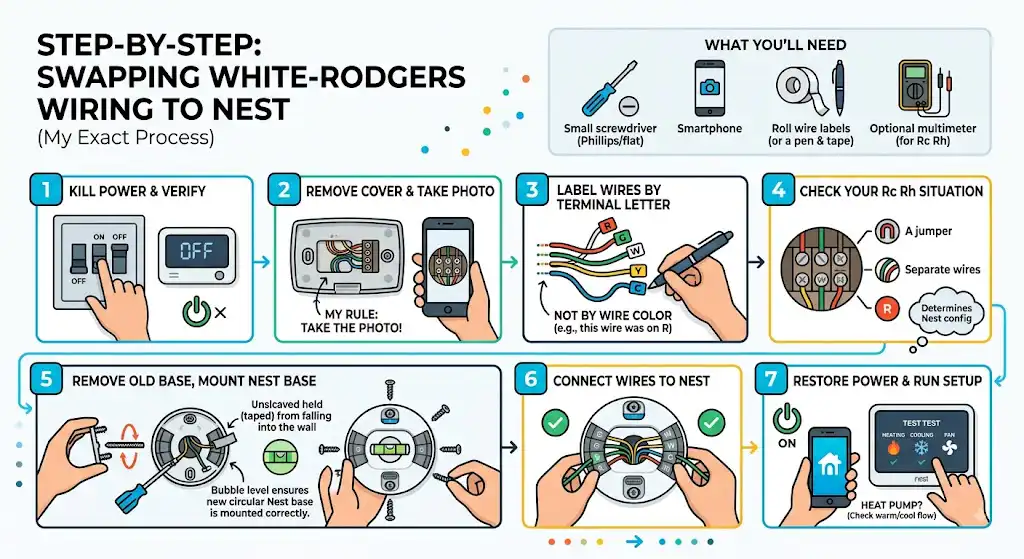
What you’ll need
- Small Phillips or flat screwdriver
- Phone camera
- Wire labels (optional but helpful)
- A pen and tape (old-school labeling works fine)
- Optional: multimeter (helpful for Rc Rh troubleshooting)
1) Kill power and verify
Turn off the breaker(s). Confirm the thermostat display is off.
2) Remove the thermostat cover and take a photo
Take a clear photo straight-on of the wire terminals and labels.
My rule: if you only do one thing, take the photo. It saves you later.
3) Label wires by terminal letter, not by color
Write down what terminal each wire was connected to.
Example:
- Red wire on R (not “red is R,” but “this wire was on R”)
4) Check your Rc Rh situation
Before removing wires, answer this:
- Is there a small jumper wire between Rc and Rh?
- Are there two separate wires on Rc and Rh?
- Is there only one R terminal?
That determines what you do at the Nest.
5) Remove old base, mount Nest base
Hold the thermostat wire bundle so it does not fall into the wall (tape it if needed). Mount the Nest base level.
6) Connect wires to Nest
Push each wire into the Nest terminal that matches the letter you labeled.
7) Restore power and run setup
In the Nest app or on the Nest display:
- Confirm it detected the same wires you connected
- Run heating test
- Run cooling test
- Run fan test
Heat pump note: If you have a heat pump and cooling blows warm (or heating blows cool), do not swap wires randomly. Go into settings and change the O/B reversing valve setting.
If your White-Rodgers terminals do not match modern letters (legacy bases)
Some older White-Rodgers thermostats predate the universal labeling most of us rely on today. You might see:
- Numbers
- Odd letters like M, H, V, F
- Older oddball combinations that do not match Rc Rh W Y G C
Common legacy-label examples (do not treat this as universal)
Older White-Rodgers lines sometimes used labels where:
- “V” may represent 24V power (similar to R)
- “F” may represent fan (similar to G)
But I’m not going to tell you “V always equals R” because I’ve seen enough variations to know that’s how homeowners get stuck.
If your labels are weird, the safest move is:
- Open the furnace air handler panel
- Find the low-voltage terminal strip
- See where each thermostat wire lands (R, C, W, Y, G, O/B)
- Wire Nest based on the furnace board letters
If you’re not comfortable opening the equipment panel, that’s a good moment to bring in a tech for a quick confirm.
Mercury White-Rodgers thermostats (how to remove them safely)
Older round and square White-Rodgers thermostats often used a mercury bulb switch. To get to the wiring terminals, there may be an inner plate holding the mercury assembly.
My removal steps:
- Power off at breaker
- Remove outer cover
- Carefully remove the inner plate (the one holding the mercury switch)
- Photograph the wiring terminals underneath
- Label wires and remove them
If the mercury bulb is broken or you see a silvery bead:
- Do not touch it directly
- Place the thermostat in a sealed container
- Dispose via a hazardous waste program or thermostat recycling program (many municipalities and some retailers offer this)
Wiring by wire count (real-world scenarios)
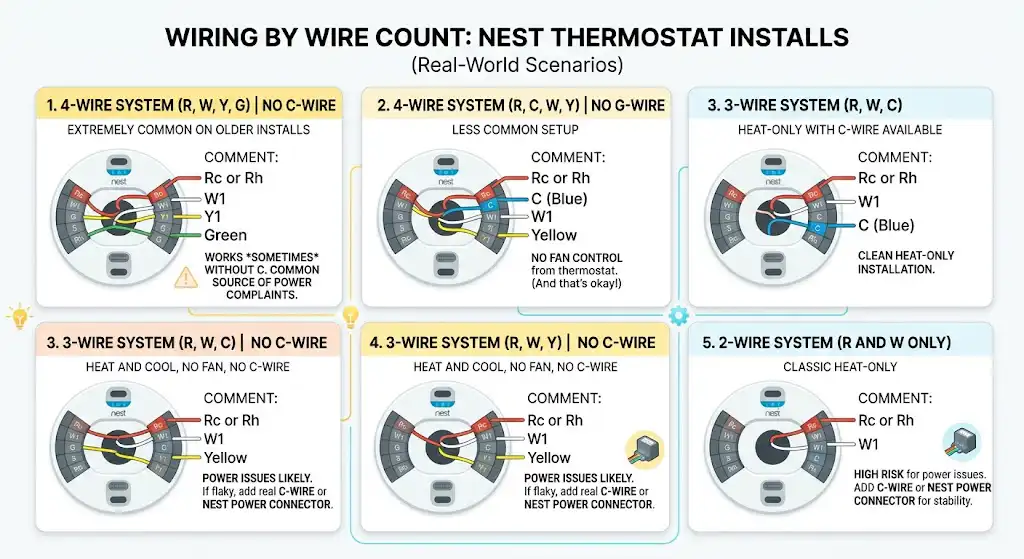
4-wire system (R, W, Y, G) no C-wire
This is extremely common on older installs.
Typical Nest wiring:
- R to Rc or Rh
- W to W1
- Y to Y1
- G to G
Will it work without C? Sometimes. But this is one of the setups where I see the most Nest power complaints.
4-wire system (R, C, W, Y) no G-wire
Less common, but it happens.
Typical Nest wiring:
- R to Rc or Rh
- C to C
- W to W1
- Y to Y1
No fan control from thermostat, and that’s okay.
3-wire system (R, W, C)
Usually heat-only with a C-wire available.
Typical Nest wiring:
- R to Rc or Rh
- W to W1
- C to C
3-wire system (R, W, Y) no C-wire
Heat and cool call, no fan wire and no common.
This is where power issues can show up. If Nest acts flaky, you’ll want a real C-wire or a Nest Power Connector.
2-wire system (R and W only)
Classic heat-only.
Typical Nest wiring:
- R to Rc or Rh
- W to W1
This is the most likely to need a Nest Power Connector or an added C-wire for long-term stability.
No C-wire: what I recommend (so your Nest stays stable)
Nest can “power steal” (power share) on some systems, but when it doesn’t have enough standby power, you’ll see symptoms like:
- Wi-Fi disconnects
- Low battery warnings
- Clicking from the furnace
- Short weird fan or heat blips
Two reliable fixes
Option 1: Use an unused conductor as C-wire
Many thermostat cables have extra unused wires tucked in the wall. If you have an unused blue or brown wire:
- Connect it to C at the furnace board
- Connect the same wire to C at the Nest
The key is: it must be connected on both ends.
Option 2: Install the Nest Power Connector
This is Google’s official adapter that installs at the furnace control board and gives Nest stable power without running new cable.
If you’re comfortable working in the furnace low-voltage compartment, it’s very doable. If you’re not, it’s a quick job for a tech.
Rc vs Rh: how to tell if you have one transformer or two (simple decision guide)
What I look for first
- One R wire and a jumper between Rc and Rh: usually single transformer
- One R terminal only: usually single transformer
- Two wires, one on Rc and one on Rh: often two transformers
If you want to confirm with a multimeter
Only do this if you’re comfortable and power is on safely.
- Measure between Rc and C: you should see about 24V AC if Rc is powered
- Measure between Rh and C: you should see about 24V AC if Rh is powered
- Measure between Rc and Rh:
- Near 0V typically suggests same transformer feed
- A higher reading can suggest separate transformers or phase differences
If any of this feels uncertain, that’s a good point to stop. A 10-minute service call is cheaper than a blown transformer or control board fuse.
Common problems after wiring (and what I do to fix them)
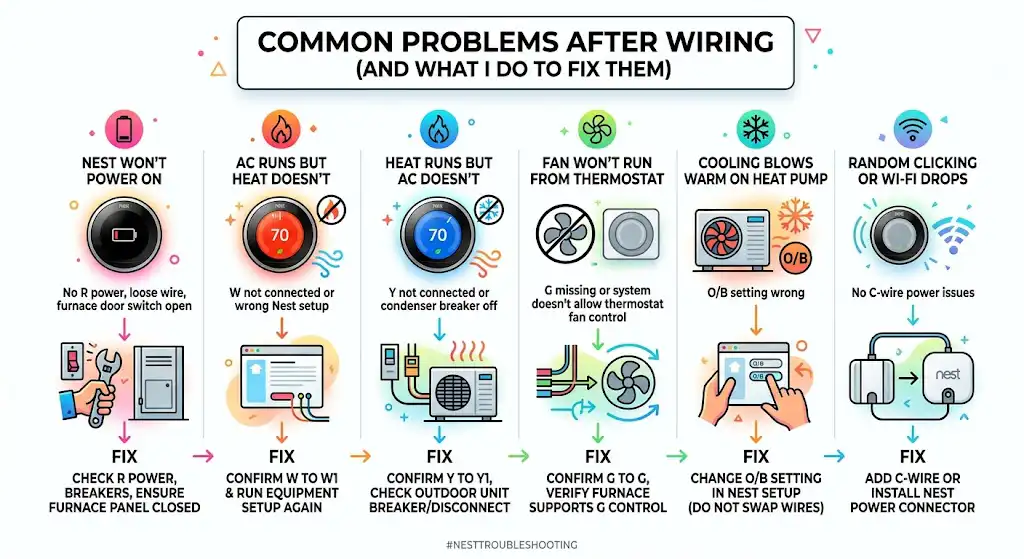
Troubleshooting table
| Nest won’t power on | No R power, loose wire, furnace door switch open | Check R seated, check breakers, ensure furnace panel is closed |
| AC runs but heat doesn’t | W not connected or wrong Nest setup | Confirm W to W1 and run equipment setup again |
| Heat runs but AC doesn’t | Y not connected or condenser breaker off | Confirm Y to Y1, check outdoor unit breaker/service disconnect |
| Fan won’t run from thermostat | G missing or system doesn’t allow thermostat fan control | Confirm G to G, verify furnace supports G control |
| Cooling blows warm on heat pump | O/B setting wrong | Change O/B setting in Nest setup, do not swap wires randomly |
| Random clicking or Wi-Fi drops | No C-wire power issues | Add C-wire or install Nest Power Connector |
Know when to stop and call a pro
Call an HVAC pro or electrician if:
- You find line-voltage wiring (120V or 240V) at the thermostat
- Your system is a complex heat pump with multiple stages and you’re unsure of wire functions
- Your White-Rodgers terminals are not standard and you cannot trace wires at the equipment
- You smell burning, see a blown fuse on the control board, or the system won’t power after wiring
FAQ
What is the red jumper wire on my White-Rodgers thermostat?
On many White-Rodgers setups, it’s a separate small jumper used to connect Rh and Rc on a single-transformer system. Leave it on the old thermostat. Nest handles bridging internally when needed.
Do I need a C-wire when moving from White-Rodgers to Nest?
Not always, but it’s strongly recommended for stable power. In my experience, older 2-wire and 3-wire White-Rodgers installs are the most likely to show low-power symptoms. A dedicated C-wire or the Nest Power Connector is the long-term fix.
My White-Rodgers thermostat has a mercury switch. Is it dangerous?
The sealed bulb is generally safe if intact. The risk is if it breaks. If there’s a spill, don’t touch it directly and dispose of the thermostat as hazardous waste through a local take-back program.
My terminals are labeled with numbers or letters I don’t recognize. What now?
That’s a legacy base. Don’t guess. Trace each wire to the furnace or air handler terminal strip (R, C, W, Y, G, O/B) and wire the Nest based on those equipment terminals.