By Nathan, HVAC technician with 10 plus years in the field
If you’re staring at a bundle of thermostat wires and wondering how in the world that turns into heating and cooling, you’re in the right place. I’ve wired and diagnosed a lot of heat pump systems over the last decade, and I can tell you this: Nest heat pump wiring is straightforward once you understand what each terminal actually does and you take it one step at a time.
In this guide, I’ll walk you through the exact process I use in the field, including common wiring diagrams, how to identify tricky wires like B and C, and how to test everything after you’re done.
- Quick safety and compatibility check (do this first)
- Heat pump basics (so the wiring makes sense)
- Tools and materials I recommend
- Prep work (this is where most “Nest problems” are prevented)
- Nest thermostat terminals explained (heat pump focused)
- The most common heat pump wiring diagrams (Nest)
- Multi-speed fan wiring (what homeowners should know)
- The C-wire question (and how to identify it correctly)
- Nest setup steps that matter (don’t skip this)
- Testing after wiring (my field checklist)
- Troubleshooting common Nest heat pump wiring problems
- Quick reference table (most common heat pump setups)
- FAQ
- My honest advice as a tech
Quick safety and compatibility check (do this first)
1) Confirm you have a low-voltage system (24V)
Nest thermostats work with 24V HVAC control wiring. If you remove your old thermostat and see thick wires or labels like 110V, 120V, 240V, stop. That’s a line-voltage thermostat and Nest is not compatible without additional controls.
2) Check Nest compatibility
Nest has an online compatibility checker. Use it if you can. In the real world, I still recommend confirming your system type first:
- Heat pump (with or without auxiliary heat)
- Dual fuel (heat pump plus gas/oil furnace)
- Multi-stage compressor or multi-stage heat
3) Turn power off at the breaker
Do not rely on turning the thermostat “off.”
Turn off the breaker(s) for:
- Air handler or furnace (indoor unit)
- Heat pump or condenser (outdoor unit), if separate
Most installs take 20 to 45 minutes if your wiring is accessible and in good shape.
Heat pump basics (so the wiring makes sense)
A heat pump heats and cools by moving heat rather than creating it.
- In cooling mode: it pushes heat outdoors
- In heating mode: it pulls heat from outdoors and brings it inside
Why auxiliary heat exists
When it’s very cold outside, a heat pump may struggle to keep up. That’s where auxiliary heat (often electric heat strips) turns on to help. This is also why proper Nest setup matters: if it’s misconfigured, you can accidentally run expensive aux heat way too often.
Efficiency stats you should know
Heat pump efficiency is commonly described as COP (coefficient of performance). Electric resistance heat is COP 1.0 (1 unit of heat per 1 unit of electricity). Heat pumps often beat that by a lot.
Here’s a realistic rule of thumb I’ve seen in the field and that aligns with widely cited DOE-style guidance:
| 50°F | 3.0 to 4.0 | 3 to 4 times more efficient than heat strips |
| 35°F | 2.5 to 3.2 | still significantly cheaper than resistance heat |
| 20°F | 1.8 to 2.5 | may need aux heat depending on sizing and insulation |
| 5°F | 1.2 to 2.0 | many systems lean on aux heat more often |
If your system has electric auxiliary heat, it’s common for the heat pump to be about 2x to 4x more efficient than the strips in mild to cold weather. That’s why we want Nest wired and configured correctly.
Tools and materials I recommend
You don’t need a truck full of HVAC tools. For most homeowners, this is enough:
- Nest thermostat (and base)
- Small Phillips and flathead screwdriver
- Wire labels (or masking tape and a pen)
- Phone to take photos (this is your backup plan)
- Wire stripper (optional but helpful)
- Level (optional, Nest doesn’t require perfectly level to function)
Prep work (this is where most “Nest problems” are prevented)
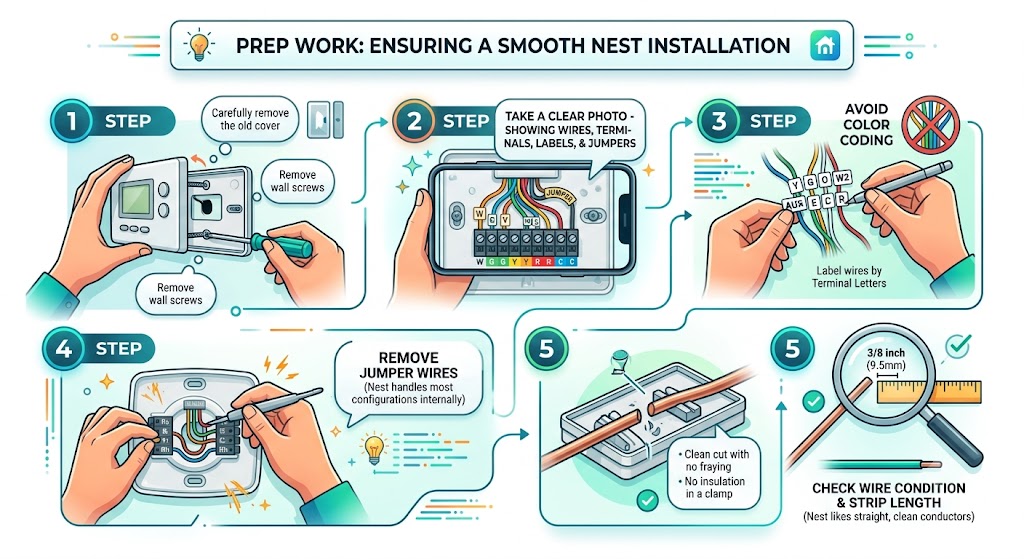
Step 1: Remove the old thermostat carefully
Pull the cover off first, then remove screws holding the thermostat to the wall.
Step 2: Photograph the wiring
Take a clear photo straight-on showing:
- which wire goes to which terminal
- any jumpers
- any labels on the old thermostat
I can’t tell you how many installs I’ve saved because somebody had one good photo.
Step 3: Label wires by terminal letters, not by color
Color is not reliable. Installers use whatever wire is available.
Label each wire with the terminal it was connected to on the old thermostat: Y, G, O, B, W2, AUX, E, C, R, etc.
Step 4: Remove jumper wires
Most smart thermostats don’t need the old jumper strategy. Nest internally handles common configurations.
Step 5: Check wire condition and strip length
Nest likes a clean, straight conductor.
Aim for about 3/8 inch of exposed copper (no fraying, no insulation in the clamp).
Nest thermostat terminals explained (heat pump focused)
This is the simplest way I explain it to homeowners: each letter is a “request” your thermostat sends to the system.
Heat pump terminal cheat sheet
| Rc | 24V power (cooling transformer) | Many systems only have one R. Nest usually uses Rc. |
| Rh | 24V power (heating transformer) | Often unused on heat pumps unless dual-transformer setup. |
| C | Common (24V return) | Strongly recommended for stable Nest performance. |
| Y1 | Compressor stage 1 | Runs the outdoor unit compressor (and usually outdoor fan). |
| Y2 | Compressor stage 2 | Only if you truly have 2-stage compressor or it’s repurposed by equipment. |
| G | Indoor blower fan | Runs the air handler blower. |
| O/B | Reversing valve | This is the big heat-pump-specific wire. Must be set correctly in Nest. |
| W2/AUX | Auxiliary heat | Often electric heat strips. Sometimes furnace call in dual fuel systems (with proper controls). |
| * (star) | Emergency heat, humidifier, dehumidifier, or 3rd stage | Can be configured in Nest Pro settings. |
The most common heat pump wiring diagrams (Nest)
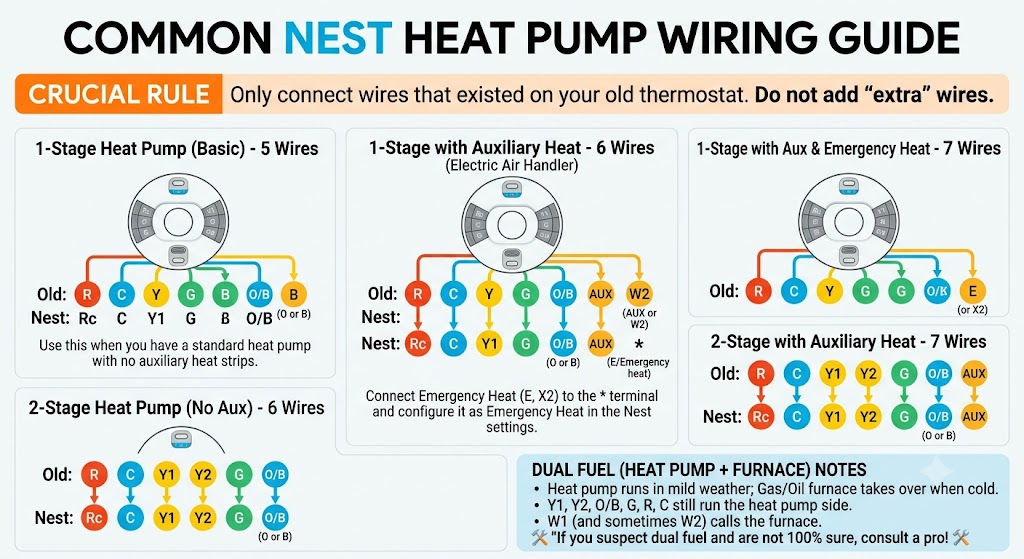
Below are the setups I see most often. I’m listing these as “wire-to-terminal” maps because that’s what you actually need at the wall.
Important rule: Only connect wires that existed on your old thermostat.
Don’t add “extra” wires because a diagram shows them.
1-stage heat pump (basic) 5-wire
Typical wires: R, C, Y, G, O/B
Nest connections
- Rc: R
- C: C
- Y1: Y
- G: G
- O/B: O or B (depending on how your system is designed)
Use this when you have a standard heat pump with no auxiliary heat strips.
1-stage heat pump with auxiliary heat 6-wire
Typical wires: R, C, Y, G, O/B, AUX (or W2)
Nest connections
- Rc: R
- C: C
- Y1: Y
- G: G
- O/B: O or B
- W2/AUX: AUX or W2
This is extremely common on electric air handlers with heat strips.
1-stage heat pump with aux and emergency heat 7-wire
Typical wires: R, C, Y, G, O/B, AUX, E (or a separate emergency heat wire)
Nest connections
- Rc: R
- C: C
- Y1: Y
- G: G
- O/B: O or B
- W2/AUX: AUX
- (star): E (Emergency heat)
In real homes, I often see emergency heat labeled E, X2, or something manufacturer-specific. Nest can usually map that to the star terminal and you set it as Emergency Heat in the configuration.
2-stage heat pump (no aux) 6-wire
Typical wires: R, C, Y1, Y2, G, O/B
Nest connections
- Rc: R
- C: C
- Y1: Y1
- Y2: Y2
- G: G
- O/B: O or B
2-stage heat pump with auxiliary heat 7-wire
Typical wires: R, C, Y1, Y2, G, O/B, AUX
Nest connections
- Rc: R
- C: C
- Y1: Y1
- Y2: Y2
- G: G
- O/B: O or B
- W2/AUX: AUX
Dual fuel (heat pump plus furnace) wiring notes
Dual fuel usually means:
- Heat pump runs in mild weather
- Gas or oil furnace takes over when it’s cold
This can be simple or it can get complicated depending on whether the system uses:
- a fossil fuel kit
- an external control board
- equipment-specific logic
Common dual fuel wiring concept (high level)
- Y1, Y2, O/B, G, R, C still run the heat pump side
- W1 (and sometimes W2) calls the furnace when needed
If you suspect dual fuel and you’re not 100 percent sure, that’s a good time to call a pro. Wiring dual fuel wrong can cause the system to run inefficiently or even fight itself.
Multi-speed fan wiring (what homeowners should know)
Most modern systems use variable-speed control logic at the air handler, and the thermostat only uses G as a fan request.
But some older or specialty setups repurpose terminals:
- Y2 may trigger a higher fan speed
- (star) may be used for a third fan relay
If your old thermostat had fan speed terminals or labels like “G1 G2 G3,” take extra care and photograph everything. If you tell me what wires you have and what terminals they were on, I can usually tell you whether your system is truly multi-speed thermostat controlled or internally controlled by the air handler.
The C-wire question (and how to identify it correctly)
A solid C-wire makes Nest way more stable. Random disconnects, low battery warnings, or short cycling often trace back to weak power.
How I identify C in the real world
- At the thermostat: it might be labeled C, but sometimes it’s labeled B (common on some conventional setups)
- At the control board in the air handler: there is almost always a terminal strip with letters (R, C, Y, G, W, O, etc.)
The tricky B wire (common vs reversing valve)
This is where many DIY installs go sideways.
Here’s the clean way to think about it:
| Heat pump system | B can be the reversing valve (energized in heating) | Connect to O/B and set Nest accordingly |
| Conventional system | B often means Common | Connect to C on Nest |
If you have both O and B wires present, you need to verify at the air handler board what each one actually is.
Nest setup steps that matter (don’t skip this)

Once the wiring is physically done, Nest will ask equipment questions. Answer carefully.
1) Set it as a heat pump
Make sure the system type is heat pump, not conventional.
2) Set the reversing valve orientation (O vs B)
If this is wrong, you’ll get:
- hot air in cool
- cold air in heat
If your old thermostat used O, you usually energize in cooling.
If it used B, you may energize in heating (depends on brand).
3) Configure Aux and Emergency heat
- Aux should be set when you have heat strips or supplemental heat
- Emergency heat should be configured if you have a separate E or X2 style circuit
4) Heat pump balance and lockouts (cost control)
If you have electric auxiliary heat, tuning this matters a lot. In many homes I’ve worked on, the biggest “bill shock” comes from aux heat running too often.
You may see settings like:
- Max savings
- Balanced
- Max comfort
If you care about operating cost, start more conservative (more heat pump, less aux) and adjust if the house can’t keep up.
Testing after wiring (my field checklist)
Give the system time. Many thermostats enforce delays to protect compressors.
Test cooling
- Set mode to Cool
- Set temperature 3 to 5 degrees below room temp
- Wait up to 5 minutes
- Confirm:
- indoor blower runs
- outdoor unit runs
- air is cool at vents after a few minutes
Test heat (heat pump)
- Set mode to Heat
- Set temperature 2 to 4 degrees above room temp
- Wait up to 5 minutes
- Confirm:
- outdoor unit runs (yes, in heat it should run)
- air feels warm (heat pumps often feel “less hot” than furnaces, that can be normal)
Test auxiliary heat
To force aux heat in many setups:
- raise setpoint 3 to 5 degrees above room temp
- wait and look for AUX indication on Nest (if available)
Test emergency heat (if you have it)
Emergency heat should run without the heat pump compressor. It usually brings on electric strips or the backup furnace only.
If you’re not sure, don’t guess. Emergency heat wired wrong can cause expensive operation or comfort issues.
Troubleshooting common Nest heat pump wiring problems
Nest blows hot air on cool (or cold air on heat)
Almost always the reversing valve setting is wrong.
- Go to Settings
- Equipment
- Heat Pump
- Change O/B orientation (energize in cool vs energize in heat)
Fan runs all the time
Possible causes I see most:
- G wire shorted or touching another conductor
- thermostat base not seated correctly
- old thermostat had corrosion or internal failure (I’ve seen this create “always on fan” symptoms)
- Nest fan schedule set to run
Aux heat runs too much
Common reasons:
- Heat pump balance set too comfort-oriented
- Outdoor temp sensor data (Wi-Fi) not available
- Heat pump not keeping up due to dirty filter, low airflow, or refrigerant issues
- Incorrect wiring where AUX is energized too easily
Nest won’t power on
- Missing C-wire or weak power stealing
- R not actually hot (tripped fuse on control board, open transformer, breaker off)
- Loose wire not fully inserted
Quick reference table (most common heat pump setups)
Use this as a fast “sanity check” after you wire.
| 1-stage heat pump | R C Y G O/B | Rc C Y1 G O/B |
| 1-stage heat pump + aux | R C Y G O/B AUX | Rc C Y1 G O/B W2/AUX |
| 1-stage + aux + emergency | R C Y G O/B AUX E | Rc C Y1 G O/B W2/AUX * |
| 2-stage heat pump | R C Y1 Y2 G O/B | Rc C Y1 Y2 G O/B |
| 2-stage + aux | R C Y1 Y2 G O/B AUX | Rc C Y1 Y2 G O/B W2/AUX |
Reminder: your wire letters matter more than the count.
FAQ
How do you identify a C-wire on Nest?
The best method is to check the air handler control board for the terminal labeled C (common). At the thermostat, it may be labeled C, or sometimes a different label depending on the original installer. If you see a “B” wire, confirm whether it’s common or a reversing valve wire before connecting it.
What if my Nest has no place for an X2 wire?
Some systems label emergency heat staging as X2 or similar. Nest can often map that function to the star terminal and you configure it as Emergency Heat in Pro settings. If you have multiple stages of electric strips, you may need to decide which stage Nest should control or consult the air handler wiring diagram.
How do I fix Nest reversing heating and cooling?
That’s the reversing valve setting.
Go to:
- Settings
- Equipment
- Heat Pump
Then switch the O/B orientation.
Should I call a pro?
Call a pro if you have:
- line voltage at the thermostat
- a communicating thermostat system
- zoning panels
- dual fuel and you’re unsure how it’s controlled
- wires that don’t match any standard terminal labels
My honest advice as a tech
If you take good photos, label wires by terminal, and confirm whether you’re dealing with O or B on the reversing valve, most Nest heat pump installs go smoothly.
If you want, paste the letters you see on your old thermostat terminals (or upload a clear photo of the old thermostat wiring and the air handler control board). I can tell you exactly where each wire should land on the Nest and what to pick during setup so you don’t end up with backwards heating or expensive aux heat running nonstop.