
Hi, I’m Nathan. I’ve been an HVAC technician for over 10 years, and I’ve wired more thermostats than I can count, from basic single stage systems to heat pumps with backup heat and two stage equipment. If you’re staring at six thermostat wires and wondering where they go, you’re in the right place.
Here’s the big idea I want you to remember throughout this whole guide:
Six wires usually means you have the standard five thermostat connections, plus one extra function. The extra function might be second stage heat, second stage cooling, or a heat pump reversing valve or auxiliary heat.
In this article, I will tell you all you need to know.
- Safety first (do this every time)
- What does a 6 wire thermostat mean?
- Identify your system first (this prevents 90 percent of wiring mistakes)
- Thermostat terminal letters (plain English)
- Thermostat wire color code (useful, but do not rely on it)
- 6 wire thermostat wiring diagram (most common setups)
- Step by step: How I wire a 6 wire thermostat (the safe, no guess method)
- Rc and Rh explained (and when you need both)
- The C wire (common wire) and what voltage you should see
- Do you need to run new thermostat wire?
- Common 6 wire thermostat problems (troubleshooting table)
- Helpful stats you can use when deciding on a thermostat upgrade
- FAQ: 6 wire thermostat wiring diagram
- When to stop and call a pro
Safety first (do this every time)
Even though thermostat wiring is low voltage (typically 24 volts AC), you can still damage your equipment if you short wires together.
Before touching thermostat wires:
- Turn off power to the furnace or air handler at the breaker or service switch.
- Confirm the thermostat screen turns off (blank display).
- If you’re opening the furnace control board panel, keep the power off the whole time.
Typical control boards have a small automotive style fuse (often 3 amp to 5 amp). A quick short between R and C can blow that fuse instantly.
What does a 6 wire thermostat mean?
Most homes with a modern digital thermostat use 5 wires:
- R (power)
- C (common)
- W (heat)
- Y (cool)
- G (fan)
When you have six wires, it’s usually those five plus one of the following:
- W2 (second stage heat)
- Y2 (second stage cooling)
- O/B (heat pump reversing valve)
- AUX (heat pump backup heat, sometimes labeled W2 at the thermostat)
Identify your system first (this prevents 90 percent of wiring mistakes)
Before you move wires, figure out which of these you have. The easiest way is to look at the letters on the old thermostat terminals (not the colors).
Quick identification table
| R, C, W, Y, G plus W2 | Two stage furnace, single stage AC | W2 |
| R, C, W, Y1, G plus Y2 | Single stage furnace, two stage AC | Y2 |
| R, C, Y, G, O or B plus AUX (or W2) and no plain W | Heat pump with backup heat | O/B or AUX |
| Labels don’t match any of the above | Could be accessory wiring, splices, or non standard | Verify at control board |
Two fast real world checks I use on service calls
- Look at the outdoor unit
- Heat pump: outdoor unit runs in winter and summer.
- Straight AC: outdoor unit runs only in summer (cooling).
- Look at the air handler or furnace control board
- The control board terminals are usually labeled R, C, W, Y, G, O/B, AUX, etc. That label is your truth.
Thermostat terminal letters (plain English)
Here’s what the common thermostat terminals do:
- R (Rc/Rh): 24V power from the transformer
- C: common wire, completes the 24V circuit to power the thermostat continuously
- W (W1): heat call (first stage heat)
- W2: second stage heat call (or AUX on heat pumps)
- Y (Y1): compressor contactor (cooling, and also heating on a heat pump)
- Y2: second stage compressor (two stage cooling or two stage heat pump)
- G: indoor fan relay
- O/B: heat pump reversing valve (O energized in cooling for most brands, B energized in heating for some brands)
Thermostat wire color code (useful, but do not rely on it)
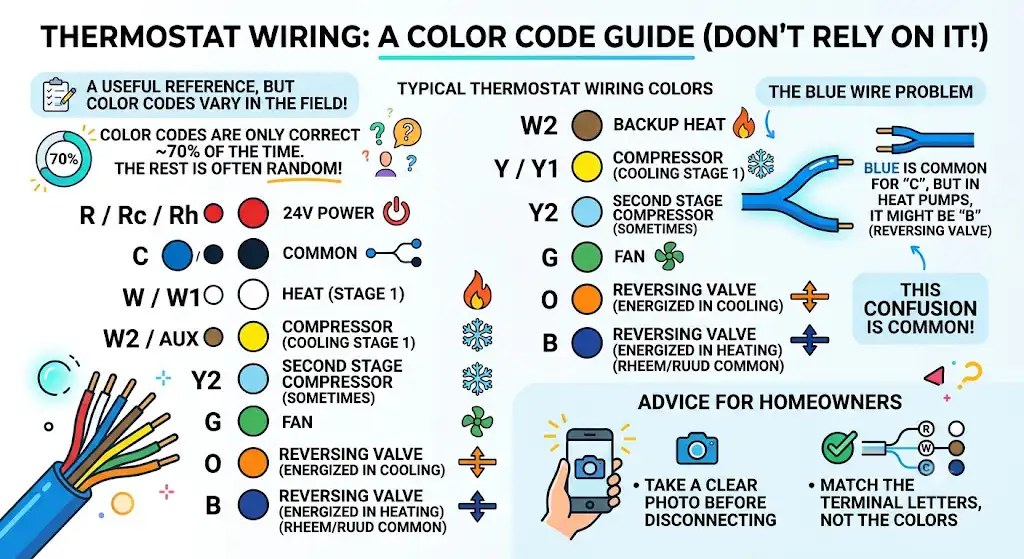
In the field, I see color codes done correctly maybe 70 percent of the time, and “whatever color the installer grabbed that day” the rest of the time. So use this as a guide, but always match wires to terminal letters from the old thermostat or the control board.
Typical thermostat wiring colors
| R / Rc / Rh | Red | 24V power |
| C | Blue or Black | Common |
| W / W1 | White | Heat (stage 1) |
| W2 / AUX | Brown (sometimes) | Second stage heat or backup heat |
| Y / Y1 | Yellow | Compressor (cooling) |
| Y2 | Light blue (sometimes) | Second stage compressor |
| G | Green | Fan |
| O | Orange | Reversing valve energized in cooling (common) |
| B | Dark blue (sometimes) | Reversing valve energized in heating (Rheem/Ruud common) |
The “blue wire problem” I see all the time
Blue is commonly used as C, but in some heat pump setups it gets used for B (reversing valve). That’s why I tell homeowners:
- Match the terminal letters, not the colors.
- Take a clear photo before you disconnect anything.
6 wire thermostat wiring diagram (most common setups)

Below are the most common 6 wire configurations I run into.
Diagram 1: Two stage heat, single stage cool (R, C, W, W2, Y, G)
This is the classic setup for a two stage furnace with standard single stage AC.
Thermostat terminals to control board:
- R to R
- C to C
- W to W (or W1)
- W2 to W2
- Y to Y (or Y1)
- G to G
Simple diagram (letter to letter is the goal):
Thermostat: R C W W2 Y G
Control bd: R C W W2 Y G
What it means in real life:
- The furnace will start in first stage heat on W.
- If the thermostat decides it needs more heat, it energizes W2 for second stage.
Diagram 2: Single stage heat, two stage cool (R, C, W, Y1, Y2, G)
This is common when someone upgrades to a two stage AC but keeps a single stage furnace.
- R to R
- C to C
- W to W
- Y1 to Y (or Y1)
- Y2 to Y2
- G to G
Thermostat: R C W Y1 Y2 G
Control bd: R C W Y Y2 G
Note: Some control boards label the first stage compressor terminal as just Y, not Y1.
Diagram 3: Heat pump with backup heat (R, C, Y, G, O/B, AUX)
If you see O, B, or O/B on the old thermostat, you are almost certainly dealing with a heat pump.
Typical wiring:
- R to R (sometimes Rc)
- C to C
- Y to Y (compressor)
- G to G
- O/B to O or B (reversing valve)
- AUX (or W2) to AUX/W2 (backup heat strips or furnace backup)
Thermostat: R C Y G O/B AUX
Control bd: R C Y G O/B AUX
Important: On a heat pump, Y is used for heating too (the compressor provides heat). That’s why many heat pump thermostats don’t use a plain W for normal heating.
Step by step: How I wire a 6 wire thermostat (the safe, no guess method)

1. Shut off power
Breaker off or furnace switch off. Make sure the thermostat display is blank.
2. Photograph the old wiring
Take:
- One wide photo of the whole thermostat base
- One close up photo where you can read every terminal letter
This saves you if a wire slips back into the wall or labels fall off.
3. Label each wire by terminal letter
Use masking tape and write the letter:
- R, C, W, W2, Y, G, O/B, AUX, etc.
Do not label by color. I’ve seen red used as C, white used as Y, and everything in between.
4. Remove the old base and mount the new thermostat base
Make sure the wire bundle doesn’t fall into the wall. I usually wrap the cable around a screwdriver as a temporary holder.
5. Land wires on the same letters
Put each labeled wire on the matching terminal on the new thermostat.
A quick tip from the field:
- The most common loose connection I find is W2 or Y2 because it’s the “extra” wire and people don’t tug test it.
- After tightening, gently tug each wire to confirm it’s clamped.
6. Configure the installer settings (this part matters)
A lot of homeowners wire everything correctly and still don’t get second stage because the thermostat is set up wrong.
Examples of settings to look for:
- Heat type: furnace vs heat pump
- Heat stages: 1 or 2
- Cool stages: 1 or 2
- Reversing valve: O or B
- AUX heat type and lockout (on heat pumps)
If you set a two stage furnace thermostat as single stage, W2 will never energize.
7. Restore power and test all modes
Test:
- Fan only (G)
- Cooling (Y, Y2 if applicable)
- Heat (W, W2 or heat pump heating through Y and O/B logic)
- If heat pump: test AUX heat and make sure it behaves correctly
Rc and Rh explained (and when you need both)
Some thermostats show Rc and Rh instead of a single R.
- Single transformer systems (most homes): Rc and Rh are usually jumped together (either with a jumper wire or internally).
- Two transformer systems (less common): separate power for heating and cooling. Then you may need both Rc and Rh.
The C wire (common wire) and what voltage you should see
If you’re installing a smart thermostat, a solid C connection matters.
What I typically measure
With a multimeter set to AC volts:
- Between R and C: about 24 to 28 VAC (varies by system)
If you get a weak reading or it bounces around, you may have:
- A loose C connection at the control board
- A broken conductor in the wall
- A blown low voltage fuse
- A transformer issue
Quick C wire clarification
- C is not “ground”.
- C is the other side of the transformer that completes the 24V circuit.
Do you need to run new thermostat wire?
If you’re opening walls anyway, I recommend running 18/8 thermostat cable (18 gauge, 8 conductors). It’s standard, affordable, and it gives you extra conductors for future upgrades.
Recommended thermostat wire specs
| Wire type | Solid copper thermostat cable |
| Gauge | 18 AWG |
| Conductors | 8 conductor (18/8) |
| Shielding | Unshielded is normal for thermostat runs |
If you only run 18/6 and later add a humidifier, two stage equipment, or a different thermostat, you can run out of conductors fast.
Common 6 wire thermostat problems (troubleshooting table)
Here’s what I check first when a homeowner tells me “I wired it the same, but it’s not working.”
| Heat works but never goes into second stage | W2 not connected, or thermostat set to 1 stage heat | Tug test W2, set heat stages to 2 |
| Cooling works but second stage never runs | Y2 not connected, or thermostat set to 1 stage cool | Tug test Y2, set cooling stages to 2 |
| Heat pump blows cool air in heat mode | O/B setting wrong in installer menu | Set reversing valve to O or B (brand dependent) |
| AUX heat runs all the time | Miswired AUX/W2, thermostat in Emergency Heat, or bad configuration | Turn off Emergency Heat, review AUX settings |
| Thermostat reboots, drops WiFi, blank screen | Weak or missing C wire | Verify 24 to 28 VAC between R and C |
| Outdoor unit runs but indoor fan does not | G not connected or bad fan relay | Check G at thermostat and control board |
Helpful stats you can use when deciding on a thermostat upgrade
I get asked all the time if upgrading to a smart thermostat is worth it. Savings depend on your schedule and how well your old thermostat was used.
Here are realistic, homeowner friendly benchmarks:
| Thermostat control voltage | 24 VAC (often 24 to 28 VAC) |
| Common smart thermostat energy savings | Around 8 percent on heating and cooling for many households (varies widely by behavior and climate) |
| Typical low voltage fuse rating | 3 to 5 amps (control board dependent) |
FAQ: 6 wire thermostat wiring diagram
What does a 6 wire thermostat wiring diagram show?
It shows how six low voltage conductors connect betweenQ your thermostat and the HVAC control board. Most commonly it’s the standard five wires (R, C, W, Y, G) plus one extra terminal like W2, Y2, O/B, or AUX.
What is the sixth wire on a 6 wire thermostat?
It depends on the system:
Two stage furnace: the sixth wire is usually W2
Two stage cooling: the sixth wire is usually Y2
Heat pump: the sixth wire is often O/B or AUX
Does 6 wires mean I have a heat pump?
Not always. Six wires can be a two stage furnace setup too. The giveaway is the presence of O, B, or O/B on the thermostat terminals, and whether the outdoor unit runs in winter.
Can I choose any wire color for W2 or Y2?
You can, as long as the same conductor is connected to the correct terminal at both ends (thermostat and control board). But I strongly prefer following common color conventions when possible because it reduces confusion later.
If I have 8 wires in the wall, can I still wire it as a 6 wire thermostat?
Yes. You simply cap off or tuck the extra conductors and only use what your thermostat and system require.
When to stop and call a pro
I’m all for DIY when it’s done safely, but I also want you to know when it’s time to pause.
Call an HVAC technician or electrician if:
- You see thick 120V or 240V wires in the thermostat box (that is not standard HVAC low voltage)
- Your wiring labels do not match any diagram and you cannot confirm at the control board
- You have a gas furnace and you’re unsure what you’re touching past the control board area
- You keep blowing the low voltage fuse after wiring changes