In this guide I’m going to walk you through exactly how to wire an Amazon Smart Thermostat to a heat pump system the same way I’d explain it to a homeowner in their hallway while we’re standing at the thermostat.
You’ll get:
- Clear wiring diagrams you can follow
- A terminal-by-terminal mapping table
- How to handle the two heat-pump specific parts: O/B and AUX and E
- The C-wire requirement (and what to do if you don’t have one)
- Real-world troubleshooting steps I use on service calls
If you take one thing from this article, it’s this: heat pump wiring is usually simple, but the Amazon Smart Thermostat has two non-negotiables on most installs: a working C-wire (or the official adapter) and the reversing valve wire on O/B.
- Safety first (do this every time)
- TL;DR wiring cheatsheet
- What makes heat pump wiring different from “normal” HVAC wiring?
- The core Amazon Smart Thermostat terminals for a heat pump
- Wiring diagrams you can follow
- The C-wire is required (and this is where most installs go wrong)
- O/B explained like I’d explain it at your kitchen table
- W2/AUX vs E (backup heat vs emergency heat)
- Wire colors (common conventions, not rules)
- Step-by-step: how I recommend you install it (clean and stress-free)
- Testing checklist (the same order I use on service calls)
- Common problems and fixes
- Know when to stop and call a pro
- FAQ
- Quick reference: old thermostat to Amazon Smart Thermostat mapping
Safety first (do this every time)
- Turn off power to your air handler or furnace and outdoor unit at the breaker panel.
- Confirm the system is actually off. Try turning heating or cooling on at the thermostat. Nothing should start.
- Treat every wire as live until proven otherwise.
TL;DR wiring cheatsheet
| No C wire at the thermostat | Amazon Smart Thermostat requires a C wire or the Amazon C-Wire Adapter. No C means the thermostat won’t power up. |
| Heat pump with no backup heat strips | Wire R, C, Y, G, O/B |
| Heat pump with electric backup heat strips | Wire R, C, Y, G, O/B, W2/AUX |
| Heat pump with backup plus Emergency Heat option | Wire R, C, Y, G, O/B, W2/AUX, E |
| System heats when you call for cool (or cools on heat) | Do not move wires. Change the O/B setting in the Alexa app. |
| Old equipment has a “B” terminal where you expected “C” | Often normal on certain brands. Confirm at the control board what that terminal actually is before moving wires. |
What makes heat pump wiring different from “normal” HVAC wiring?
On a straight AC plus furnace system, the thermostat mostly deals with:
- Y for cooling
- W for heating
- G for fan
- R and C for power
A heat pump adds:
- O/B for the reversing valve (this is what switches between heat mode and cool mode)
- W2/AUX for backup heat strips on many systems
- E for Emergency Heat on some systems
That’s it. Most homeowner confusion comes from those three terminals.
The core Amazon Smart Thermostat terminals for a heat pump
Here’s the basic set you should expect on a typical single-stage heat pump:
| R | 24V power from the transformer (hot) |
| C | 24V common (needed to power the thermostat continuously) |
| Y | Compressor contactor call (heat pump uses the compressor in heat and cool) |
| G | Indoor blower fan |
| O/B | Reversing valve (determines whether the system is in heat or cool mode) |
If you have backup electric heat strips:
- W2/AUX controls auxiliary heat (the heat strips)
If you have a separate Emergency Heat wire:
- E controls emergency heat (typically heat strips only, compressor locked out)
Wiring diagrams you can follow
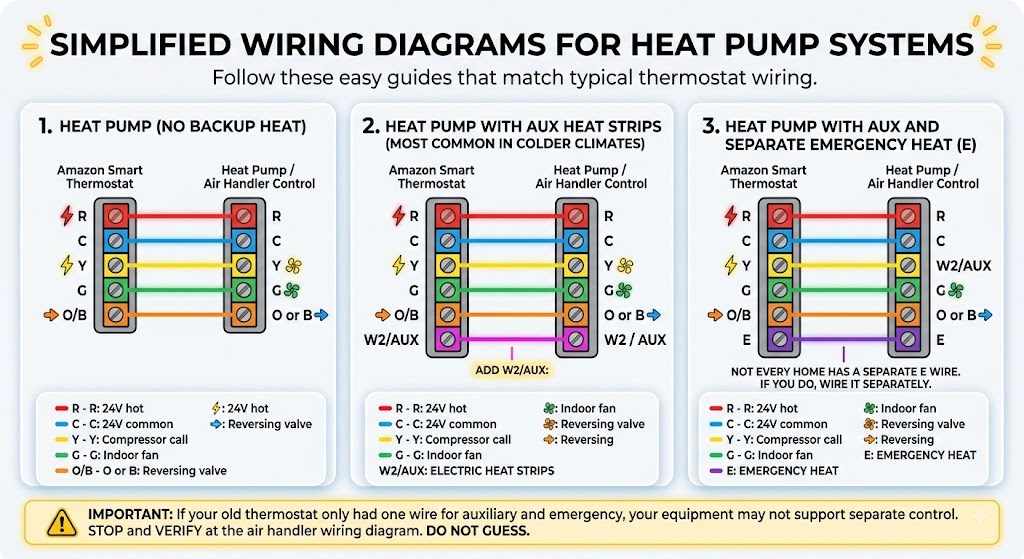
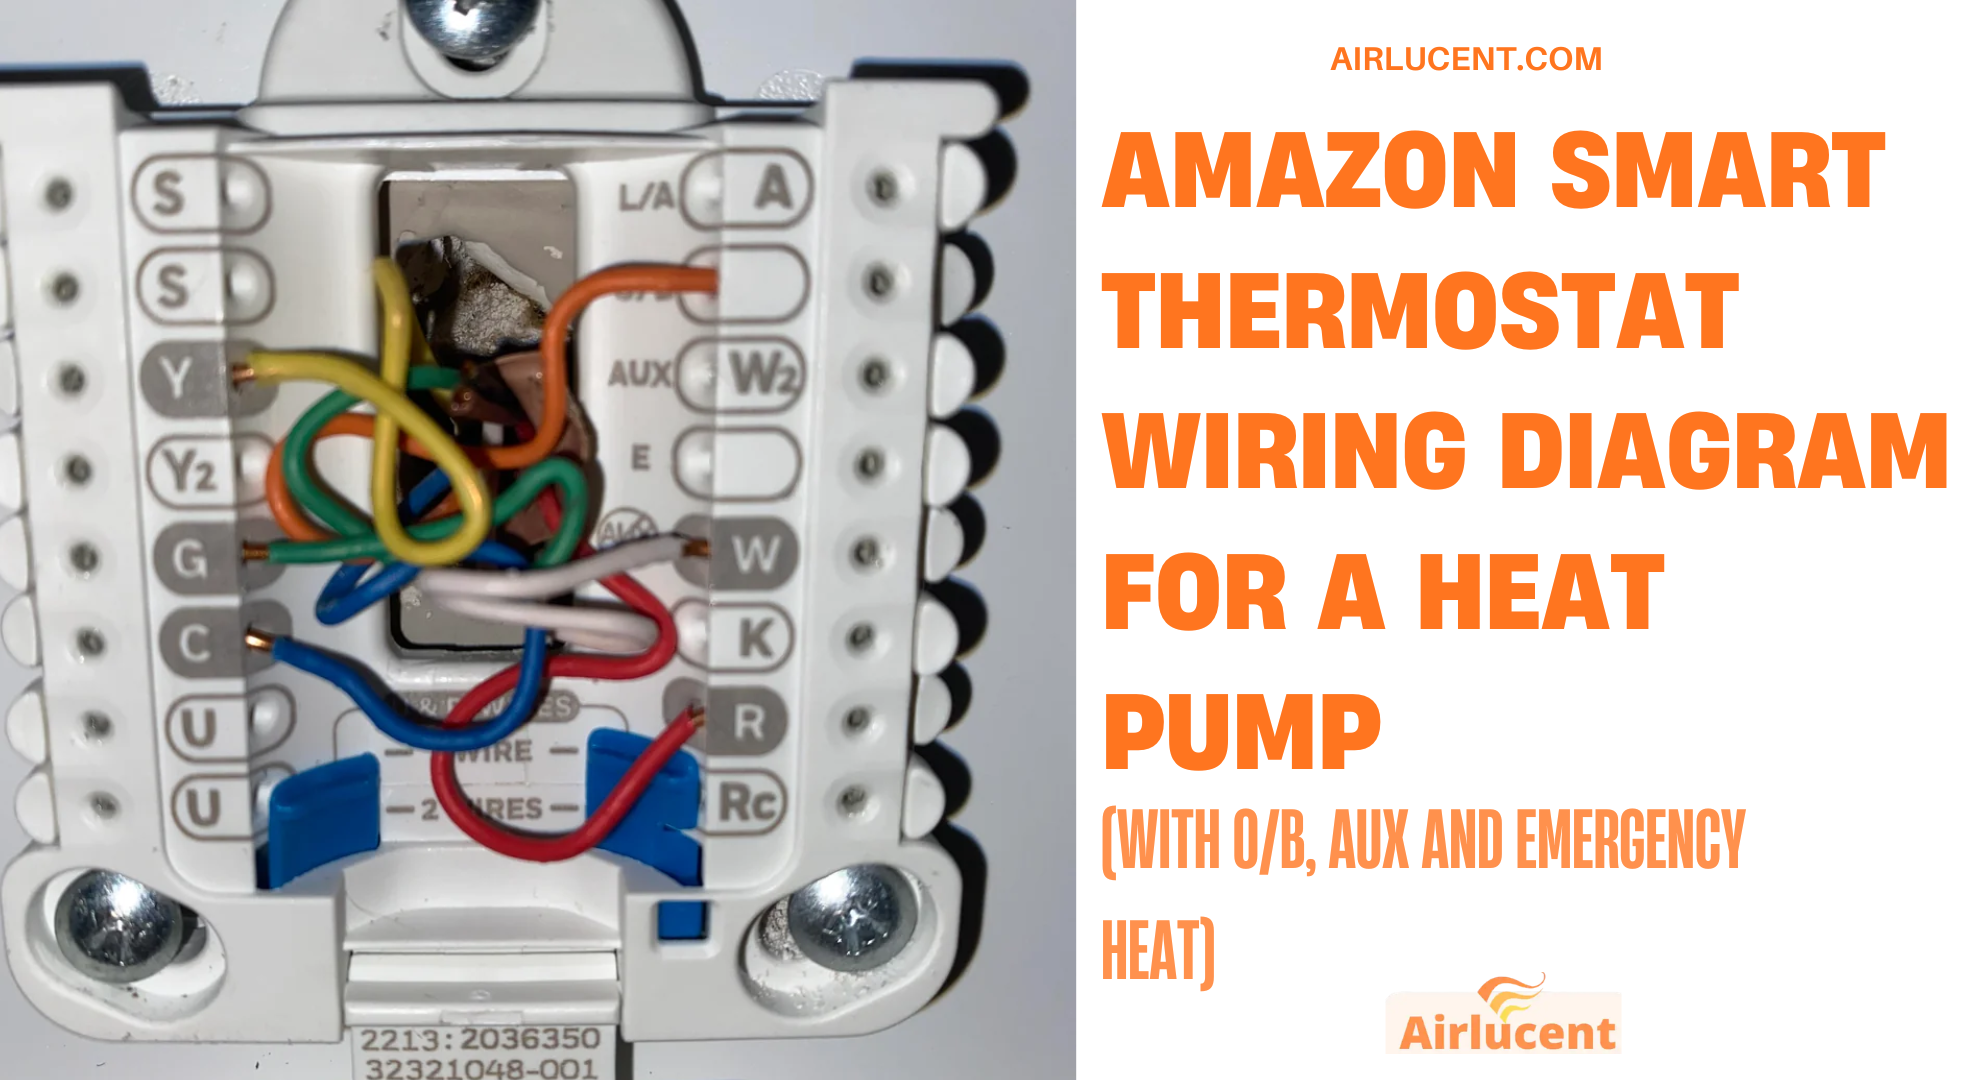
These are simplified diagrams that match how these systems are typically wired at the thermostat.
Diagram 1: Heat pump (no backup heat)
Thermostat terminals:
R to R
C to C
Y to Y
G to G
O/B to O/B
Amazon Smart Thermostat Heat Pump / Air Handler Control
—————————————————————
R ——————————– R (24V hot)
C ——————————– C (24V common)
Y ——————————– Y (compressor call)
G ——————————– G (indoor fan)
O/B——————————– O or B (reversing valve)
Diagram 2: Heat pump with AUX heat strips (most common in colder climates)
Add W2/AUX:
Amazon Smart Thermostat Heat Pup / Air Handler Control
—————————————————————
R ——————————– R
C ——————————– C
Y ——————————– Y
G ——————————– G
O/B——————————– O or B
W2/AUX—————————– W2 / AUX (electric heat strips)
Diagram 3: Heat pump with AUX and separate Emergency Heat (E)
Not every home has a separate E wire, but if you do, wire it separately.
Amazon Smart Thermostat Heat Pump / Air Handler Control
—————————————————————
R ——————————– R
C ——————————– C
Y ——————————– Y
G ——————————– G
O/B——————————– O or B
W2/AUX—————————– W2 / AUX
E ——————————– E (emergency heat)
If your old thermostat only had one wire for auxiliary and emergency, your equipment may not support separate control. In that case, stop and verify at the air handler wiring diagram. Don’t guess.
The C-wire is required (and this is where most installs go wrong)
In the field, the number one reason smart thermostat installs fail is power. The Amazon Smart Thermostat is not the kind that “sort of works” without a C wire. If C isn’t present (or the adapter isn’t installed correctly), you’ll usually see:
- A blank screen
- Random reboots
- Wi-Fi dropping
- Clicking relays but no consistent operation
How to check if you really have a C wire
At the thermostat, look for a wire connected to C.
But here’s the trick: sometimes the wire is in the wall but not connected at the thermostat. I regularly find an unused blue or black conductor tucked behind the plate.
What I do:
- Remove the old thermostat from its base.
- Look for any unused wire in the bundle.
- Open the air handler or furnace control board panel.
- See if that same spare wire is connected to C on the board.
If it’s not connected, you can often connect it at both ends and you’re done.
What if you truly don’t have a spare wire?
Then you use the Amazon C-Wire Adapter (installed at the control board, not at the thermostat).
Important from real-life experience: the adapter changes what you do at the thermostat terminals. On many setups, once the adapter is used, the thermostat side will use a different terminal arrangement (Amazon uses the adapter to create a constant power path using existing conductors). Follow the instructions that come with the adapter step-by-step and wire-by-wire. Do not “wing it” from memory.
If you’re not comfortable working inside the air handler control compartment, this is a good point to hire a pro. It’s still low voltage, but it’s easy to mis-land a wire and take out the board fuse.
O/B explained like I’d explain it at your kitchen table
The O/B wire controls the reversing valve. The reversing valve is what makes a heat pump a heat pump.
- In one mode the refrigerant flow is set up for cooling.
- In the other mode it’s set up for heating.
Where does the reversing valve wire go?
It goes to O/B on the Amazon Smart Thermostat. Always.
The confusion is not where the wire lands. The confusion is how the thermostat is configured in the app.
O vs B: what’s the difference?
- O means the reversing valve is energized in cooling
- B means the reversing valve is energized in heating
Different manufacturers do it differently. Many systems use O. Some brands commonly use B. The only reliable way to be sure is:
- Check the old thermostat wiring labels
- Check the air handler wiring diagram sticker
- Or test after installation and change the setting in the app if it’s backwards
The most important troubleshooting tip in this whole article
If your heat pump blows warm air when you call for cooling, or cold air when you call for heat:
- Do not move wires.
- Go into the Alexa app and switch the O/B setting.
That fix alone solves a huge percentage of “my thermostat is wired wrong” complaints.
W2/AUX vs E (backup heat vs emergency heat)
This is another spot where homeowners get tripped up, so here’s the clean explanation.
W2/AUX (Auxiliary heat)
Aux heat is automatic backup heat. On most heat pump systems with electric heat strips:
- The thermostat will bring on AUX when it’s very cold outside
- Or when the heat pump can’t raise indoor temperature fast enough
That means the compressor may run and AUX may run at the same time depending on the system and controls.
E (Emergency heat)
Emergency heat is manual “something is wrong with the heat pump” heat.
When you select Emergency Heat:
- The system typically locks out the compressor
- Runs the heat strips (or other backup heat) only
I tell homeowners: AUX is for normal winter operation. Emergency Heat is for a heat pump problem.
Do not combine E and W2 unless the manufacturer specifically shows that
If your old thermostat had separate E and AUX wires, land them separately if your Amazon thermostat supports both terminals for your setup. If your system only has one backup heat wire, you may only use W2/AUX.
When in doubt, match what’s on the air handler’s wiring diagram, not what you think “should be right.”
Wire colors (common conventions, not rules)
I’ve opened thermostats where the “yellow” wire was on C and the “blue” wire was on Y. So use this as a reference, not gospel.
| Red | R | 24V power |
| Blue or Black | C | Common |
| Yellow | Y | Compressor |
| Green | G | Fan |
| Orange | O | Reversing valve (often energized in cooling) |
| Dark blue | B | Reversing valve (often energized in heating on some brands) |
| White | W2/AUX | Electric backup heat strips |
| Brown | E | Emergency heat |
My rule on every swap: label wires by terminal letter on the old thermostat before you disconnect anything.
Step-by-step: how I recommend you install it (clean and stress-free)
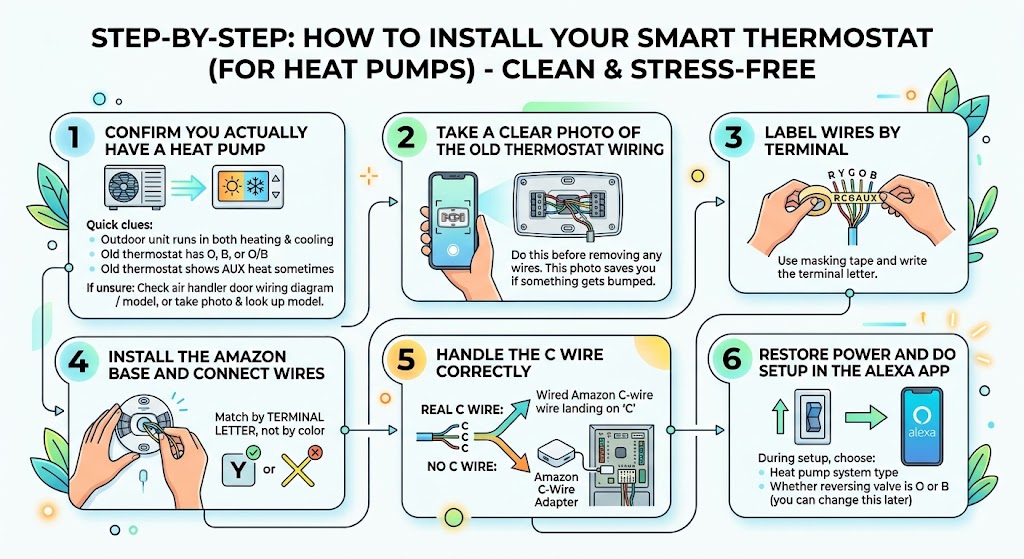
1. Confirm you actually have a heat pump
Quick clues:
- You have an outdoor unit that runs in both heating and cooling
- Your old thermostat has O, B, or O/B
- Your old thermostat shows AUX heat on the display sometimes
If you’re unsure, check the air handler door for a wiring diagram and model number, or take a photo and look up the model.
2. Take a clear photo of the old thermostat wiring
Do this before removing any wires. This photo saves you if something gets bumped.
3. Label wires by terminal
Use masking tape and write the terminal letter: R, C, Y, G, O, B, AUX, E, etc.
4. Install the Amazon base and connect wires
Match by terminal letter, not by color.
5. Handle the C wire correctly
- If you have a real C wire: land it on C.
- If you don’t: install the Amazon C-Wire Adapter at the control board.
6. Restore power and do setup in the Alexa app
During setup, choose:
- Heat pump system type
- Whether reversing valve is O or B (you can change this later if it’s wrong)
Testing checklist (the same order I use on service calls)
After installation and app setup:
Test 1: Cooling
- Set thermostat to cool
- Lower setpoint a few degrees
- Wait a few minutes
You should feel cooler air and typically hear the outdoor unit run.
If it heats instead, change O/B setting in the app.
Test 2: Heating
- Set thermostat to heat
- Raise setpoint a few degrees
- Wait a few minutes
You should get warm air. Heat pumps often feel “warmish,” not blazing hot like gas heat, especially at first.
If it cools instead, change O/B setting in the app.
Test 3: AUX heat (if wired)
If it’s warm outside, AUX may not come on easily. Some thermostats allow a test mode, but many don’t. If you can’t force AUX safely:
- Watch for AUX engagement during a colder evening
- Or have an HVAC tech confirm operation from the control board
Test 4: Thermostat stays powered
If the screen goes blank or reboots, that’s almost always a C-wire or adapter wiring issue.
Common problems and fixes
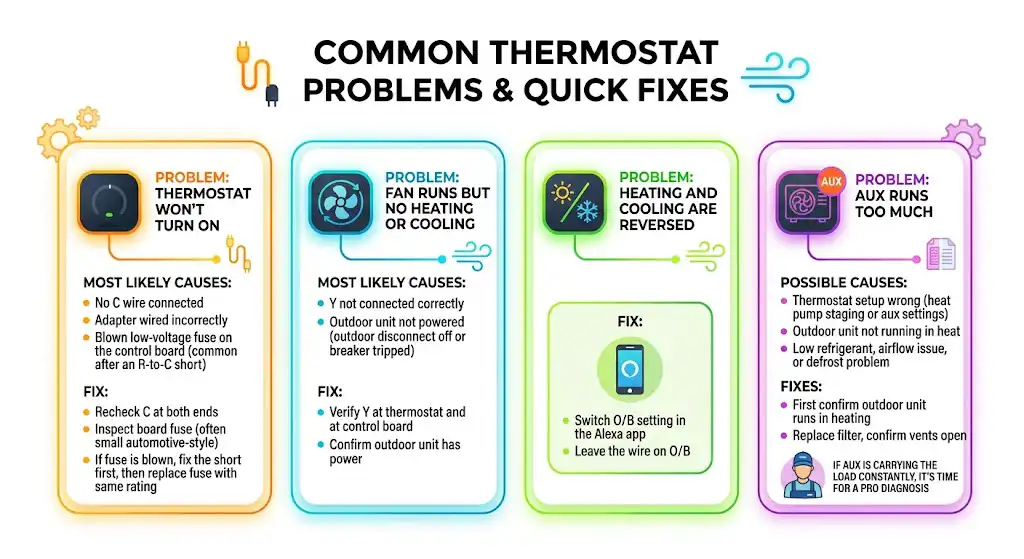
Problem: Thermostat won’t turn on
Most likely causes:
- No C wire connected
- Adapter wired incorrectly
- Blown low-voltage fuse on the control board (common after an R-to-C short)
Fix:
- Recheck C at both ends
- Inspect board fuse (often a small automotive-style fuse)
- If fuse is blown, fix the short first, then replace fuse with same rating
Problem: Fan runs but no heating or cooling
Most likely:
- Y not connected correctly
- Outdoor unit not powered (outdoor disconnect off or breaker tripped)
Fix:
- Verify Y at thermostat and at control board
- Confirm outdoor unit has power
Problem: Heating and cooling are reversed
Fix:
- Switch O/B setting in the Alexa app
- Leave the wire on O/B
Problem: AUX runs too much
Possible causes:
- Thermostat setup wrong (heat pump staging or aux settings)
- Outdoor unit not running in heat
- Low refrigerant, airflow issue, or defrost problem
Fix:
- First confirm outdoor unit runs in heating
- Replace filter, confirm vents open
- If AUX is carrying the load constantly, it’s time for a pro diagnosis
Know when to stop and call a pro
Call an HVAC technician or electrician if:
- You see thick 120V or 240V wires at the thermostat location (line-voltage thermostat)
- You’re not sure which wires are low voltage vs high voltage in the air handler
- The control board wiring diagram doesn’t match common heat pump layouts
- The thermostat swap caused the system to stop working and you suspect a blown fuse or board issue
A one-hour service call is cheaper than a fried control board.
FAQ
Does the Amazon Smart Thermat need a C wire?
Yes. In my experience, if you try to install it without a proper C or the correct adapter setup, you’ll end up with a blank display or unstable operation.
What does O/B do on a heat pump thermostat?
O/B controls the reversing valve. The wire lands on O/B, then you choose in the app whether your system energizes the valve in cooling (O) or heating (B).
My old thermostat has a wire on B. Is that the reversing valve or common?
It can be either depending on the equipment. That’s why I always verify at the air handler control board and its wiring diagram sticker. Don’t assume based on wire color or one letter alone.
Can I just move wires around if heating and cooling are backwards?
No. Keep the reversing valve wire on O/B and change the O/B configuration in the app.
Quick reference: old thermostat to Amazon Smart Thermostat mapping
| R, Rc, Rh | R | 24V power |
| C | C | Common (required) |
| Y, Y1 | Y | Compressor |
| G | G | Indoor fan |
| O, B, O/B | O/B | Reversing valve |
| AUX, W2 | W2/AUX | Auxiliary heat strips |
| E | E | Emergency heat |