
Hi I’m Nathan. I’ve worked as an HVAC technician for over 10 years, and sure my day job is heating and cooling, but I also end up spending a lot of time in peoples homes dealing with the real world issues that show up around those systems. Scratched glass comes up more than youd think, especially around windows, kitchen splashbacks, glass tabletops, and even induction hobs.
The good news is that a lot of glass scratches can be improved at home, and some can be removed fully. The tricky bit is using the right approach for the right kind of scratch, and also knowing when you’re about to make it worse rather than better.
In this guide i will tell you all you need to know.
- First: Understand What “Removing a Scratch” Really Means
- Quick Scratch Test: Light, Moderate, or Deep?
- Safety and “Do Not Do This” Notes (Please Read)
- Tools and Materials (What I Keep on Hand)
- Step 1: Clean the Glass Correctly (This Matters More Than People Think)
- DIY Methods to Repair Scratched Glass (From Mild to Strong)
- Method 1: Baking Soda Paste (best for light scratches)
- Method 2: Toothpaste (best for light scratches and small scuffs)
- Method 3: Metal Polish (only if it is non-abrasive)
- Method 4: Cerium Oxide Glass Polish (best DIY for moderate scratches)
- Optional “Cosmetic” Fix: Clear Nail Polish (fills, doesn’t truly remove)
- How to Repair Scratches on Specific Glass Surfaces
- How Long Does This Take and What Does It Cost?
- When Scratches Are a Bigger Problem Than They Look
- How to Prevent Scratches on Glass (What Actually Works)
- FAQ: Repairing Scratched Glass
- Final Advice (From Me to You)
First: Understand What “Removing a Scratch” Really Means
Most DIY “scratch removal” on glass is actually polishing. You’re not pulling the scratch out. You’re reducing how visible it is by smoothing the edges of the scratch and blending the surrounding area.
For deeper scratches, you might only manage to make them less noticeable. And if the glass has a special coating (pretty common on modern windows, and some shower glass), then aggressive polishing can permanently damage that layer.
Quick Scratch Test: Light, Moderate, or Deep?
Before you touch anything, clean the area and do this simple test.
The fingernail test (fastest way to judge depth)
- If your fingernail does not catch: usually a light surface scratch. DIY methods often work.
- If your nail slightly catches: moderate scratch. You’ll likely need a proper glass polish (cerium oxide).
- If your nail catches clearly or you feel a groove: deep scratch. DIY can make it worse. Consider a pro.
Scratch severity guide (use this table)
| Light | Hazy line, doesn’t catch nail | Baking soda or toothpaste polishing | Often good |
| Moderate | Visible line, nail lightly catches | Cerium oxide polish with felt pad | Good with patience |
| Deep | Groove, sharp edges, distortion | Professional polishing or replacement | Unreliable DIY |
Safety and “Do Not Do This” Notes (Please Read)

I’ve seen homeowners accidentally turn a small cosmetic issue into a replacement job. Here’s what I don’t want you to do.
Avoid these common mistakes
- Do not use regular sandpaper on glass.
- Do not use abrasive pads like green scrubbers.
- Do not use harsh pressure on tempered glass or induction hobs.
- Do not polish coated glass (Low-E window coatings, anti-glare coatings) unless you’re sure the scratch is on an uncoated surface.
Wear basic protection if you’re polishing
- Safety glasses
- Gloves
- A dust mask if using powders like cerium oxide
Tools and Materials (What I Keep on Hand)
Here’s the realistic, homeowner-friendly kit.
| Microfiber cloths | Prevent new micro-scratches | Use clean ones only |
| Glass cleaner or vinegar mix | Removes grit before polishing | Grit is what causes new scratches |
| Baking soda | Mild abrasive for light scratches | Mix into a paste |
| Non-gel toothpaste | Mild abrasive for light scratches | Whitening is often slightly more abrasive |
| Cerium oxide | Best DIY option for moderate scratches | Common pro polishing compound |
| Felt polishing pad | Works cerium oxide evenly | Hand pad or drill pad |
| Masking tape | Protects surrounding area | Especially on splashbacks |
| Distilled water | Prevents mineral spots | Nice to have, not required |
Step 1: Clean the Glass Correctly (This Matters More Than People Think)
If you polish over dust or sand, you can create a whole “constellation” of fine scratches.
My cleaning method (simple and safe)
- Rinse or wipe the area to remove loose grit.
- Spray glass cleaner (or use a 50/50 mix of white vinegar and water).
- Wipe with a clean microfiber cloth.
- Dry completely.
- Re-check the scratch from different angles with good lighting.
Tip from the field: I like using a flashlight held at an angle.
DIY Methods to Repair Scratched Glass (From Mild to Strong)
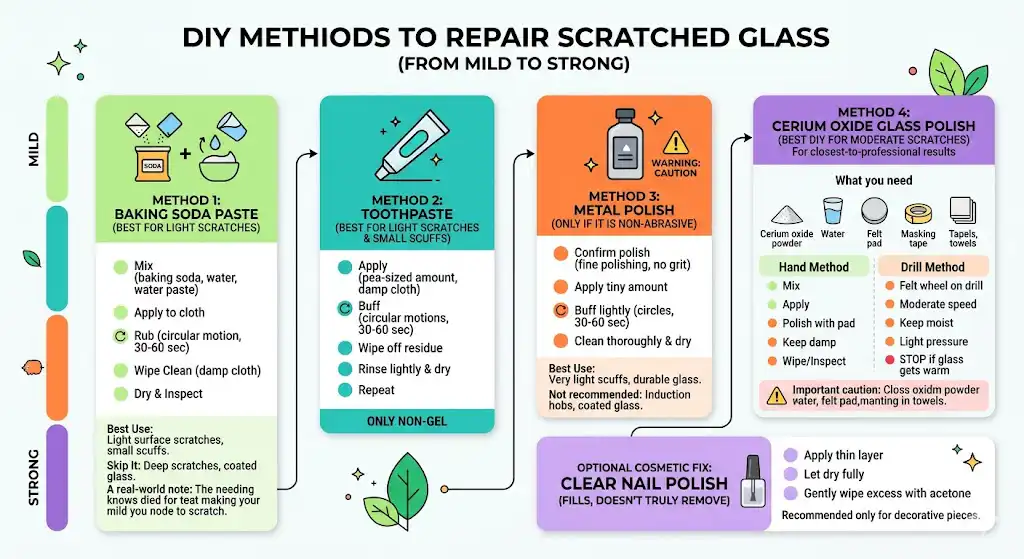
Method 1: Baking Soda Paste (best for light scratches)
This is my go-to “try first” method because it’s cheap and low risk.
What you’ll do
- Mix 2 parts baking soda with 1 part water to form a paste.
- Apply a small amount to a microfiber cloth.
- Rub the scratch gently in small circular motions for 30 to 60 seconds.
- Wipe clean with a damp cloth.
- Dry and inspect.
- Repeat up to 2 to 3 times.
When it works best
- Light surface scratches on windows and glass tables
- Small scuffs that show up in sunlight
When to skip it
- Deep scratches you can feel clearly
- Coated glass you’re unsure about
Method 2: Toothpaste (best for light scratches and small scuffs)
Use non-gel toothpaste. Gel toothpaste usually has little to no polishing effect.
Steps
- Put a pea-sized amount of toothpaste on a damp microfiber cloth.
- Buff the scratch in circular motions for 30 to 60 seconds.
- Wipe off residue.
- Rinse lightly and dry.
- Repeat if needed (don’t go crazy with pressure).
My real-world note
Method 3: Metal Polish (only if it is non-abrasive)
Some people have success with certain metal polishes, but this is where you have to be careful. If the product contains abrasive grit, you can make the glass hazy.
Steps
- Confirm the polish is meant for fine polishing (not heavy cutting).
- Apply a tiny amount to a cloth.
- Buff lightly in circles for 30 to 60 seconds.
- Clean thoroughly and dry.
Best use
- Very light scuffs on durable glass surfaces
Not recommended for
- Induction hobs
- Any coated or specialty glass
Method 4: Cerium Oxide Glass Polish (best DIY for moderate scratches)
This is the closest thing to “professional results” you can get at home for moderate scratches.
What cerium oxide does
It polishes glass by gently abrading and smoothing the surface, which can reduce scratch visibility dramatically.
What you need
- Cerium oxide powder
- Water
- Felt polishing pad (hand pad or drill attachment)
- Masking tape (optional)
- Microfiber towels
Steps (hand method)
- Mix cerium oxide with water until it forms a thin slurry (like runny paste).
- Apply slurry to the scratch.
- Using a felt pad, polish in small circular motions.
- Keep the surface damp so it doesn’t dry out.
- Wipe clean, rinse, dry, and inspect.
- Repeat as needed.
Steps (drill method, faster but riskier)
- Attach a felt polishing wheel to a drill.
- Keep drill speed moderate (too fast builds heat).
- Keep the area moist the entire time.
- Use light pressure and steady movement.
Important: Heat and pressure are what get people in trouble. If the glass gets warm, stop and let it cool.
Optional “Cosmetic” Fix: Clear Nail Polish (fills, doesn’t truly remove)
This can hide a fine scratch by filling it, but it’s not a true repair and may not hold up on surfaces that get cleaned often.
- Apply a thin layer over the scratch.
- Let it dry fully.
- Gently wipe excess with a cloth lightly dampened with acetone (avoid touching surrounding surfaces).
I only recommend this for decorative pieces, not kitchen glass or windows.
How to Repair Scratches on Specific Glass Surfaces

Scratched glass windows
Windows are tricky because many modern windows have coatings.
Best process
- Clean thoroughly.
- Identify whether it’s a standard pane, tempered glass, or coated glass (if unsure, treat as coated).
- Start with baking soda or toothpaste for light scratches.
- For moderate scratches, consider cerium oxide very cautiously.
When to call a pro for windows
- Deep scratches
- Double-pane windows where you’re unsure which side is coated
- Scratches across a large area (polishing can create distortion if uneven)
Scratched glass table tops
Glass tables scratch easily because people slide items across them.
My steps
- Sweep off crumbs and grit first (do not rub them around).
- Clean with glass cleaner and microfiber.
- Test your method on an inconspicuous corner.
- Use baking soda or toothpaste first.
- Move to cerium oxide if the scratch is moderate.
Tip: Mask off the area around the scratch so you don’t accidentally “polish a halo” into the glass.
Scratched glass screen protectors (phones, tablets, watches)
Most protectors have coatings, and polishing can damage them.
What I recommend
- For very light scratches, try toothpaste or baking soda using a cotton swab with extremely light pressure.
- If the scratch affects visibility or touch response, replacement is usually the smarter move.
Here’s the honest math: screen protectors are designed to be sacrificial. Polishing is rarely worth the time.
Scratched kitchen glass splashbacks
Splashbacks show everything because light hits them at eye level.
Steps
- Degrease first (kitchen oil film makes polishing less effective).
- Tape around the scratch to protect the surrounding glass.
- Use a light method first.
- If using cerium oxide, clean thoroughly afterward so no residue remains in a food area.
Scratched glass induction hobs
Induction hobs are a special case because they’re glass-ceramic and part of an electrical appliance.
What I’d do
- Make sure the hob is off and fully cool.
- Clean with a hob-safe cleaner and microfiber.
- Try toothpaste or a dedicated glass-ceramic hob polish.
- If scratches are deep, stop and consult a pro or the manufacturer.
How Long Does This Take and What Does It Cost?
Here’s what most homeowners can expect.
| Baking soda paste | 10 to 20 minutes | Very low | Light scratches |
| Toothpaste | 10 to 20 minutes | Low | Light scratches |
| Cerium oxide by hand | 30 to 90 minutes | Low to moderate | Moderate scratches |
| Cerium oxide with drill | 20 to 60 minutes | Moderate | Moderate scratches, larger areas |
| Professional polishing | 1 to 2 hours | Varies by area and glass type | Moderate to deep |
| Replacement | Half-day to full day | Highest | Deep damage, safety concerns |
When Scratches Are a Bigger Problem Than They Look
Can scratches weaken glass?
Yes, deep scratches can create a weak point, especially in glass exposed to:
- Temperature swings (sun on a cold pane)
- Mechanical stress (doors, hobs, balustrades)
- Impact risk (kids, pets, high traffic)
When replacement is the smarter choice
- A scratch is deep enough to catch your nail clearly.
- You see spreading cracks.
- The glass is safety-critical (shower doors, railings, large panes near walkways)
- You suspect you’ve damaged a coating and now have haze or distortion.
How to Prevent Scratches on Glass (What Actually Works)
These are the same habits I recommend to homeowners during service calls.
Cleaning habits that prevent scratches
- Use microfiber cloths only, washed without fabric softener.
- Rinse dust off first if possible (dust can contain mineral grit)
- Avoid paper towels if they leave lint or if you tend to press hard.
- Don’t clean glass in direct sunlight (the cleaner dries too fast, and you scrub harder)
Everyday prevention tips
- Use coasters and placemats on glass tables.
- Add felt pads to décor items that sit on glass.
- Never slide ceramic dishes, gritty planters, or metal décor across glass.
- For induction hobs, make sure pans have clean, smooth bottoms.
- Consider a protective film or table pad for high-use areas.
FAQ: Repairing Scratched Glass
Can sunlight make scratches look worse?
Yes. Angled light (especially direct sun) highlights surface defects and makes fine scratches stand out more.
Can improper cleaning cause scratches?
Absolutely. The most common cause I see is wiping dry dust with a cloth and applying pressure. That dust can act like sandpaper.
Will these methods work on tempered glass?
Light scratch methods can work, but tempered glass is not something you want to aggressively polish. If a scratch is deep on tempered glass, I recommend professional guidance.
Final Advice (From Me to You)
Start gently. Clean properly. Test a small area first. If you see improvement, keep going slowly. If you don’t see any change after a couple of attempts, don’t escalate into heavy pressure or aggressive abrasives. That’s how glass turns cloudy or warped-looking.


