I’m Nathan. I’ve worked as an HVAC technician for over 10 years, and while caulking isn’t “HVAC work,” I’ve spent a lot of time in bathrooms and basements seeing what moisture does to homes when water gets where it shouldn’t. A bad caulk line around a tub looks minor, but it can be the start of hidden rot, mold, and expensive repairs.
So let’s answer the question in a practical way.
- The short, honest answer
- Why the “dry time” matters as much as the install
- How long should caulk last once you do it right?
- Tools and materials (what I actually recommend)
- Step by step: exactly how I recaulk a tub (with time estimates)
- Step 1: Remove everything from the tub area (5 to 10 minutes)
- Step 2: Cut the edges of the old caulk (10 to 20 minutes)
- Step 3: Scrape out the old caulk completely (30 to 120 minutes)
- Step 4: Vacuum and deep-clean the joint (10 to 20 minutes)
- Step 5: Dry the area completely (30 minutes to overnight)
- Step 6: Optional but smart: fill the tub with water (2 minutes)
- Step 7: Tape your lines (10 to 20 minutes)
- Step 8: Cut the tip and run a continuous bead (10 to 20 minutes)
- Step 9: Tool the bead (smooth it) immediately (5 to 15 minutes)
- Step 10: Remove the tape (2 to 5 minutes)
- Step 11: Let it cure (at least 24 hours)
- The fastest realistic timeline (if everything goes well)
- Cost breakdown (what most homeowners spend)
- My best pro tips (the stuff that prevents failure)
- Mistakes I see all the time (so you can avoid them)
- When you should stop and call a pro
- FAQ
The short, honest answer
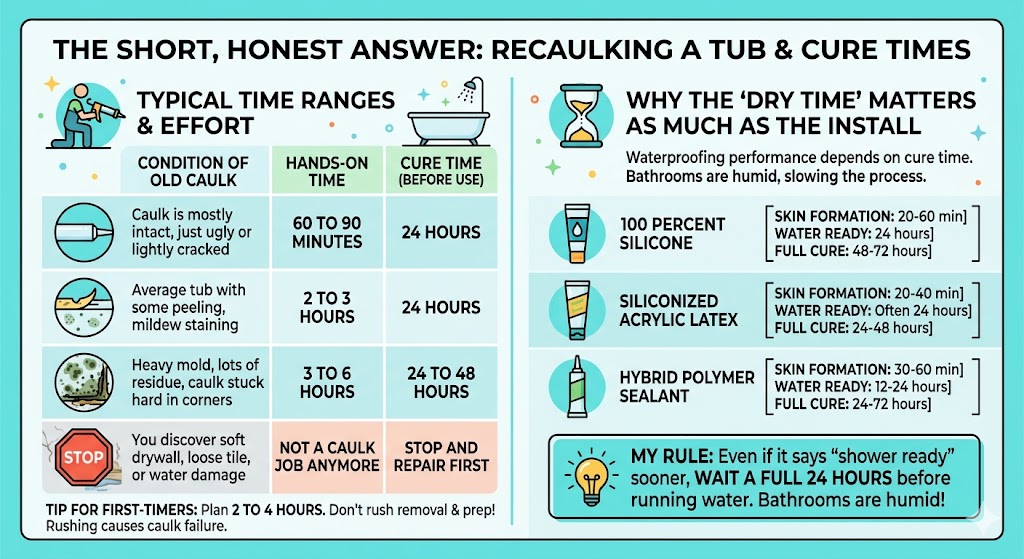
Recaulking a tub usually takes 1 to 3 hours of hands-on work, plus 24 hours of cure time before you use the shower or tub.
That said, the real time depends on how nasty the old caulk is and how much cleanup you need to do.
Typical time ranges (what I see most often)
| Caulk is mostly intact, just ugly or lightly cracked | 60 to 90 minutes | 24 hours |
| Average tub with some peeling, mildew staining | 2 to 3 hours | 24 hours |
| Heavy mold, lots of residue, caulk stuck hard in corners | 3 to 6 hours | 24 to 48 hours |
| You discover soft drywall, loose tile, or water damage | Not a caulk job anymore | Stop and repair first |
If you’re doing this for the first time, plan for 2 to 4 hours so you don’t rush the removal and prep. Rushing is what causes caulk failure.
Why the “dry time” matters as much as the install
Most people think the job is done when the bead looks smooth. In reality, the waterproofing performance depends on cure time.
Common cure times (read your tube, but this is a solid baseline)
| 100 percent silicone | 20 to 60 minutes | 24 hours | 48 to 72 hours |
| Siliconized acrylic latex | 20 to 40 minutes | Often 24 hours | 24 to 48 hours |
| Hybrid polymer sealant | 30 to 60 minutes | 12 to 24 hours | 24 to 72 hours |
My rule: even if it says “shower ready” sooner, I still recommend waiting a full 24 hours before running water on it. Bathrooms are humid, and humidity can slow curing.
How long should caulk last once you do it right?
If your caulk failed in under a year, that usually points to one of these:
- wrong caulk (not bathroom-rated)
- applied over old caulk or soap scum
- applied onto a damp surface
- The bead was too thin or separated because the tube flexed
Tools and materials (what I actually recommend)
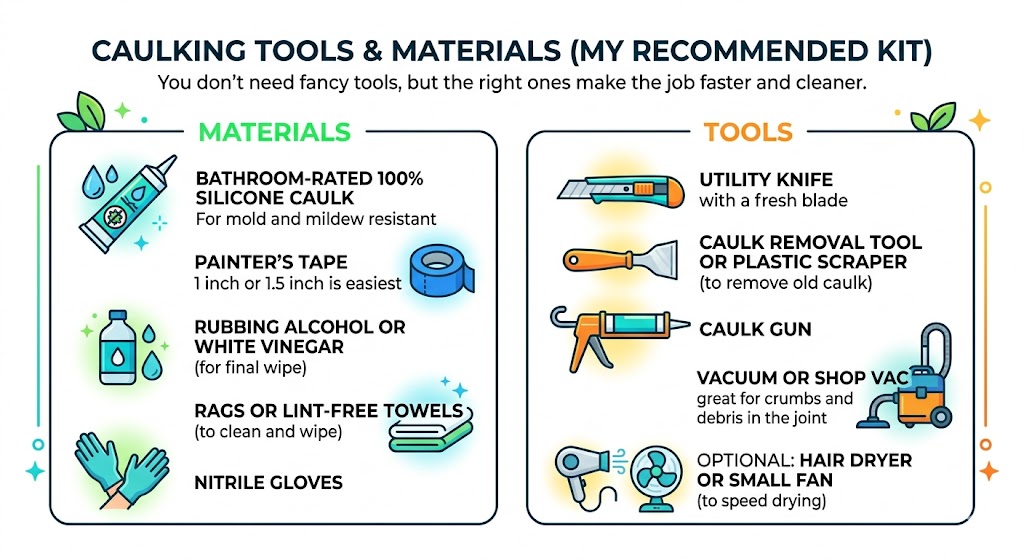
You don’t need fancy tools, but the right ones make the job faster and cleaner.
Materials
- Bathroom-rated 100 percent silicone caulk For mold and mildew resistant
- Painter’s tape, 1 inch or 1.5 inch is easiest
- Rubbing alcohol or white vinegar (for final wipe)
- Rags or lint-free towels
- Nitrile gloves
Tools
- Utility knife with a fresh blade
- Caulk removal tool or plastic scraper
- Caulk gun
- Vacuum or shop vac (great for crumbs and debris in the joint)
- Optional: hair dryer or small fan (to speed drying)
Step by step: exactly how I recaulk a tub (with time estimates)
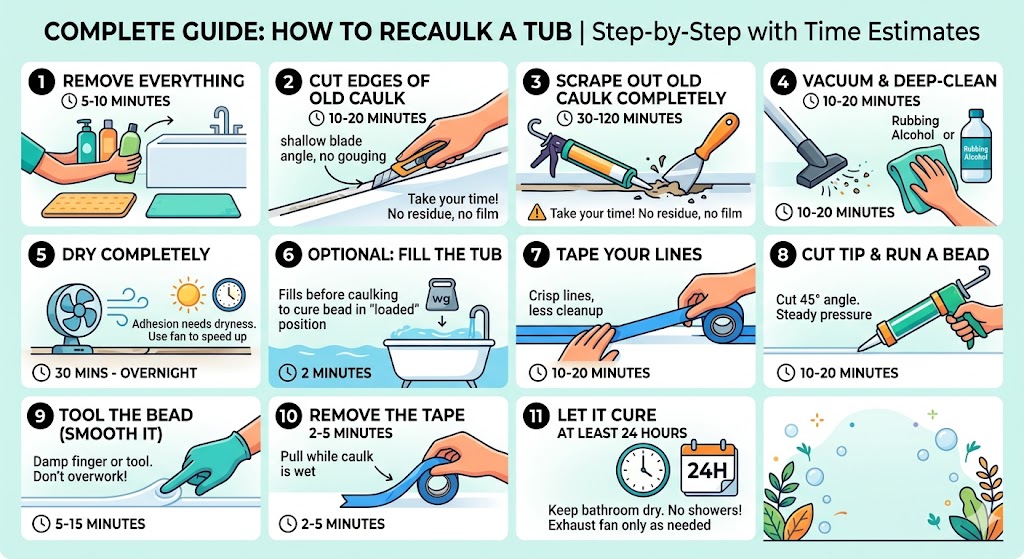
Step 1: Remove everything from the tub area (5 to 10 minutes)
Clear shampoo bottles, shower mats, and anything that will get in your way. You want space to work continuously around the tub.
Step 2: Cut the edges of the old caulk (10 to 20 minutes)
Use a utility knife to score along both sides of the caulk bead:
- where caulk meets the tub
- where caulk meets the tile or surround
Tip from my field experience: keep your blade angle shallow. The goal is to cut caulk, not gouge fiberglass or scratch a tub finish.
Step 3: Scrape out the old caulk completely (30 to 120 minutes)
This is the part that decides whether your new bead lasts.
Use a caulk removal tool or scraper and take your time. You want:
- no loose pieces
- no shiny silicone film
- no soft, moldy residue
Do not caulk over old caulk. New silicone does not reliably bond to old silicone, even if it looks “clean enough.”
Step 4: Vacuum and deep-clean the joint (10 to 20 minutes)
Vacuum the joint, then wipe it down.
Good options:
- Rubbing alcohol for final cleaning and residue removal
- White vinegar can help with mildew film on some surfaces
Step 5: Dry the area completely (30 minutes to overnight)
Dry time depends on your bathroom’s humidity.
- If your bathroom is dry and you wiped thoroughly, 30 to 60 minutes might be enough.
- If it’s humid or you have mildew, I prefer a few hours or overnight.
Step 6: Optional but smart: fill the tub with water (2 minutes)
Some DIYers skip this, but here’s why people do it:
A tub can flex slightly when filled and when a person stands in it. Filling it before caulking can help the bead cure in the “loaded” position, reducing the chance it stretches and separates later.
I don’t call this mandatory, but it’s a low-effort step that can help, especially on fiberglass tubs.
Step 7: Tape your lines (10 to 20 minutes)
Put painter’s tape on both sides of the joint, leaving the gap you want to fill.
A clean bead is usually around 1/8 inch wide (varies by your joint). Taping:
- makes the bead straighter
- keeps silicone off textured tile
- reduces cleanup time
Step 8: Cut the tip and run a continuous bead (10 to 20 minutes)
Cut the caulk tip at a 45-degree angle.
Start with a smaller opening. You can always cut more, but you can’t un-cut it.
Apply steady pressure and move at a consistent speed. You want the bead to be:
- continuous
- slightly proud (a little extra is fine)
- fully contacting both surfaces
Step 9: Tool the bead (smooth it) immediately (5 to 15 minutes)
You can use:
- a gloved finger lightly dampened
- a caulk tooling tool
- a damp paper towel
Important: do not overwork silicone. A couple clean passes beats ten messy passes.
Step 10: Remove the tape (2 to 5 minutes)
Pull the tape slowly while the caulk is still wet. That’s how you get crisp edges.
Step 11: Let it cure (at least 24 hours)
Keep the bathroom as dry as you can. No showers, no splashing, and ideally run your exhaust fan only as needed so you’re not pushing moisture into a bead that’s still curing.
The fastest realistic timeline (if everything goes well)
Here’s a time plan you can actually follow.
| Setup and prep | 10 minutes |
| Cut and remove old caulk | 45 to 90 minutes |
| Clean and vacuum | 15 minutes |
| Dry time before applying new caulk | 30 to 60 minutes (or longer if needed) |
| Tape, apply, tool, remove tape | 30 to 45 minutes |
| Total hands-on time | 2 to 3 hours |
| Cure time before using tub/shower | 24 hours |
Cost breakdown (what most homeowners spend)
| Bathroom 100 percent silicone (1 tube) | 8 to 15 |
| Caulk gun (if you don’t own one) | 8 to 20 |
| Caulk removal tool | 5 to 15 |
| Painter’s tape, rags, alcohol | 5 to 15 |
| Total DIY cost | 20 to 60 |
Most standard tubs use about 1 tube, but if your gaps are wide or you’re also doing vertical corners, having a second tube on hand prevents a mid-job scramble.
My best pro tips (the stuff that prevents failure)
- Spend your time on removal, not on fancy smoothing. Adhesion is everything.
- Use bathroom-rated silicone for wet zones. Acrylic is easier to tool, but silicone handles water better.
- Don’t caulk over damp surfaces. If you’re unsure, wait longer or use a fan.
- Keep the bead consistent. Stop-start lines are where leaks begin.
- Ventilation matters. If your bathroom fan is weak, caulk and grout will always struggle. Run the fan during and after showers.
Mistakes I see all the time (so you can avoid them)
- Applying new caulk over old caulk
- Skipping tape and then smearing silicone all over the tile texture
- Cutting the nozzle too big and laying a massive bead that’s hard to tool
- Showering “just once” after a few hours and ruining the cure
- Sealing over hidden mold without cleaning and drying first
When you should stop and call a pro
Recaulking is a good DIY project, but not if it’s covering up a bigger issue.
Call a pro if:
- The tile is loose or moving.
- The wall feels soft or swollen near the tub.
- You see water staining on the ceiling below the bathroom.
- mold smell persists even after cleaning
- The tub flexes a lot and keeps cracking the caulk.
FAQ
Can I use the shower the same day?
If you recaulked in the morning, plan on not using it until the next day. Most bathroom caulks need 24 hours before water exposure.
Why did my caulk turn yellow or get moldy?
Usually one of these:
The surface wasn’t fully cleaned.
The bathroom stays humid (fan issue)
The caulk wasn’t mold-resistant bathroom caulk.
The bead has gaps where water sits.
Is filling the tub with water really necessary?
Not always, but it can help reduce bead stress on flexible tubs. I do it when I can because it’s easy and it doesn’t hurt anything.