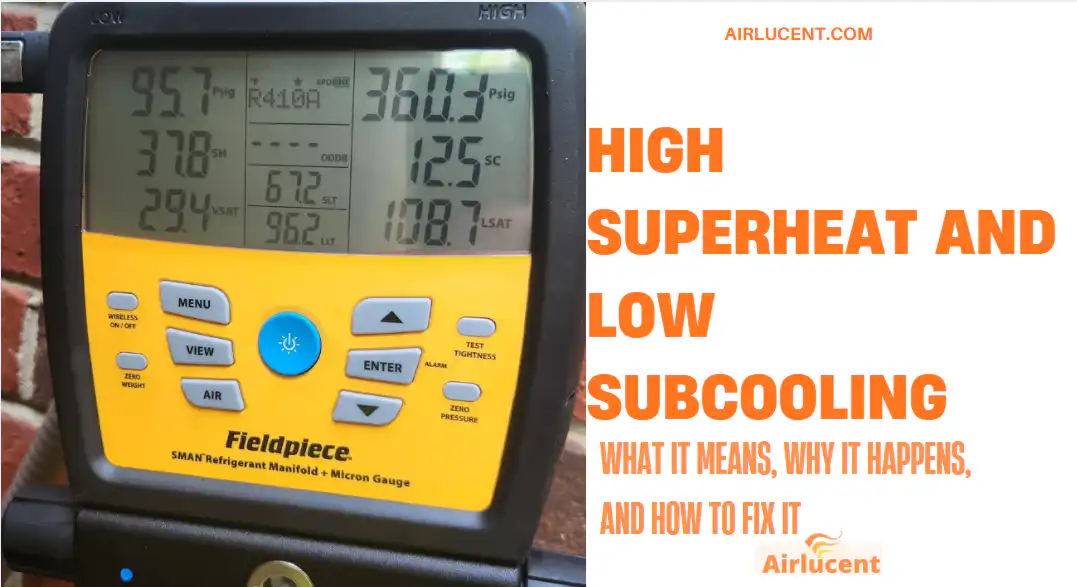
I’m Nathan. I’ve worked as an HVAC technician for over 10 years, and I’ve seen this exact combo show up on service calls more times than I can count: high superheat and low subcooling.
When those two readings show up together, the system is usually telling you one clear story:
The evaporator is being starved of refrigerant, and the condenser doesn’t have enough liquid backed up to build normal subcooling.
Most of the time that points to low refrigerant charge due to a leak or a feed problem (metering device/liquid line restriction). But you don’t want to guess. You want to prove it with a clean process.
This guide walks you through what the numbers mean, the most common causes, and a step-by-step troubleshooting workflow I personally use in the field.
Check your filter first (seriously)
Before gauges, before refrigerant conversations, check airflow basics. A surprising number of “refrigerant problems” are actually airflow problems.
Here are a few practical filter facts I tell homeowners:
| Common MERV range you’ll see on filters | 1–20 |
| Most homes do best with | MERV 8–13 (balances filtration + airflow) |
| Baseline replacement interval (EPA rule of thumb) | About every 90 days |
| Typical filter cost (the part itself) | $5–35 (depends on size and MERV) |
What I want you to do right now
- If the filter looks dirty, replace it, then re-check system performance.
- Make sure supply registers and return grilles aren’t blocked.
- If you upgraded to a very high MERV filter and airflow got worse, that can absolutely skew coil performance and readings.
Airflow issues don’t always create “high superheat + low subcooling” as a perfect pair, but they can confuse diagnostics and make a marginal system look worse.
What is superheat (in plain English)?
Superheat is how much hotter the refrigerant vapor is above its boiling temperature at the pressure it’s at.
Why superheat matters
Superheat is basically the safety buffer that helps ensure only vapor returns to the compressor. Liquid refrigerant returning to the compressor can cause serious damage.
Superheat formula (the quick version)
Superheat = suction line temperature – saturated suction temperature
You measure:
- Suction pressure (to get saturated suction temperature)
- Suction line temp (clamp thermometer near the evaporator outlet)
What is subcooling (in plain English)?
Subcooling is how much cooler the liquid refrigerant is below its condensing temperature leaving the condenser.
Why subcooling matters
Proper subcooling helps ensure you’re feeding the metering device with a solid column of liquid, not a mix of liquid and flash gas. That means better capacity and stable operation.
Subcooling formula (the quick version)
Subcooling = saturated condensing temperature – liquid line temperature
You measure:
- Liquid pressure (to get saturated condensing temperature)
- Liquid line temp (clamp thermometer on the liquid line leaving condenser)
What “high superheat + low subcooling” usually means
When I see high superheat and low subcooling at the same time, my first suspicion is:
Most common meaning: an underfed evaporator
- High superheat: not enough refrigerant boiling off in the evaporator, so the vapor gets extra hot by the time it leaves.
- Low subcooling: not enough refrigerant stored as liquid in the condenser to cool down below condensing temp.
That’s why many techs shorthand this as: undercharge until proven otherwise.
Typical target ranges (but don’t treat these like universal laws)
Targets depend on the system type (TXV vs fixed orifice), load, and manufacturer specs. Still, these are common ballparks I see in residential/light commercial when conditions are normal and the system is stable:
| Fixed orifice / piston (many older systems) | Often 8–20°F (varies with charts) | Often 5–15°F |
| TXV/EEV systems (common today) | Often 5–15°F | Often 8–15°F (many units call for 10–12°F) |
If you’re a homeowner: the key is not chasing a “magic number.” The key is understanding what direction the numbers point and confirming with proper diagnostics.
A quick example (so the math clicks)
Let’s say you’re working on an R-410A system:
- Suction pressure corresponds to 40°F saturation
- Suction line temp is 65°F
Superheat = 65 – 40 = 25°F (high)
Now the liquid side:
- Liquid pressure corresponds to 110°F saturation
- Liquid line temp is 108°F
Subcooling = 110 – 108 = 2°F (low)
That pattern screams: starved evaporator + not enough liquid reserve.
The most common causes (ranked by what I actually see in the field)
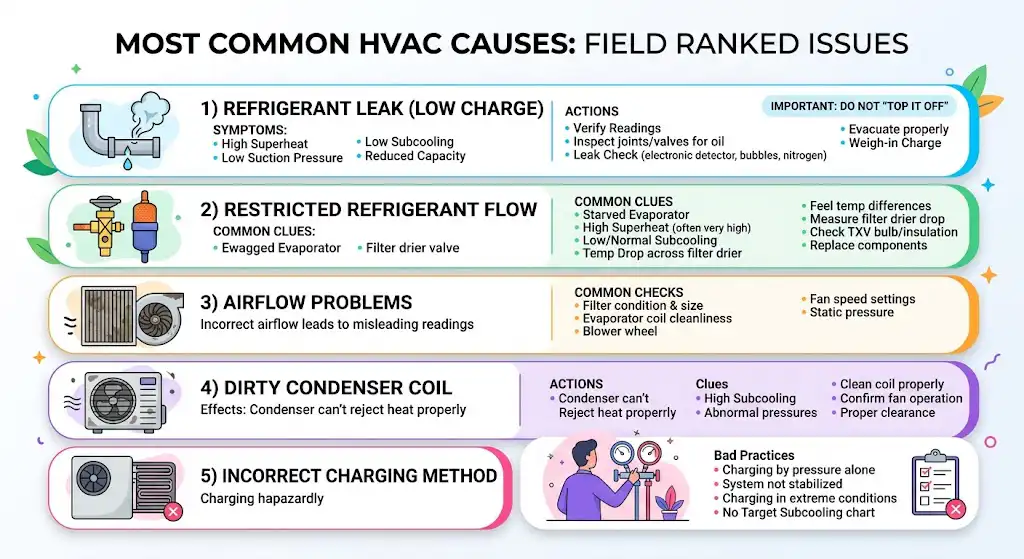
1) Refrigerant leak leading to low charge (the big one)
If refrigerant is leaking out, charge drops and you often end up with:
- High superheat
- Low subcooling
- Often low suction pressure
- Often reduced capacity and longer run times
What you might notice
- House won’t hit set temperature
- Coil may start to frost or freeze (especially if airflow is also weak)
- Compressor runs hot
What I do
- Verify readings under stable conditions
- Inspect for oil stains at joints, service valves, coil bends
- Leak check (electronic detector, bubbles, nitrogen pressure test depending on situation)
- Repair the leak
- Evacuate properly
- Weigh in the factory charge (and fine-tune if the unit requires it)
Important: Do not just “top it off.” If it’s low, there’s a reason.
2) Restricted refrigerant flow to the evaporator (metering device or liquid line issue)
A restricted TXV/EEV, clogged screen, kinked liquid line, or restricted filter drier can starve the evaporator.
Common clues
- High superheat (often very high)
- Low subcooling (can be low, sometimes can be normal depending on restriction location and severity)
- Temperature drop across filter drier (restriction indicator)
- Erratic TXV behavior or hunting
What I do
- Feel for abnormal temperature differences
- Measure temp drop across filter drier
- Check TXV bulb placement/insulation (TXV systems)
- Confirm charge is correct before condemning the valve
- Replace restricted components and evacuate properly
3) Airflow problems that confuse the diagnosis (dirty filter, dirty coil, blower issues)
Airflow issues more often drive low superheat in some cases and high superheat in others depending on system type and conditions. What I can tell you from experience is this:
If airflow is wrong, your refrigerant readings can be misleading.
Airflow checks I trust
- Filter condition and correct size
- Evaporator coil cleanliness (a dirty coil can be hidden under the plenum)
- Blower wheel cleanliness
- Correct fan speed settings
- Static pressure (best confirmation if you have the tools)
4) Dirty condenser coil or condenser airflow issue
This typically drives high subcooling more than low subcooling, but don’t skip it.
If the condenser can’t reject heat, pressures go abnormal, and your “low subcooling” may simply be a bad measurement condition or unstable operation.
What I do
- Clean the coil properly (not just rinsing the outside)
- Confirm condenser fan operation
- Confirm proper clearance around the unit
5) Incorrect charging method or wrong conditions during charging
I see this after bad installs or rushed service calls.
Examples:
- Charging by pressure alone (not valid)
- Not letting the system stabilize
- Charging during extreme indoor/outdoor conditions without using manufacturer guidance
- Not using target subcooling charts on TXV systems
Symptom-to-cause cheat sheet (fast direction, not a final diagnosis)
Use this as a guide to decide what to check next:
| High superheat + low subcooling | Undercharge/leak or restriction starving evaporator |
| High superheat + normal/high subcooling | Feeding issue (TXV underfeeding), airflow issue, or restriction depending on pattern |
| Low superheat + high subcooling | Often overcharge, or TXV overfeeding/flooding risk |
| Low suction + low head + high superheat + low subcooling | Very common low charge signature |
| Frosting at evaporator + low capacity | Could be low charge or airflow, confirm with measurements |
Tools you actually need to do this right
If you’re a technician (or you want to understand what your tech should be doing), these are the essentials:
- Digital manifold gauges (or accurate analog)
- Temperature clamps (fast response matters)
- Refrigerant PT chart/app for the refrigerant in the system
- Micron gauge and proper vacuum setup (for repairs)
- Leak detection tools (electronic detector, soap bubbles, nitrogen kit)
- Multimeter (fans, controls, contactors, sensors)
Step-by-step: how I troubleshoot high superheat and low subcooling
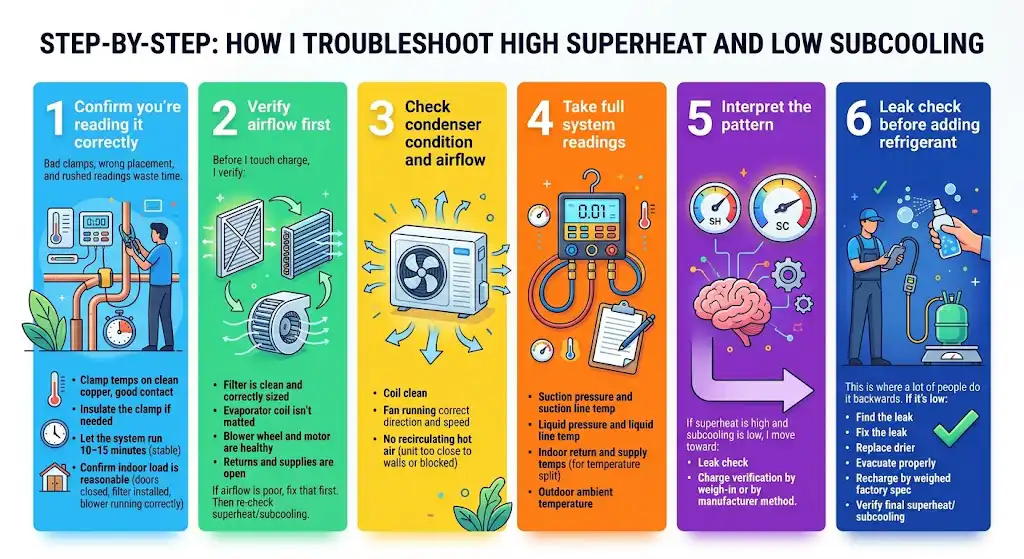
Step 1: Confirm you’re reading it correctly
Bad clamps, wrong placement, and rushed readings waste time.
- Clamp temps on clean copper, good contact
- Insulate the clamp if needed (especially on suction)
- Let the system run 10–15 minutes (or until stable)
- Confirm indoor load is reasonable (doors closed, filter installed, blower running correctly)
Step 2: Verify airflow first
Before I touch charge, I verify:
- Filter is clean and correctly sized
- Evaporator coil isn’t impacted or matted
- Blower wheel and motor are healthy
- Returns and supplies are open
If airflow is poor, fix that first. Then re-check superheat/subcooling.
Step 3: Check condenser condition and airflow
- Coil clean
- Fan running correct direction and speed
- No recirculating hot air (unit too close to walls or blocked)
Step 4: Take full system readings
Record:
- Suction pressure and suction line temp
- Liquid pressure and liquid line temp
- Indoor return and supply temps (for temperature split context)
- Outdoor ambient temperature
Step 5: Interpret the pattern
If superheat is high and subcooling is low, I move toward:
- Leak check
- Charge verification by weigh-in (after repair) or by manufacturer method
Step 6: Leak check before adding refrigerant
This is where a lot of people do it backwards.
If it’s low:
- Find the leak
- Fix the leak
- Replace drier if the system was opened
- Evacuate properly
- Recharge by weighed factory spec
- Verify final superheat/subcooling under stable conditions
How to fix it (what the fix usually looks like)
If it’s low charge due to a leak
- Locate leak (oil stains are a big clue)
- Repair (braze/replace coil/replace Schrader core, etc.)
- Evacuate with a micron gauge (don’t guess)
- Weigh in factory charge (data plate)
- Confirm with subcooling target (TXV) or superheat chart (fixed orifice)
If it’s a restriction starving the evaporator
- Confirm charge is not simply low
- Check drier temp drop and inspect liquid line for kinks
- Confirm TXV bulb placement and insulation
- Replace restricted component(s)
- Evacuate and recharge properly
- Re-check stability and final readings
If it’s airflow-related
- Replace filter (correct MERV for the system)
- Clean evaporator coil if impacted
- Confirm blower speed and static pressure (best practice)
- Re-test superheat/subcooling after airflow is corrected
Preventative maintenance that actually prevents this problem
This is what I recommend to homeowners who want fewer breakdowns:
Every 1–3 months
- Replace/inspect filter (don’t push it past ~90 days as a baseline)
Each cooling season
- Keep the outdoor unit clear (leaves, lint, grass clippings)
- Rinse condenser coil gently when needed (power off first)
Yearly (or twice yearly if you run it hard)
- Professional maintenance: coil inspection, drain check, electrical checks, blower condition
- Catch small refrigerant issues before they become compressor-killers
In my experience, small leaks often show up first as “it runs longer than it used to” before homeowners notice comfort problems.
When you should call a pro (and not keep experimenting)
Call a licensed HVAC tech if:
- You suspect a refrigerant leak
- The coil is freezing repeatedly
- You hear unusual compressor noises
- You’ve replaced the filter and cleared airflow issues but performance is still poor
Refrigerant handling isn’t just technical, it’s regulated, and the correct repair process matters for safety and reliability.
FAQs
What is the most common cause of high superheat and low subcooling?
In real-world service work, it’s most commonly low refrigerant charge from a leak. The evaporator gets starved and the condenser has little liquid reserve, so subcooling drops.
Can a dirty filter cause high superheat and low subcooling?
A dirty filter mainly causes airflow problems, which can distort readings and reduce capacity. It might not perfectly create that exact combination every time, but it’s easy to check and it affects everything, so I always start there.
What are “good” superheat and subcooling numbers?
It depends on the system and metering device, but many systems run roughly:
Superheat: 5–15°F
Subcooling: 10–15°F
Always prioritize the manufacturer target charts/data plate when available.
Should I just add refrigerant if subcooling is low?
No. If it’s low because the system leaked, adding refrigerant without fixing the leak is a temporary patch that usually turns into a bigger bill later. Confirm the cause first.
What happens if I ignore high superheat?
High superheat often means the compressor is running hotter than it should and cooling performance is reduced. Over time, that can contribute to oil breakdown, overheating, and compressor failure.
Bottom line
When you see high superheat and low subcooling, the system is usually telling you it’s not getting enough refrigerant flow through the evaporator. In my 10+ years in the field, the top causes are:
- Low charge from a refrigerant leak
- A restriction or metering device feed issue
- Airflow problems that muddy the diagnosis