Q: I went to turn on my pool heater, which is a Hayward model, but it flashes the LO code as seen in the image below. Can you help me fix this?
According to the Hayward Heater Manuel: The Hayward heater LO code indicates a fault in the temperature limit switch, vent pressure switch, or water pressure switch. To fix it, ensure the pump is on, is wired and connected well, the water flow is above the required minimum pressure, and the filters are clean. Replace defective switches.
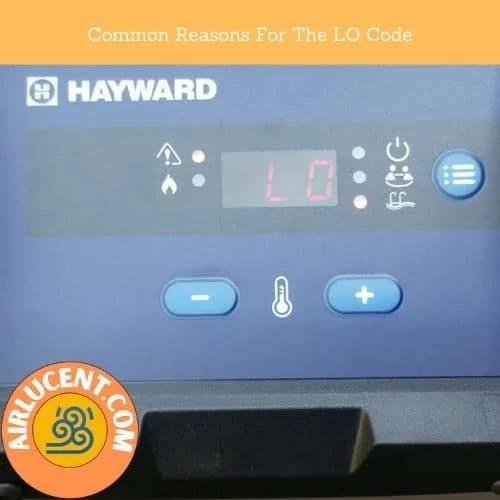
A: Would be glad to answer as I have worked on Hayward pool heaters for years and the LO code is one of the most common. This code is a ‘limit string open error,’ indicating that the limit string is open, causing your heater to shut down and go into lockout. Don’t worry, I’ll guide you through some steps to fix this. Remember, if you correct the error and the limit string closes, the heater should automatically restart within 2 minutes.
- 1. Check the Pump: First, ensure that your pump is on. The LO code often appears when the pump isn’t running or isn’t providing enough water flow. The pump needs to be wired and connected properly for optimal performance.
- 2. Water Flow: Your heater requires a certain minimum water pressure to operate correctly which is 20 GPM (H150FD & H200FD), 25 GPM (H250FD & H300FD), and 30 GPM (H350FD & H400FD).. If the water flow is too low, it can trigger the LO code. Check if the water flow is above the required minimum pressure. This can often be a simple fix.
- 3. Clean Filters: Dirty filters can restrict water flow, leading to the LO code. Make sure your filters are clean. Regular cleaning and maintenance of filters can prevent many common heater issues.
- 4. Switches Inspection: The LO code can also indicate a fault in the temperature limit switch, vent pressure switch, or water pressure switch. These switches are crucial for the safe operation of your heater. If any of these switches are defective, they need to be replaced.

Detailed Troubleshooting of the LO Code
There are a few culprits that might be causing this low water flow situation:
| LO code fault | Main fixes |
| Faulty water temperature switch | Turn on the water pump, ensure adequate flow and connections, clean filters, replace the water temperature switch if needed. |
| Faulty temperature limit switch | Ensure adequate flow, proper connection, replace the temperature limit switch if needed. |
| Faulty vent pressure switch | Ensure adequate flow and proper connection, and replace the vent pressure switch if needed. |
Maybe the pool pump decided it needed a vacation and isn’t running like it should. That’s your cue to check if it’s on and doing its job.
Debris can be a real party crasher, clogging up your skimmers and pump baskets. That’s like trying to sip a thick milkshake through a tiny straw—no fun for your heater.
A dirty filter is no friend of water flow. If your filter looks like it’s been through the wringer, it’s time to give it a good cleaning or replace it.
Each one of these can make your heater think it’s not getting the water it needs, triggering the safety-first ‘LO’ code. But guess what? Your heater’s got your back. By giving you the heads-up with the ‘LO’ code, it’s stopping potential damage and keeping your pool heating adventures safe.
In our upcoming chat, we’ll talk about the next step—safety first. We’ll make sure you’re prepped and ready to troubleshoot your heater without any whoopsies. Because while it’s great to be a hands-on homeowner, nobody wants to be a hands-burned one! So stay tuned as we gear up to ensure we’re all safety champions before we tackle that ‘LO’ code together.
Alrighty, now that we’re in the know about what’s behind that pesky ‘LO’ code on your Hayward heater, let’s talk about gearing up for some safe troubleshooting. Before you channel your inner handyman or handywoman, let’s make safety our top priority—because nothing dampens the DIY spirit like an unplanned trip to the emergency room. So, before you even think about poking around inside that heater, here are some iron-clad safety precautions to keep you as safe as a bug in a rug.
Turn Off the Power
First things first: power down, folks. And I don’t just mean flipping the switch to ‘off.’ Head on over to your breaker box and shut off the breaker that feeds power to your heater. This is your first line of defense against any unintended sparks or jolts of electricity. An accidental zap is no joke, and treating electricity with respect is rule number one in the DIY handbook.
Let It Cool
Patience is a virtue, especially when it comes to letting hot equipment cool down. Give your heater plenty of time to chill out after you’ve turned it off—because handling hot components is as sensible as grabbing a seat on a cactus. Let it sit for a while. Go have a coffee, catch up on some reading, or plan your next pool party. Just give it time to reach a temperature that won’t scorch your fingertips.
Grab the Right Tools
There’s a reason why that fancy toolbox you got as a birthday gift has all those compartments and gizmos—they’re meant to be used! Make sure you have the correct tools for the job: screwdrivers, wrenches, a multimeter, and maybe even those quirky-looking pliers you’ve never used before. Having the right tools not only makes the job easier but also keeps you safer. Using a butter knife as a screwdriver is not only a culinary crime but a shortcut to injury city.
Safety Gear is Your Friend
This isn’t a fashion show, but donning some safety gear will make you look smart—and keep you safe. Safety goggles are a must because flying debris is never a welcome surprise. Gloves are also a good idea to protect those hands that you need for, well, just about everything. And if you’re venturing into the realm of the electrically unknown, non-conductive gloves are your best pals.
Clear the Area
Now, we all love a cozy atmosphere, but the space around your heater isn’t the place for that fluffy poolside towel or the inflatable flamingo. Clear out any clutter or flammable materials from around the heater to avoid accidents. A tidy workspace is not only safer but also helps you keep track of your tools and the task at hand.
Know Your Limits
This might be the most important safety tip of all. If you peek inside that heater and feel more confused than a chameleon in a bag of Skittles, it might be time to call in the pros. There’s no shame in recognizing when a job is beyond your expertise. Some things are better left to those who troubleshoot these machines for a living.
Once you’ve got these safety bases covered, you’re ready to start those preliminary checks. We’re talking about making sure the simple stuff isn’t to blame for that ‘LO’ code before we dive into the nitty-gritty. Ensuring that the power supply is steady, looking for clear-as-day blockages, and double-checking the pump’s performance are all on the docket. So, let’s move on to these initial diagnostics with our safety checklist firmly in hand.
Alright, before we roll up our sleeves and dive into the heart of your heater woes, let’s tick off some basics. Think of this as the warm-up before the main event—skipping these steps would be like baking a cake without preheating the oven. Not gonna end well, friends.
So, you’ve got that LO code glaring at you, and you’re ready to troubleshoot, but let’s not jump the gun. Here’s a nifty little checklist to breeze through before we tackle the nitty-gritty:
Power Check 101
Your heater needs juice to do its thing, so first up is a power check. Is your heater plugged in and getting power? I know, I know, it’s the equivalent of “Did you try turning it off and on again?” but you’d be surprised how often the simplest answer is the right one. Look for any signs of life from the heater, any lights or sounds that indicate it’s powered up. No signs? Make your way to the breaker box and double-check that the circuit hasn’t tripped. If it has, flip it back and see if your heater springs to life. If not, keep it off for now—for safety’s sake.
Visual Inspection Round
Next, we play detective with a visual inspection. You’re looking for any signs of physical damage or wiring that’s gone rogue. Any exposed wires, burnt areas, or damage to the heater itself should raise red flags. If you find damage, this is where that safety advice about knowing your limits really comes into play. Messing with damaged electricals isn’t DIY territory; it’s time to phone a friend, and by friend, I mean a certified technician.
Are Blockages Visible?
Let’s tackle possible blockages. Leaves, debris, and who-knows-what-else can clog up the works and prevent your heater from getting the airflow it needs. Check the intake and exhaust vents—these guys should be free of obstructions to let your heater breathe easy.
Filter System Check-in
Now, this one’s a biggie—the filter system. This is like the heart of your pool’s circulation, and if it’s clogged, you’re going nowhere fast. Pop open those skimmer baskets and pump strainer baskets. Any gunk? Clean them out thoroughly. It’s like giving your pool a mini detox.
Flow Like a Pro
Water flow is like the lifeblood of your heater, so let’s make sure it’s flowing like a champion. Is your pump running as it should? If the pump isn’t on, that LO code is just doing its job—so flick that switch and get it humming. Keep an ear out for any weird noises or performance hiccups, because a happy pump means a happy heater.
Maintaining Water Flow
Don’t overlook the gauge on your filter; a high pressure is more than a number—it’s a warning. This could be impacting your heater’s performance and might signal issues like the LO code. Understanding and acting upon these signals are key to maintaining water flow in pools. This guide offers step-by-step pool heater troubleshooting advice to ensure your system runs smoothly.
Troubleshooting Steps:
- Check Your Pump: Verify it’s operating correctly. A consistent and robust flow is vital for avoiding common issues like the LO code.
- Inspect Skimmers and Strainer Baskets: Clear debris to ensure unimpeded water flow. A clean pathway significantly reduces the strain on your system.
- Monitor Filter Pressure: Normal pressure should be between 10 to 25 psi. High readings may indicate a blockage, a common culprit behind the LO code.
- Examine Multiport Valve: Incorrect settings can disrupt water flow. Ensure it’s properly set to “Filter” to maintain optimal circulation.
- Assess Flow and Pressure Switches: Regular checks can prevent the LO code by ensuring everything is functioning as it should.
- Clear Return Jets: Fully open and unobstructed jets are necessary for maintaining water flow in pools.
- Inspect the Heat Exchanger: Regular cleaning can prevent buildup that slows water flow and affects heater performance.
Preventive Maintenance: Consistently cleaning and checking your pool’s components can prevent common issues, including the LO code. Schedule regular maintenance and consult a professional for an annual system overview.
Safety First: Always prioritize safety by shutting down the system before doing any checks or maintenance. For persistent issues or complex setups, consulting professionals is recommended.
Maintaining water flow in pools is crucial for avoiding the LO code and ensuring efficient heater performance. By following these pool heater troubleshooting steps, you’ll keep your pool in prime condition. If the problem persists or you need guidance, don’t hesitate to contact a professional. Keep your pool party-ready with regular maintenance and stay tuned for more insightful pool care tips!
Inspecting and Testing the Pressure Switches
To resolve the LO code in your Hayward heater, focusing on the pressure switches is crucial. These components are pivotal for monitoring water pressure and ensuring your heater operates safely and efficiently.
Locating the Pressure Switches: Your heater has several pressure switches, including:
- Temperature Limit Switch: Prevents overheating by monitoring water temperature, usually located near the heated water outlet.
- Vent Pressure Switch: Ensures clear venting and is found near the heater’s vent pipes.
- Water Pressure Switch: Often the primary suspect for LO codes, it monitors the water flow and is located near the water inlet.
Safety First: Always turn off the power before inspecting any parts of the heater.
Inspecting the Pressure Switches: Visually check each switch for damage or corrosion. Ensure connections are secure and free of any signs of wear.
Testing the Pressure Switches:
- Temperature Limit Switch: Disconnect wires and use a multimeter to check for continuity.
- Vent Pressure Switch: Remove wires and test for a closed circuit, indicating clear venting.
- Water Pressure Switch: Disconnect and test for continuity to confirm adequate water pressure.
Adjusting and Replacing Faulty Pressure Switches:
If a switch is faulty or overly sensitive, it may need adjusting or replacing. For adjustments, tweak the pressure switch’s screw while monitoring the heater’s response. For replacements, ensure the new switch matches the specifications of the old one, and install it securely.
By carefully inspecting, testing, and, if necessary, adjusting or replacing the pressure switches, you’re taking a significant step towards fixing the LO code and maintaining water flow in your pool. Remember, while DIY can be rewarding, always prioritize safety and consult professionals for complex issues or if you’re unsure about the process.
Have a question about pool heaters? Airlucent owner Tim David would like to answer your question in an upcoming article, call (256) 399-9708 or contact David via the contact page.
Other Hayward Heater Error Code Fix Guides: