Winter is on its way. But this time you don’t want to go for a bank-breaking gas furnace to enjoy the warmth.
Well..well, it’s an outdoor wood furnace that some people suggest. But is it warm (and safe) enough?
The truth is, if you can keep the smoke and fire danger away, this is a smart way to stay warm without breaking the bank.
There are factory-made furnaces that you can purchase for a few thousand bucks. But, moving into the more cost-effective zone, you can make your DIY outdoor wood furnace yourself.
Either way, it might sound adventurous, but we all know making that happen is not as easy as it sounds. If you are not that determined you can hire an expensive handyman to do it for you.
But if you want to learn how to do it yourself, well, my friend, I’ve crafted this entire post exactly for people like you. This covers EVERY single thing you need to know and learn before you go and build your own outdoor wood furnace this winter.
Warning: it’s a 4000+ words post. And it’s full of technical details. So take enough time to read it thoroughly, or bookmark it so you can access it later.
DIY Outdoor Furnace: The Basic Knowhow
First, an outdoor wood furnace is different from an outdoor wood boiler or an outdoor wood stove. Even Google itself provides confusing results among these three things.
For the record, we are going to deal with a forced-air outdoor wood furnace only, not a boiler, not a stove. I have separateguides on how to install an indoor furnace here and reviews on Drolet Wood Stoves here.
How Does An Outdoor Forced-Air Wood Furnace Work?
An outdoor wood furnace is driven by a method called ‘forced-air’ heat transfer. Air that’s heated by the heat of a wood-burnt fire, is forced through the ducting into your home’s ducting system.
Based on the temperature level, this process keeps repetitively taking place. For example- it runs for 20 minutes and shuts off for another 20 minutes until the temperature is cold enough over again.
To keep it running, you’ve to ensure a regular supply of firewood- the fuel. As an obvious consequence, there will be smoke, ashes, fumes, etc.
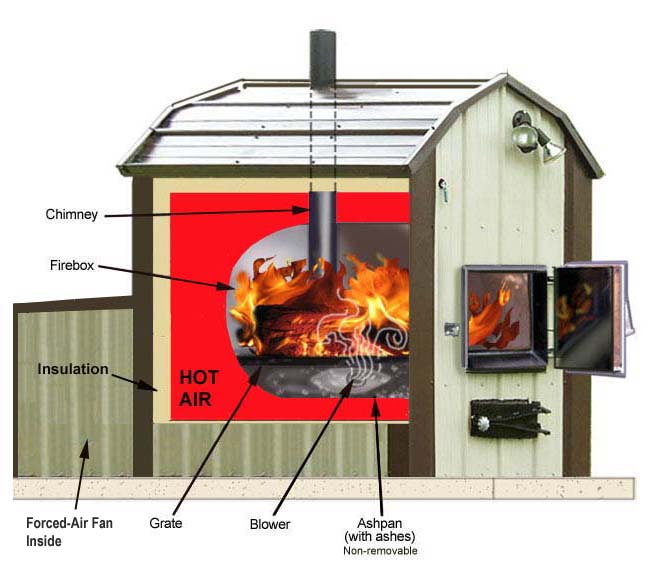
The 5 major parts of this outdoor furnace are-
- Firebox.
- Hot air chamber.
- Chimney.
- Ducting.
- Ducting fan.
The firebox is made of tough steel, and it’s made leak-proof by flat slabs(welded). And the same goes for the rest of the ducting. Both supply air(hot) and return air(cool) are required not to be exposed to the environment by any means.
Benefits of Using A Forced-Air Outdoor Furnace
Simply put- there are a handful of perks that outdoor wood has over indoor gas furnaces. I’ve put together a list of them all:
- It runs on wood- the most practical form of renewable energy.
- Consumes way less electricity compared to ones that burn oil/gas.
- The overall (installation+fuel) cost is way cheaper and more available.
- Don’t bother your home with smoke, ash, dirt, and the overall fire risk (yes, it exists!).
- Easier to maintain and troubleshoot than complex gas furnaces.
Optimal Placement of an Outdoor Wood Furnace

When embarking on the installation of an outdoor wood furnace, one critical decision is its placement. Through my own experience, I’ve found that the ideal installation distance is within 10 feet of the house or structure being heated.
This proximity is essential for efficiency, as it allows the air, which travels directly through the duct rather than an insulated underground path, to retain more heat due to the shorter distance.
However, with proximity comes the challenge of smoke management. From my trials, I learned that extending the chimney height is key. Aim for a height that prevents smoke from becoming a nuisance to you or your neighbors.
This could vary depending on your location, but the goal is to keep the smoke well away from living spaces. Remember, proper chimney height not only respects your comfort but also that of those around you.
Finally, let’s talk about duct alignment. Whether connecting the furnace to your home through an underground garage window or a ceiling port, it’s crucial to ensure a direct and unobstructed path from the furnace to the house ducting.
This setup is pivotal for maximizing heat transfer and efficiency. In my project, ensuring a straight path for the ducting significantly improved the furnace’s performance.
Essential Considerations for DIY Outdoor Wood Furnace
Embarking on a DIY outdoor wood furnace project requires a clear understanding of what to expect and the skills you’ll need. Let’s set realistic expectations and outline the necessary skills for this undertaking.
Setting Expectations Correctly
Firstly, it’s crucial to recognize that outdoor wood furnaces are not the pinnacle of energy efficiency. Based on my experience and industry standards, you can expect an efficiency range of 50-80%, which is on par with commercially available models.
Additionally, unlike their indoor or gas counterparts, outdoor wood furnaces produce smoke and fumes. Proper smoke and fume management is key to avoid inconveniencing your neighbors. I learned this the hard way and had to adjust my setup for better fume routing.
Skills Required for DIY Installation
If you’re planning to install the furnace without professional help, you’ll need to be adept in several areas. And if you’re building the furnace from scratch, that’s an even more complex challenge.
Based on my journey in building and installing my own furnace, here are the skills you would need for a successful outcome:
- Welding: This is crucial for assembling the furnace parts securely.
- Electrical Wiring: Essential for setting up the furnace controls and connections.
- Metal Sheet Cutting: Needed for fabricating the furnace body and components.
- Trench Cutting: Important for installing underground ducts, if required.
- Ducting Installation and Insulation: Key for efficient heat distribution.
- Firewood Cutting: Essential for preparing your fuel supply.
Pro Tip: Don’t underestimate the complexity of these tasks. Each skill requires a level of proficiency to ensure safety and efficiency. I recommend practicing these skills on smaller projects before starting your furnace build.
Tim David, Airlucent
Installing An Outdoor Wood Furnace
Creating your own outdoor wood furnace can be more straightforward than it seems. While there are various methods, I’ll guide you through a simple yet effective DIY process. This basic design will resemble a steel box within another but will fulfill all fundamental furnace functions.
Things You Will Need
- ½ inches of steel sheet roll.
- Sheet metal cutter.
- Stainless steel Hinges.
- MIG/TIG welding machine.
- Ducting(8”) and ducting accessories(collar, clamp etc).
- 8” Duct Fan.
Steps of Making A Simple DIY Outdoor Furnace
Step 1: Cut the Boxes
Construct the Boxes:

- Outer Box: Cut three pieces of ½” steel for the base, with the sides and back extending 1-2 inches for seam creation.
- Inner Box (Firebox): Choose a round or rectangular shape, ensuring an 8-12 inch gap between the top of the outer box and the firebox for air heating. The firebox should be 20-24 inches in length and width (or diameter if round).
Step 2: Make The Door

Based on whether the firebox is circular or square, the shape of the door will be determined. While you’re cutting the door hole, be careful enough to make it a smooth one.
The cut-out portion from the door hole should be added up with a ½” steel sheet with at least 1” extension than the size of the door-cut sheet.
As the door will be installed on hinges, you need to cut out two steel blocks for that one too. If you want, you can install the hinges on the door as well.
Step 3: Create Holes on The Top

On both the inside and outside boxes, you need to create holes to pass the air away.
The insider box will contain one home of 8” diameter, and the outsider box will contain two holes of 8” diameter each.
Make sure the insider 8” hole is in perfect alignment with one on the outer box. This will drive the fumes and smoke away from the firebox.
Step 4: Add the Legs On The Bottom

To support the furnace on the ground, it’s better to stand it on 4 metal legs. They can be added on each corner of the bottom but with a fair distance of 1-3” from the edge.
Once you’ve got the legs prepared, weld them up to the bottom with the help of an experienced welder(if you’re not one).
Step 5: Weld Up The Seams

This is the step where you’ll need serious welding skills. The most common form of welding done in such cases is MIG welding or gas metal arc welding. You can also apply TIG(tungsten inert gas) welding here.
No matter which way you go, make sure the seams are all welded up perfectly.
Step 6: Do The Ductwork
Remember we created one 8” hole on the insider box and 2 similar holes on the outer ones? If you do, you might also recall that 1 hole from each of the boxes is in alignment.
Well, this line-up will take the fire smoke and fumes away. Add an 8” ducting from the inside box through the hole on the outer box. Make sure it’s leak-proof.
Next, add another 8” ducting on the second hole of the outer box. This will take the hot air to your home duct. To make it move the air better, add an in-line duct fan of 8” diameter to put the hole when needed.
Step 7: Build the Wood Rack
To let the wood burn well inside the firebox, you need to build a rack for them. The rack will be 2” tall from the bottom of the firebox, and a little bit shorter than the width of it in order to make it a perfect fit.
The 2” gap between the rack and the firebox will contain mostly the ashes from burnt wood.
Steps For Building A Wood Shed

No matter if you have installed a ready-to-install wood furnace or built one yourself, one thing you’d need in common is firewood storage.
Depending on how bad the winter is, the amount of firewood might vary from year to year. But usually, it’s a smart idea to store one year(winter) worth of firewood for your outdoor furnace.
Now, where and how would you install it for maximum usability?
Step 1: Collect the Materials and Tools
First thing first, we’ve to collect the wood and other materials.
For different positions, the size has to be different. But the best kind is “treated pine wood”.
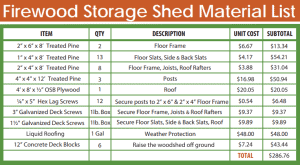
Here are the sizes of treated pine wood-
- For the floor frame: 2”x 6”x 8’ treated pine.
- For the floor, back, and side slats: 1”x4”x” 8’treated pine.
- For the floor frame, roof rafters, and joists: 2”x4”x”8’ treated pine.
- For the posts: 4”x4”x”12’ treated pine.
Among other materials, these are compulsory-
- Roof: OSB plywood of 4’x8’x1/2”.
- Screws: ¼”x5” hex screws, 3” deck screws, 1-½” deck screws.
- Liquid Roofing: 1 gallon.
- Deck bolts: 12” concrete deck screws
Apart from them all, you’ll also need some tools and gear.
- Ladder.
- Saw.
- Level.
- Measuring tape.
- Triangle square.
- Drill machine with ¼” driver.
- Brush.
- Protective gear
Step 2: Cut and Stain The Wood
We’ve provided sizes for a wood store that can contain about 1 cord of wood. In case you want to customize it, you’re welcome to do it anyway.
As these woods will dry eventually, if not coated with protection, they might rot as well. Therefore, we’ll apply a stain on them.
You can get along with oil-based stains available in the market. In the absence of those, you can use a natural stain as well.
On the other hand, using a ball of steel wool soaked in apple cider vinegar will provide a rich, brown stain on the wood.
Step 3: Build the Side Panels
The side panels need to be supported with cross supports that connect through pilot holes to the posts. On top of them, the slats are installed and built as the side supports.
Connect the supports and side panels well with screws, adhesive, etc.
Step 4: Set the Footings for The Walls and Base
The base is built on the footings/piers. Without installing these, building a strong structure is quite hard.
Therefore, set the four corner footings and make sure the distances go well with the lengths of your pinewood slats.
Once the piers are set, raise the walls on them. Also, set the floor right on the set of footings.
Step 5: Add the Beams, Posts, and Joists
It’s time to strengthen the structure with the supports of joists, posts, and beams. We believe you have them ready to install by now.
To fasten them, you’ve to use joist hangers, nails(16d), and deck screws.
Step 6: Install The Roof
For this project, we’ve taken the roof as a plywood-made one. To provide them further strength, you can use rafters and connect them to the beams.
Use screws along with a rubber gasket to strengthen the structure of the roof, as it’ll be the major layer of protection to the wood inside. If you want, you can also add a couple of diagonal braces to the posts.
Are Outdoor Wood Furnaces Worth the Money?

YES! These are some of the most inexpensive ways to heat an area once they are in place.
Don’t believe me? Keep reading 🙂
Cost of Outdoor Wood Furnace vs Indoor Gas Furnace
The costs of an outdoor wood furnace come in two parts:
- The constructional cost.
- The fuel (wood) cost.
The Constructional Costs
The construction cost widely depends on how big of a furnace you’re building. If you’d like to stay within budget, it’d take about $700-1200 to set the whole thing up. In case you’d like to move towards a higher end of built quality, it can go as high as $1500-2000.
If the furnace is ready-made, the construction cost will be a bit less because several items will be in the package. Other stuff might cost about $300-400 at best.
However, there is another construction cost, and that’s for the woodshed. Based on the instructions we’ve provided before, the cost of that can be around $200-300.
The Fuel Cost
The fuel cost is, however, the only ongoing cost on this list. And it is quite dependent on the weather and the size of the home space you’re heating. From an average point of view, it takes about $1300-1500 of firewood to feed the furnace for an entire winter.
Total Outdoor Wood Furnace Cost-
- Average cost of DIY Furnace Construction(w/ setup): $700-2000
- Average cost of Ready-made Furnace(w/ setup): $1500-2000
- Average cost of firewood store: $200-300
- Average Fuel Cost: $1300-1500/year
Costs for an indoor furnace
Installing a good quality indoor furnace would cost around $3,000 – $8,000. This usually includes the setup costs, as the setup is usually done on behalf of the manufacturer.
What about fuel?
A house that is heated by a gas(propane) furnace would cost about $500-700 of propane in a month.
- Average cost of indoor gas furnace(w/ setup): $3000-8000
- Average Fuel Cost: $2000-3000/year
- Average Utility Bill: $300-500/year
The verdict?
An outdoor wood furnace is a clear winner regarding cost-effectiveness.
Outdoor Wood Furnace vs Indoor Gas Furnace – Main Differences
As we have been through the steps on DIY outdoor wood furnaces, we are missing some of the perks that modern gas furnaces would bring in.
In this section, we want to acknowledge the differences between these two and get prepared for what it
| Point | Outdoor Wood Furnace | Indoor Gas Furnace |
| Fuel | Firewood | Propane Gas |
| Accessibility | Single/Multiple Houses | Single House |
| Cost(Furnace) | $700-2000 | $3000-8000 |
| Urban-friendly | No | Yes |
| Efficiency | 50-80% | 75-90% |
Bottom Line
As we come to the end of our guide on installing an outdoor wood furnace, whether DIY or factory-made, I hope you feel equipped and inspired to embark on this rewarding project. Remember, the warmth and comfort of your home during those chilly months can be greatly enhanced with a well-installed outdoor furnace.
Building or installing an outdoor wood furnace is a challenging but fulfilling endeavor. It’s a journey of learning, skill enhancement, and ultimately, creating a warm haven for yourself and your loved ones.
Your Turn to Share:
I’d love to hear about your experiences. Whether you’re planning to start this project, are in the midst of it, or have already completed it, your stories and insights can be incredibly valuable to others embarking on the same journey.