

I am Nathan. I have worked as an HVAC technician for over 10 years, and Carrier furnace code 34 is one of those faults I see a lot when the weather turns cold and furnaces start cycling hard.
If your Carrier furnace is flashing code 34, it usually means the furnace tried to light the burners but the control board did not “prove” the flame. In plain English, the furnace believes gas is flowing and ignition is happening, but the system cannot confirm a stable flame, so it shuts the gas off for safety.
Most Carrier furnaces will retry ignition several times. If it fails enough times, it often ends up in code 14, which is an ignition lockout on many models.
This guide walks you through what code 34 means, the most common causes, the fastest fixes, and when it is time to stop and call a professional.
- What Does Carrier Furnace Code 34 Mean?
- Quick Symptoms Checklist (So You Know You Are Diagnosing the Right Problem)
- The Most Common Causes of Code 34 (Real World Ranking)
- Before You Touch Anything: Safety First
- Tools That Make This Much Easier
- Step by Step Troubleshooting for Carrier Code 34
- Step 1: Reset the Furnace the Right Way
- Step 2: Watch One Full Ignition Cycle (This Tells You Everything)
- What the pattern usually means
- Step 3: Clean the Flame Sensor (Best First Fix)
- What the flame sensor does
- How to clean it
- My field note
- Step 4: Check Grounding and Flame Sensor Wiring (This Is the Sneaky One)
- Step 5: Test Flame Sensor Signal (Microamps) If You Want a Real Answer
- Step 6: Inspect the Hot Surface Igniter (HSI)
- Visual check
- Continuity check (recommended)
- Step 7: Verify Gas Supply (Do the Obvious Checks First)
- Step 8: Gas Valve Electrical Check (Do This Carefully)
- How to interpret it
- Step 9: Check Venting and Pressure Switch System (Especially on High Efficiency Furnaces)
- Step 10: When It Is the Control Board
- Carrier Code 34 and Code 14 Together (What It Means)
- Helpful Numbers and Practical Expectations
- When You Should Stop DIY and Call a Technician
- My Final Take (Nathan’s Field Advice)
What Does Carrier Furnace Code 34 Mean?
On most Carrier units, code 34 = ignition proving failure (sometimes described as “ignition fault” or “flame not sensed”).
What typically happens is:
- Thermostat calls for heat
- Inducer motor starts
- Pressure switch closes
- Igniter heats up (hot surface igniter)
- Gas valve opens and burners light
- Flame sensor is supposed to detect flame using flame rectification
If the furnace fails several tries, many Carrier boards move to hard lockout, commonly code 14.
Important note: On a small number of Carrier high efficiency models, some people see code 34 tied to pressure switch or venting restrictions. That is why I include venting and pressure switch checks in this guide as well.
Quick Symptoms Checklist (So You Know You Are Diagnosing the Right Problem)
You will usually notice one or more of these:
- Furnace starts, you hear the inducer, then it stops and retries
- Igniter glows, burners light briefly, then shut off
- Furnace runs for a few seconds and then cycles
- Blower may run with no heat
- Eventually the system locks out (often code 14)
The Most Common Causes of Code 34 (Real World Ranking)
Based on what I see most often on service calls, here is the general order:
| Dirty flame sensor | Burners light then shut off within a few seconds | Easy DIY |
| Poor grounding or loose connections | Random flame sensing issues, intermittent | Medium |
| Weak or cracked hot surface igniter | No ignition, or ignition is inconsistent | Medium |
| Gas supply issue (low pressure, valve partially closed) | Igniter glows but burners do not light reliably | Medium to Pro |
| Failing gas valve | 24 volts present but valve not opening properly | Pro |
| Control board issue | Erratic sequence, no proper outputs | Pro |
| Venting or pressure switch problem (some models) | Inducer runs, pressure switch does not prove, ignition may not complete | Medium |
A simple flame sensor cleaning fixes a large portion of code 34 calls I run. Not all of them. But it is the best first step because it is fast, safe, and cheap.
Before You Touch Anything: Safety First
You are working around electricity, hot surfaces, and fuel gas.
- Turn off power at the furnace switch or breaker before removing panels
- If you smell gas, do not troubleshoot. Leave the home and call your gas utility or a licensed technician
- If your carbon monoxide alarms are chirping or alarming, stop and address that immediately
- If you are not comfortable using a meter, do not guess on gas valve testing
Tools That Make This Much Easier
| Nut driver set or screwdriver | Access panels, flame sensor screw |
| Fine emery cloth or fine steel wool | Cleaning flame sensor rod |
| Multimeter | Checking voltage and igniter continuity |
| Microamp meter (or multimeter with microamp capability in series) | Testing flame sensor signal properly |
| Flashlight | Seeing burner flame and components |
If you only have basic tools, you can still do the flame sensor cleaning and visual checks.
Step by Step Troubleshooting for Carrier Code 34
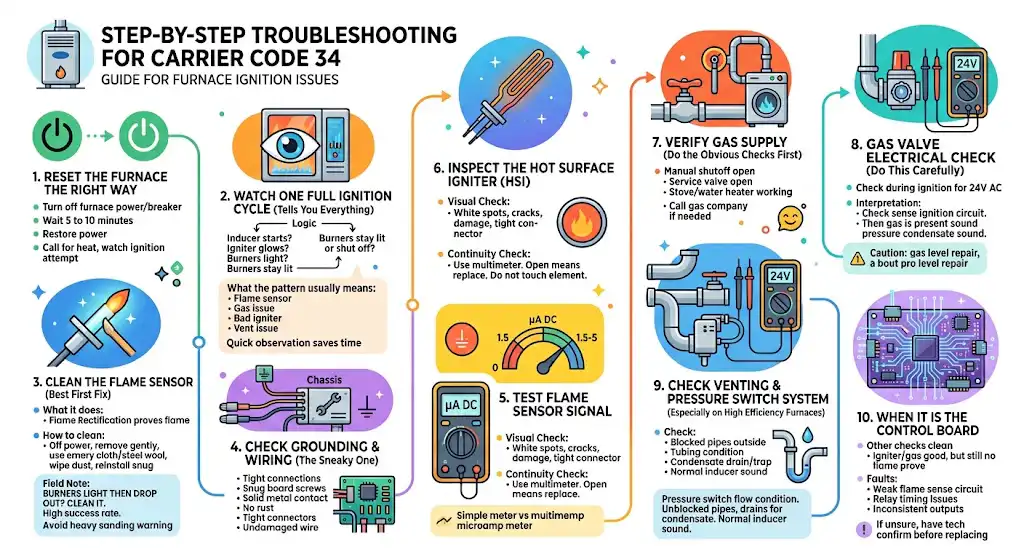
Step 1: Reset the Furnace the Right Way
Sometimes code 34 is stored after repeated failed tries.
- Turn off the furnace power switch or breaker
- Wait 5 to 10 minutes
- Restore power
- Call for heat again and watch the ignition attempt
Step 2: Watch One Full Ignition Cycle (This Tells You Everything)
Take the lower panel off and observe through the burner view port if you have one.
Ask yourself:
- Does the inducer start?
- Does the igniter glow?
- Do the burners light?
- Do the burners stay lit or shut off after 2 to 10 seconds?
What the pattern usually means
- Igniter glows, burners light, then shut off quickly: flame sensor or grounding is most likely
- Igniter glows, but burners never light: gas supply issue, gas valve issue, or board issue
- Igniter never glows: igniter is bad, board is not powering it, or safety is open
- Inducer runs forever and nothing else happens: pressure switch, tubing, venting, condensate drain (high efficiency)
This quick observation saves a lot of wasted time.
Step 3: Clean the Flame Sensor (Best First Fix)
What the flame sensor does
The flame sensor is a small metal rod (often straight or L shaped) that sits in the burner flame. It does not “look” for flame like a camera. It uses flame rectification to prove the flame to the control board. When the rod gets coated with oxidation, it cannot conduct properly and the board thinks there is no flame.
How to clean it
- Turn off power to the furnace
- Locate the flame sensor near the burners (usually one screw holding it)
- Remove it gently
- Clean only the metal rod with fine emery cloth or fine steel wool until it is shiny
- Wipe dust off with a clean dry cloth
- Reinstall and make sure it is snug and properly positioned in the flame
Avoid heavy sanding. You are not trying to reshape it, just remove oxidation.
My field note
If your burners light and then drop out after a few seconds, cleaning the flame sensor is the first thing I do. It is one of the highest success rate fixes for code 34.
Step 4: Check Grounding and Flame Sensor Wiring (This Is the Sneaky One)
Flame sensing depends on a good ground path back to the control board. I have fixed plenty of code 34 issues that were not the sensor itself but a weak ground.
Check:
- Ground wire connections to the furnace chassis are tight
- Control board mounting screws are snug (some boards ground through mounting)
- Burner assembly has solid metal to metal contact
- No rust buildup where grounds connect
- Flame sensor spade connector is tight and not corroded
- Wire is not damaged or pinched
If you clean the sensor and it still trips code 34, this is the next place I look.
Step 5: Test Flame Sensor Signal (Microamps) If You Want a Real Answer
If you have the right meter, measure flame sensor current.
Typical flame rectification readings many furnaces like to see are often in the neighborhood of 1.5 to 5 microamps DC, though exact targets vary by model and board.
- If you are getting very low microamps, the board will not prove flame
- Low microamps can be a dirty sensor, poor ground, weak flame, or bad board input
If you do not have a microamp meter, do not worry. You can still solve most code 34 problems with cleaning, inspection, and basic voltage checks.
Step 6: Inspect the Hot Surface Igniter (HSI)
A weak or cracked igniter can cause ignition issues that look like code 34, especially if ignition is delayed or inconsistent.
Visual check
With power off:
- Look for white spots, hairline cracks, or damage
- Make sure the connector is tight
Continuity check (recommended)
- Disconnect igniter
- Use a multimeter to check continuity
- If it is open (no continuity), replace it
If you are unsure, do not touch the igniter element with bare fingers. Oils can shorten igniter life.
Step 7: Verify Gas Supply (Do the Obvious Checks First)
Before blaming the gas valve or control board, confirm the basics:
- Manual gas shutoff valve is fully open
- Any service valve near the furnace is open
- Other gas appliances (stove, water heater) are working normally
If other appliances are weak too, you may have a supply or regulator issue that needs the gas company or a licensed pro.
Step 8: Gas Valve Electrical Check (Do This Carefully)
If the igniter glows and you suspect the valve is not opening:
- During the ignition trial, check for 24 volts AC at the gas valve terminals (only if you know how to test safely)
How to interpret it
- You have 24 VAC but no gas flow or ignition: valve may be sticking or failed, or you have gas supply issues
- You do not have 24 VAC when you should: control board, wiring, or safeties are interrupting the call
Gas valve replacement is usually a professional level repair in my opinion. When gas components are involved, I want everything leak tested and set up correctly.
Step 9: Check Venting and Pressure Switch System (Especially on High Efficiency Furnaces)
On some Carrier systems, what looks like an ignition proving issue can be triggered by draft and venting problems that disrupt the ignition sequence.
Check:
- Intake and exhaust pipes outside are not blocked (snow, leaves, nests)
- Rubber pressure switch tubing is not cracked, brittle, or full of water
- Condensate drain and trap are not clogged (high efficiency furnaces)
- Inducer motor sounds normal and is not straining
If the pressure switch is not proving reliably, the furnace can behave like it is trying to light and then quitting.
Step 10: When It Is the Control Board
If you have:
- Clean flame sensor
- Verified good ground
- Verified igniter operation
- Verified gas supply
- Verified valve is being energized correctly
And it still will not prove flame, the control board can be at fault.
Control boards can fail in ways that look like flame sense problems, including:
- weak flame sense circuit
- relay timing issues
- inconsistent outputs to igniter or valve
At that stage, I recommend having a tech confirm with proper readings before replacing parts. Boards are not cheap, and guessing gets expensive fast.
Carrier Code 34 and Code 14 Together (What It Means)
When you see code 34 first and later code 14, it is usually this story:
- The furnace attempted ignition multiple times
- Each time, it failed to prove flame
- After the allowed retries, it went into lockout for safety
To clear lockout, you usually need to shut power off and back on. But clearing it does not fix the underlying issue. If the cause is still present, it will lock out again.
Fast Fix Table: Cause and What You Should Do
| Dirty flame sensor | Remove and clean sensor rod, reinstall | Yes |
| Loose ground or corroded connections | Tighten and clean grounds, check sensor wire | Yes if comfortable |
| Bad igniter | Test continuity, replace igniter | Yes for handy homeowners |
| Gas supply problem | Confirm valves open, confirm other gas appliances | Yes |
| Bad gas valve | Verify 24 VAC during trial, replace if failed | Usually no |
| Venting restriction or pressure switch issue | Clear vent termination, inspect tubing, check condensate drain | Sometimes |
| Control board failure | Confirm signals and microamps, replace board | Usually no |
Helpful Numbers and Practical Expectations
These are not universal specs for every Carrier model, but they are useful reference points I rely on in the field:
| Flame sensor current | Often roughly 1.5 to 5 microamps DC when stable |
| Gas valve control voltage | 24 volts AC during ignition trial |
| Flame sensor service life | Commonly around 3 to 7 years depending on conditions |
| Most common fix | Cleaning flame sensor and correcting grounding |
If you want the exact specifications for your unit, use your furnace model number and look up the Carrier installation or service manual for that specific series.
When You Should Stop DIY and Call a Technician
I am all for homeowners learning their equipment, but I also know where repairs cross into risk.
Call a pro if:
- You smell gas at any point
- Burners are lighting with a boom or delayed ignition
- You have repeated lockouts after cleaning the flame sensor
- You suspect a gas valve or control board issue
- Venting is damaged, disconnected, or you see signs of flue gas leakage
- Your carbon monoxide alarm has activated
A good service tech should be checking flame sensor microamps, gas pressure, venting, temperature rise, and overall combustion safety, not just swapping parts.
My Final Take (Nathan’s Field Advice)
Carrier furnace code 34 is usually fixable without replacing half the furnace. In my experience, the best path is:
- Watch the ignition sequence
- Clean the flame sensor
- Confirm solid grounding and tight wiring
- Check igniter condition
- Verify gas supply
- Move into meter based diagnosis for gas valve or control board only if needed
One last thing I tell homeowners all the time: error codes are clues, not a guaranteed diagnosis. They point you toward a system and a moment in the sequence, but the real fix comes from verifying what is actually happening.