Is your ac compressor not working, but the fan is running? There are quite a few issues that could prevent your compressor from running. These issues can range from ‘easy to fix’ to more complex ones that can require a licensed Technician to come and have a look.
Some reasons your compressor is not working, but your fan is running include: a bad compressor capacitor, bad starter relay, low refrigerant levels, power issues, bad thermostat wiring, bad contactor, and a dead compressor. Shortly, we’ll be looking at these issues in a little bit in detail.
Air conditioners are typically installed with two fans. One fan that is installed inside your home blows air throughout your home, and the other one found in the ac condenser unit blows away heat from the coils.
Let’s now look at what can cause your compressor not to run when your fan(s) are running.
Read also: Home AC Compressor Not Turning On [Solved]
Why Is My AC Compressor Not Working, but Fan Is Running?
Your AC system has two fans so let’s start by looking at what can cause your indoor fan to run when your compressor unit is not working. Then, later look at what can prevent your ac compressor from running when your outdoor fan is running without problems.
Case #1: AC Compressor Not Working, but Indoor Fan is running
If you have an ac compressor that is not working but your air handler fan is running properly, look out for the following things:
1. Problems With Power
Power and electrical-related issues are common causes for your ac compressor not working. When your compressor and the whole condenser unit is not turning on, this is a clear sign of a power issue. To troubleshoot and fix power issues, you should start by checking the following things:
- Circuit breakers and power switches for both the outdoor and indoor units. Check the air conditioner circuit breaker and verify that it is not tripped. Reset the tripped breakers. If the breaker trips again, you need to call in HVAC professionals.
- Suppose the disconnect is pulled out. A disconnect is a small device planted on the wall of your house near the refrigerant lines. It acts as a switch to cut off power from your condenser unit for any reason you have. A disconnect can also cut power if inserted upside down or in another way. If everything is fine with it, let’s move to the next step.
2. Bad AC contactor
A defective ac contactor can be why your compressor is not turning on. A contactor conducts electricity to all other components of your condenser unit. It has a coil inside and can get magnetic when there is a signal to do so.
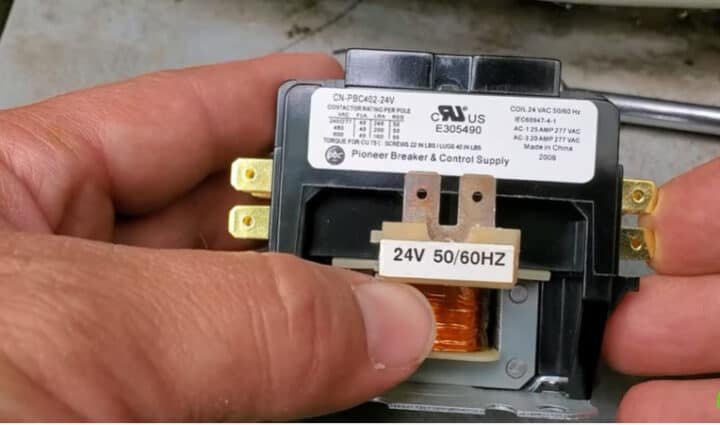
When the coil inside the contactor gets burnt out, it will not close the circuit, and the condenser unit will be cut off from power. Meanwhile, your air handler inside will not be affected, and the fan can be running quite fine.
To rule out an ac contactor, get a screwdriver and manually push a metal plate against the other to complete a circuit. If the unit starts running, then the problem is with the contactor. If it doesn’t, then something else could be messing with you. At this point, you need to look at your compressor capacitor.
3. Bad Compressor Capacitor
A defective compressor capacitor could be why your ac compressor is not turning on. A capacitor is an important part of your ac condenser unit because it powers your compressor and fan motor. A defective capacitor is the most common among the top issues that can stop your compressor from running.
The good part is compressors are usually cheap to buy and easy to fix. Just make sure before touching the capacitor you discharge it of all voltage.
Sometimes, you can tell when a capacitor is defective if it has a swollen top but other times, there could be no signs at all. In this case you will need a multimeter to test it for continuity.

4. Bad Thermostat Wiring
A thermostat that is not properly wired can fail to make cooling calls to your HVAC system. This could be why your compressor isn’t working. Pull off your thermostat from the wall and check its wiring.
Make sure there is a jumper between R terminal(power) and the Rc terminal (power for cooling). Without Rc terminal connected, your compressor won’t turn on to start cooling.
Other thermostat issues that could affect the working of your compressor include thermostat settings. For your AC compressor to start running, your thermostat must be adjusted to a temperature lower than the room temperature reading.
5. Low Refrigerant
If the refrigerant leaks out of your ac system, the low-pressure switch will detect this and can shut off the compressor over at the contactor. The low-pressure switch ensures that there is enough refrigerant in your ac system.
6. High-pressure Switch
The high-pressure switch will shut off the compressor if it detects high pressure in your system. That is if the condenser can’t eject heat for some reason, like when it’s blocked or has lots of build-up on it. If the fan motor is defective, much of the heat absorbed from your home won’t be ejected, and the pressure will rise and cause the high-pressure switch to kick in and discontinue the pressure from rising.
Also read: Air Conditioner Not Blowing Cold Air but Running
Safety First: What NOT to Do
Your outdoor unit has 240 volts running through it right now. The capacitor holds a charge that can stop your heart even when the breaker is off. You’re dealing with pressurized refrigerant that can cause freeze burns in seconds.
Stop before you touch anything.
NEVER open the outdoor unit’s panel cover without killing power at the breaker box first.
NEVER touch capacitor terminals.
NEVER attempt to discharge a capacitor yourself unless you have insulated tools and know the exact procedure.
NEVER bypass the contactor by jumping wires to “test” if the compressor works.
NEVER cut or disconnect refrigerant lines.
NEVER poke around internal components with metal tools while the power is on.
NEVER ignore burning smells or sparking sounds from the outdoor unit.
NEVER work on the electrical panel, disconnect box, or wiring connections.
NEVER attempt refrigerant work without EPA 608 certification.
NEVER force stuck components, unscrew housing panels, or dismantle the compressor.
Can You Fix This Yourself? Honest Assessment
Here’s the truth. Some of you can handle this repair, most of you can’t, and all of you think you’re in the first group.
Let’s figure out which category you actually fall into.
If You’ve Never Opened Your Outdoor Unit Before
Stop right here. You’re dealing with 240 volts, stored electrical charge in the capacitor, and refrigerant systems that require EPA certification to touch legally. Basic tools won’t cut it.
You need a multimeter, a voltage tester, an insulated screwdriver, and the knowledge to use them without killing yourself.
If You’ve Done Electrical Work Before
You might be able to handle a capacitor replacement. Might. Depends on your electrical experience and comfort level working with high voltage components.
Here’s what makes you a good candidate for DIY. You own a multimeter and know how to test voltage safely. You’ve replaced electrical outlets, installed ceiling fans, or worked inside breaker boxes before. You understand that capacitors store charge and need discharge procedures before touching terminals.
If You’re Handy But Not Electrically Experienced
This is the danger zone. You’ve fixed plenty of things around the house. You’ve got mechanical aptitude and a decent toolbox. You watch YouTube videos and think, “I can do that.”
You probably can’t do this one safely. Mechanical skills don’t transfer to electrical troubleshooting.
The compressor itself? That’s not a DIY repair even for experienced people. Compressor replacement requires recovering refrigerant, cutting refrigerant lines, brazing new connections, pulling a vacuum on the system, and recharging with the exact refrigerant weight. You need a manifold gauge set, vacuum pump, recovery machine, brazing torch, and nitrogen for purging lines.
The Real Question You Should Be Asking
Can you physically do the repair? Maybe. Should you do the repair? Different answer.
If you’re unsure, hire someone. Your safety and your bank account will thank you.
DIY Repair Guide (For Experienced DIYers Only)
You’re still reading. That means you’ve decided you can handle electrical work at 240 volts with stored charge components. Good.
This repair takes 45 minutes to 1 hour for someone with electrical experience. First-timers should budget 90 minutes. Cost runs 100 to 200 dollars for the replacement capacitor depending on microfarad rating and whether you’ve got a dual run or single cap.
What You Need Before You Start
Multimeter with capacitance testing capability. Non-negotiable. You need to verify the old cap is actually bad and test the new one before installation.
Insulated screwdriver set rated for electrical work. The discharge procedure requires an insulated handle. Standard screwdrivers conduct electricity straight into your hand.
Voltage tester, preferably non-contact type. You’re verifying power is actually off before touching anything inside that panel.
Camera phone. Take pictures of the wiring before you disconnect anything. Your memory will fail you during reassembly.
Replacement capacitor with exact microfarad rating and voltage rating. The numbers are printed on the side of your existing cap. Match them exactly, not close enough.
Step 1: Kill All Power
Go to your breaker box. Flip the circuit breaker for your outdoor unit to OFF. Not the thermostat, the actual breaker feeding 240 volts to the condenser unit outside.
Wait 5 minutes. Capacitors hold charge, but transformers and contactors can also store residual voltage.
Step 2: Verify Power Is Actually Off
Use your voltage tester on the outdoor unit’s panel before removing any screws. Touch the tester to the metal housing. If it lights up or beeps, you’ve still got voltage somewhere. Go back and find what you missed.
Step 3: Discharge the Capacitor
This is where people get hurt. The cap holds charge even with power off.
Take your insulated screwdriver. Touch the metal shaft across the capacitor terminals simultaneously. You’re looking for terminals marked HERM, FAN, and C (common). On a dual run cap, you’ll see three terminals on top.
Short HERM to C first by touching the screwdriver across both terminals at once. You might see a small spark. That’s normal. Short FAN to C next using the same technique. Short HERM to FAN last, just to be thorough.
The capacitor is now discharged.
Step 4: Document the Wiring
Pull out your phone. Take a clear picture of how the wires connect to the capacitor terminals. You need to see which color wire goes to which terminal.
Step 5: Remove the Old Capacitor
Pull the wires off the terminals. They’re usually spade connectors that slide straight off. Some older units use screw terminals. Either way, gentle pressure removes them.

Step 6: Test the Old Capacitor
Set your multimeter to capacitance mode. The symbol looks like two parallel lines with a gap between them.
Touch the meter probes to the old capacitor terminals. HERM to C first. The reading should match the microfarad rating printed on the cap, usually within 10 percent. If it reads zero or significantly low, the cap is dead.
Test FAN to C next. Again, compare the reading to the printed rating. A bad dual run cap usually fails on one side first, so you might see good readings on FAN but dead readings on HERM, or vice versa.
Step 7: Install the New Capacitor
Mount the new cap in the bracket. Orientation doesn’t matter electrically, but position it so the terminals are accessible and match your wiring photo.
Step 8: Reconnect the Wiring
Look at your photo. Connect the wires to the new capacitor terminals exactly as shown. HERM wire to HERM terminal. FAN wire to FAN terminal. Both common wires to C terminal.
Double-check every connection against your photo. This is not the time for “I think it goes there.”
Step 9: Test Before Closing Up
Go back to your disconnect box and restore power. Go to your breaker and flip it back to ON.
Walk back to the outdoor unit. Do NOT touch anything inside. Just listen and watch.
The compressor should start within 10 seconds of the thermostat calling for cooling. You’ll hear a distinct hum, then a deeper running sound as the compressor kicks in. The fan should already be running.
If the compressor starts and runs, you fixed it. If you hear clicking or humming but no start, you’ve got a different problem.
Step 10: Close It Up
Power everything back off. Breaker OFF, disconnect OFF.
Replace the access panel and secure all screws. Restore power one final time.
Set your thermostat to cool and lower the temperature 5 degrees below current room temp. The system should fire up and run continuously. Let it run for 15 minutes to verify the compressor stays running and doesn’t cycle off due to overheating or pressure issues.
FAQ – QUICK ANSWERS
How do I know if it’s the capacitor or compressor?
Listen to the outdoor unit when it tries to start. A clicking sound that repeats every few seconds means the contactor is closing but the compressor won’t engage. That’s usually a bad capacitor or a seized compressor.
Humming without starting points to a bad capacitor 80 percent of the time. The compressor has power and wants to run but can’t get the starting boost it needs. If you hear loud humming that strains for 10 to 15 seconds then stops, that’s a weak or failed capacitor.
What does it mean if the compressor hums but doesn’t start?
Most likely cause is a bad run capacitor. The capacitor provides the starting surge the compressor needs. When it fails, the compressor draws power but can’t generate enough torque to start spinning.
You’ll hear 5 to 15 seconds of loud humming, then silence as the overload protection kicks in.
Is it safe to replace a capacitor myself?
Safe if you know what you’re doing with electrical work. Unsafe if you don’t.
What tools do I actually need?
Multimeter with capacitance testing, insulated screwdriver set, voltage tester, and a camera phone for wiring documentation.
Can a bad compressor electrocute me?
The compressor itself won’t shock you… the wiring and capacitor connected to it will.
Should I turn off the breaker before the technician arrives?
Yes. Turn off the breaker and the outdoor disconnect box right now.
How long can I run the AC with a bad compressor?
Don’t run it at all. Shut it down immediately at the breaker and thermostat.