Your walls are staring at you again, aren’t they? Those blank, boring surfaces that scream “I gave up on decorating three years ago!” Trust me, I’ve been there.
You walk into your living room and feel like you’re entering a beige void where creativity goes to die.
But here’s the thing – transforming your walls doesn’t require a design degree or emptying your savings account. I’ve spent countless weekends experimenting with wall decor (some disasters included), and I’m here to share the winners that actually work.
These ten DIY projects will breathe life into your space without breaking the bank or your sanity.
Why DIY Wall Decor Beats Store-Bought Every Time
Before we jump into the fun stuff, let’s talk about why making your own wall art rocks. Store-bought pieces often look like everyone else’s home – you know that feeling when you visit three different houses and see the same “Live, Laugh, Love” sign? Yeah, we’re avoiding that trap entirely.
DIY wall decor gives you complete control over colors, sizes, and style. Plus, there’s something incredibly satisfying about guests asking “Where did you get this?” and responding with “I made it!”
Boho Macrame Wall Hanging DIY

Let’s kick things off with something that screams “I’m creative and slightly mysterious.” Macrame wall hangings bring that effortless boho vibe that makes your space feel like a Pinterest board come to life.
Getting Started with Macrame Magic
You’ll need macrame cord, a wooden dowel, and basic knot-tying skills. Don’t worry if you can barely tie your shoes – macrame uses surprisingly simple knots that you’ll master in no time.
Start with these essential knots:
- Square knots for texture
- Half hitch knots for clean lines
- Gathering knots for dramatic drops
The beauty of macrame lies in its imperfection. Those slightly uneven knots? They add character. I learned this the hard way after spending hours trying to make everything symmetrical, only to realize the “mistakes” looked better than my perfectly measured sections.
Design Variations That Actually Work
Create different textures by varying your cord thickness. Combine 3mm and 6mm cord for visual interest that doesn’t look chaotic. Add wooden beads or small mirrors for unexpected pops of shine.
Ever wondered why some macrame pieces look expensive while others scream “craft store clearance”? It’s all about proportion and negative space. Leave breathing room between your knot clusters – your wall hanging needs to breathe, literally.
Floating Shelf Gallery Wall Design
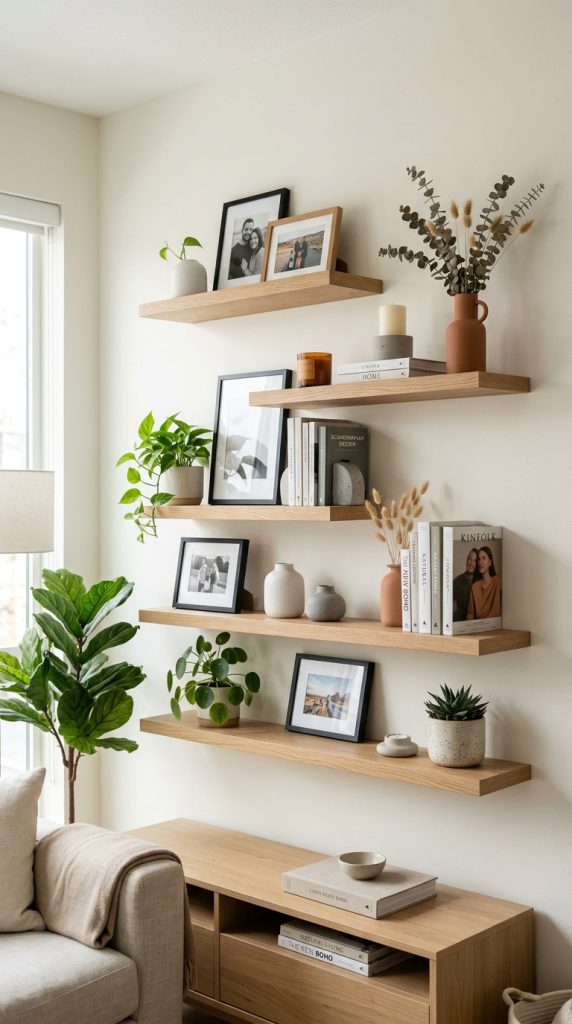
Gallery walls intimidate people, but floating shelves make the process foolproof. You can constantly rearrange your display without creating more nail holes than a construction site.
Planning Your Floating Paradise
Measure your wall space and sketch your layout first. I cannot stress this enough – winging it leads to wonky arrangements that haunt you every time you walk past.
Choose shelves in varying lengths:
- 24-inch shelves for larger pieces
- 18-inch shelves for medium items
- 12-inch shelves for small treasures
Styling Tips That Transform Amateur to Pro
Layer your items like you’re creating a visual sandwich. Place larger pieces in back, medium items in middle, and small objects in front. This creates depth that makes your display look intentional rather than random.
Mix textures and heights religiously. Combine books, plants, picture frames, and decorative objects. The key is odd numbers – groups of three or five items look more natural than even pairs.
Want to know a secret? Leave some empty space on each shelf. Cramming everything together makes your display look cluttered, not curated.
Minimal Line Art Frame Arrangement

Simple line drawings prove that less really can be more. This trend works because clean lines create visual calm in our chaotic world.
Creating Your Own Line Art
Grab a black marker and white paper – seriously, it’s that simple. Focus on continuous lines that capture the essence of your subject without getting lost in details.
Popular subjects that work beautifully:
- Face profiles
- Plant silhouettes
- Abstract shapes
- Single-line animals
The trick is keeping your hand moving without lifting the marker. Imperfections add authenticity that expensive prints can’t replicate.
Frame Selection Strategy
Black frames create cohesion, but don’t feel trapped by matching sets. Mix frame sizes while keeping the same color and style. This creates visual rhythm without looking like you bought everything in one shopping trip.
Arrange frames before hammering anything. Use paper templates taped to the wall – trust me on this one. I once spent an entire Saturday repositioning frames because I got trigger-happy with the hammer.
Also Read: 10 Fabulous Wall Decor Ideas for Pinterest-Worthy Rooms – Airlucent
Paper Flower 3D Wall Decor Setup

Paper flowers sound crafty in the worst way, but executed correctly, they create stunning dimensional art that guests assume cost a fortune.
Choosing Papers That Don’t Look Cheap
Invest in quality cardstock over construction paper. The slight weight difference transforms your flowers from elementary school craft to sophisticated art installation.
Color palettes that never fail:
- Monochromatic whites and creams
- Dusty roses with sage greens
- Deep jewel tones for drama
Construction Techniques for Realistic Results
Layer petals in odd numbers and curl edges slightly with scissors. This creates natural-looking curves that flat paper can’t achieve. Vary your flower sizes dramatically – tiny buds mixed with oversized blooms create visual interest.
Attach flowers at different heights from the wall using foam mounting squares. This creates shadows and depth that make your display pop off the surface.
Mirror Cluster Accent Wall Idea

Mirrors multiply light and space while adding sophisticated glamour. The cluster approach prevents that “checking my appearance every five seconds” problem of single large mirrors.
Mirror Selection Without the Headache
Choose mirrors with similar finishes but different shapes. Round, hexagonal, and sunburst styles work together when unified by color or material.
Size variety is crucial:
- One large statement mirror (24+ inches)
- Three to four medium mirrors (12-18 inches)
- Multiple small mirrors (6-10 inches) to fill gaps
Installation Logic That Actually Works
Start with your largest mirror as the anchor point. Build outward, maintaining roughly equal spacing between pieces. Use a level religiously – crooked mirrors make entire rooms feel off-balance.
Pro tip from my own trial and error: photograph your arrangement before committing to nail holes. You’ll spot balance issues in photos that you miss in person.
Wooden Geometric Wall Panel Design

Geometric wood panels add texture and warmth that paint alone can’t achieve. This project looks incredibly complex but uses surprisingly basic construction techniques.
Material Selection for Durability and Style
Choose wood species based on your existing decor. Pine works for painted finishes, while oak or walnut showcase natural grain beautifully.
Essential tools you’ll need:
- Miter saw for precise angles
- Wood glue for strong bonds
- Brad nailer for quick assembly
- Sandpaper for smooth finishes
Design Patterns That Don’t Overwhelm
Start with simple chevron or herringbone patterns. These create visual interest without inducing headaches. Limit your pattern to one accent wall – geometric designs work best as focal points, not room domination strategies.
Stain or paint your pieces before installation. Trust me, trying to finish wood while it’s mounted on the wall is a special kind of torture that tests both patience and shoulder muscles.
Also Read: 10 Eye-Catching TV Wall Decor Ideas for Modern Interiors – Airlucent
Photo Collage Memory Wall Grid

Photo walls celebrate your life without looking like a scrapbook exploded. The grid approach creates order from potential chaos.
Planning Your Photo Story
Choose photos with similar editing styles or filters. Mixing bright, saturated images with moody, dark photos creates visual conflict that distracts from your memories.
Consider your narrative flow:
- Chronological arrangements tell life stories
- Color-coordinated displays create artistic impact
- Mixed orientations add dynamic energy
Grid Systems That Actually Look Professional
Maintain consistent spacing between photos – usually 2-4 inches works perfectly. Use identical frames or matting to unify different photo sizes and orientations.
Map your grid on the wall with painter’s tape before hanging anything. This prevents the “slightly off” syndrome that makes entire walls look amateur.
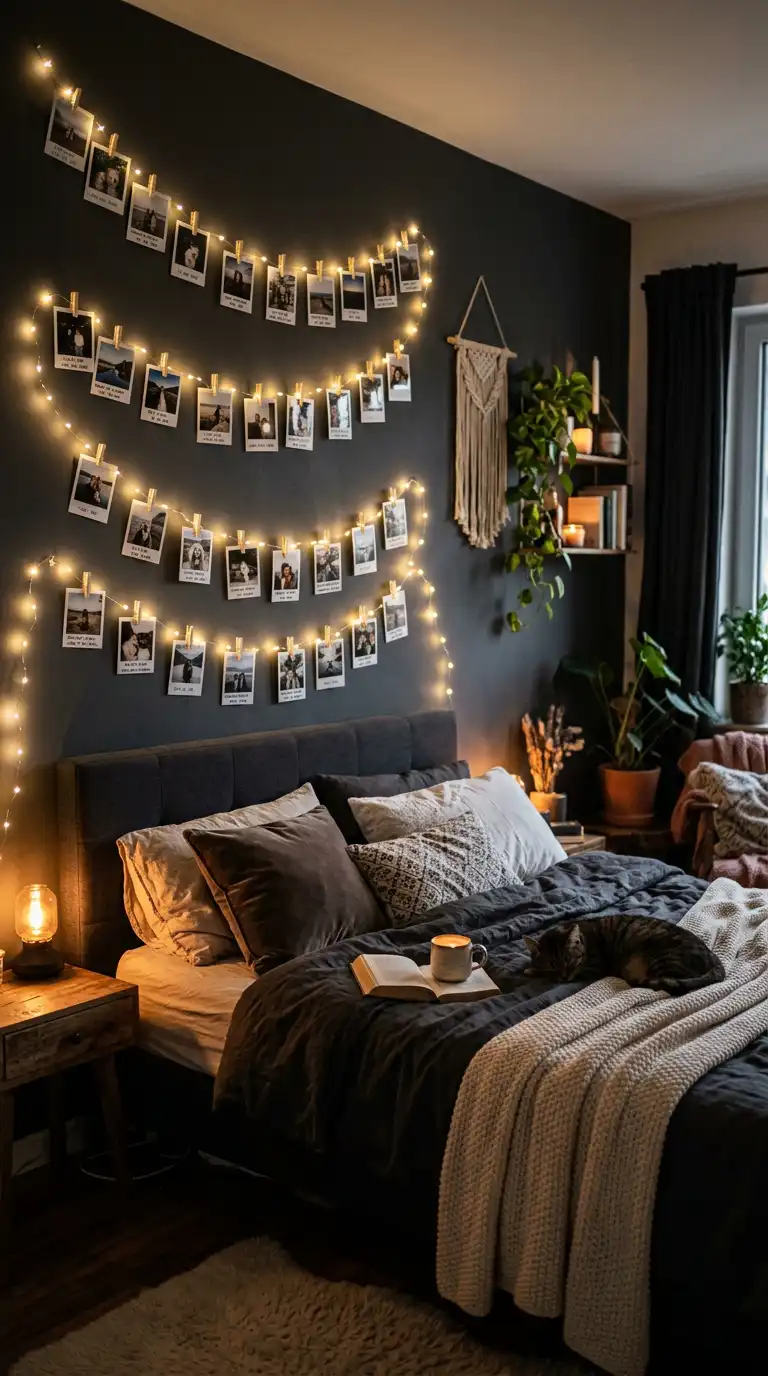
LED Fairy Light Wall Aesthetic

Fairy lights aren’t just for college dorms anymore. Strategic placement creates ambiance that transforms ordinary walls into magical spaces.
Light Selection for Adult Spaces
Choose warm white LEDs over multicolored options for sophisticated appeal. Battery-operated strings offer placement flexibility without hunting for outlets like a desperate phone charger.
Quality indicators to watch for:
- Copper or silver wire (not green plastic)
- Consistent LED spacing
- Dimmer controls for mood adjustment
- Timer functions for convenience
Installation Patterns Beyond Random Draping
Create intentional shapes – geometric patterns, constellation maps, or nature silhouettes. Use small clear hooks or adhesive clips to secure your design without damaging walls.
Layer different light densities for depth. Combine sparse background lighting with concentrated accent areas that draw attention to specific wall features.
Canvas Abstract Paint Splash Wall

Abstract art intimidates people, but paint splashing embraces happy accidents that often create the most interesting results.
Paint Selection for Professional Results
Acrylic paints dry quickly and offer vibrant colors that won’t fade over time. Invest in artist-quality paints rather than craft store alternatives – the color saturation difference is dramatic.
Essential tools for controlled chaos:
- Various brush sizes for different effects
- Palette knives for texture creation
- Spray bottles for blending techniques
- Drop cloths for mess containment
Techniques That Look Intentional
Start with background washes in neutral tones. Build layers gradually, allowing each to dry completely. Focus on color harmony rather than matching exact shades – analogous colors (neighbors on the color wheel) create pleasing combinations.
Practice your techniques on paper first. Understanding how your paints behave prevents expensive canvas mistakes that can’t be undone.
Also Read: 10 Fabulous Mirror Wall Decor Luxury Accent Walls – Airlucent
Woven Basket Wall Art Display

Baskets aren’t just for storage – they create fantastic textural wall art that adds warmth and natural elements to any space.
Basket Selection for Visual Impact
Choose baskets with varying weave patterns and depths to create dimensional interest. Flat baskets work better for wall mounting than deep storage baskets that stick out awkwardly.
Color coordination strategies:
- Natural tones for organic appeal
- Painted baskets for color pops
- Mixed materials (wicker, seagrass, rattan) for texture variety
Arrangement Principles That Work
Treat baskets like any other gallery wall – plan your arrangement before mounting. Vary sizes significantly to avoid that “matching dinnerware” look that feels sterile.
Mount baskets securely with hidden hangers or picture wire. Heavy baskets require wall anchors, not just nails that will eventually fail and send your art crashing down.
Making It All Work Together
Here’s what I’ve learned after years of DIY experiments: start small and build gradually. You don’t need to transform every wall simultaneously. Choose one focal wall and execute it beautifully rather than attempting mediocre makeovers throughout your entire home.
Consider your room’s existing elements when selecting projects. Boho macrame might clash with ultra-modern furniture, while geometric wood panels could overwhelm already-busy spaces.
Most importantly, trust your instincts. Design rules exist, but your home should reflect your personality, not interior design textbooks. If you love purple paper flowers with geometric wood panels, make it work!
These ten DIY wall decor ideas prove that stunning interiors don’t require designer budgets or professional skills. They require creativity, patience, and willingness to experiment. Your walls are waiting for their transformation – which project will you tackle first?
Remember, the best wall decor tells your story while making your space feel intentionally designed rather than accidentally assembled. Happy decorating, and FYI, don’t forget to share your results – DIY wins deserve celebration!


