
I’m Nathan, and I’ve worked as an HVAC technician for over 10 years. I’ve swapped out hundreds of old analog thermostats in real homes with real wiring quirks, drywall issues, and “nothing is standard” surprises. The good news is this job is usually very doable for a homeowner if you take safety seriously and you wire it exactly the way your old one was wired.
If you want a more comfortable home, better temperature accuracy, and lower heating and cooling costs, upgrading from an old dial style thermostat to a digital one is one of the simplest improvements you can make.
- How much can a digital thermostat save?
- Quick answer: how to replace an analog thermostat with a digital one
- Before you start: the most important step is compatibility
- Tools and supplies I recommend (keep it simple)
- Safety first (how I do it every time)
- Step by step: replacing your old thermostat with a digital thermostat
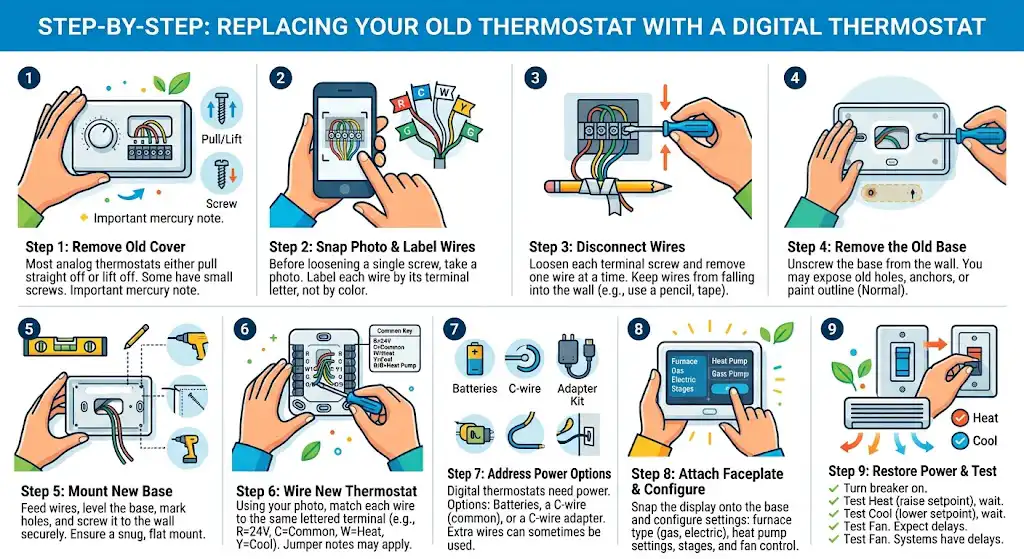
- Step 1: Take off the old thermostat cover
- Step 2: Take a clear photo and label every wire
- Step 3: Disconnect the wires (and keep them from falling into the wall)
- Step 4: Remove the old thermostat base
- Step 5: Mount the new thermostat base (level and secure)
- Step 6: Wire the new thermostat (match letters, not colors)
- Step 7: Batteries, C-wire, and power options (the part that surprises people)
- Step 8: Attach the thermostat faceplate and configure settings
- Step 9: Restore power and test heating and cooling
- Special cases I see all the time (and how to handle them)
- Common problems after installation (quick troubleshooting)
- When you should stop and call a pro
- Cost and value: what to expect
- What to do with the old thermostat (especially if it contains mercury)
- FAQ: Questions homeowners ask me all the time
- Final thoughts from the field
How much can a digital thermostat save?
Savings depend on your habits, insulation, fuel costs, and whether you choose a programmable or smart thermostat.
Here are reliable, widely-cited benchmarks:
| Basic digital (non-programmable) | Modest | Biggest benefit is accuracy and steadier comfort |
| Programmable | Up to about 10 percent per year | U.S. Department of Energy commonly cites around 10 percent when schedules are used correctly |
| Smart thermostat (Energy Star certified) | Often around 8 percent HVAC savings | Energy Star reporting shows meaningful savings when installed and used properly |
In plain terms: if your heating and cooling costs are high, the thermostat upgrade can pay back quickly, especially if your old analog thermostat is drifting a few degrees.
Quick answer: how to replace an analog thermostat with a digital one
You’ll:
- Turn off power to the HVAC system
- Remove the old thermostat cover
- Photograph and label each wire
- Remove the old base from the wall
- Mount the new thermostat base level and secure
- Connect wires to matching terminals
- Install batteries or connect common wire if required
- Snap on the new faceplate
- Restore power and test heating and cooling
That’s the overview. Now I’ll walk you through the same process I use on service calls, including the mistakes I see homeowners make most often.
Before you start: the most important step is compatibility
Not every thermostat works with every system. The biggest compatibility issue is whether your system is low voltage or line voltage.
Low voltage vs line voltage (this matters a lot)
| Common systems | Furnace, boiler with controls, central AC, heat pump | Electric baseboard heaters, some wall heaters |
| Typical voltage | 24V | 120V or 240V |
| Wire size | Thin thermostat cable (often 18 gauge) | Thicker house wiring |
| Wire count | Usually 2 to 8+ conductors | Often 2 to 4 conductors |
| Safety risk | Lower shock risk but still can short equipment | Much higher shock risk, can seriously injure or kill |
If you have electric baseboards and thick wires on the thermostat, stop and buy a thermostat rated for line voltage. Do not install a standard 24V digital thermostat on a line voltage system.
Tools and supplies I recommend (keep it simple)
You don’t need fancy gear, but you do need the right basics.
| Small screwdriver (Phillips and flat) | Terminal screws and mounting screws |
| Drill and bit (sometimes) | If new mounting holes are needed |
| Level | A crooked base looks bad and can affect some older mechanical models |
| Wire labels or masking tape | Prevent wiring mistakes |
| Needle-nose pliers (optional) | Helps with small wires |
| Non-contact voltage tester or multimeter | Confirm power is actually off |
| Wall anchors (often included) | For secure mounting |
Time estimate in most homes: 20 to 60 minutes.
Safety first (how I do it every time)
- Turn off power at the breaker for the furnace, air handler, boiler, or baseboard circuit.
- Also shut off the furnace switch if you have a service switch near the unit.
- Verify power is off using a voltage tester or multimeter.
Do not skip verification. I’ve seen mislabeled panels and shared circuits more times than I can count.
Step by step: replacing your old thermostat with a digital thermostat
Step 1: Take off the old thermostat cover
Most analog thermostats either pull straight off or lift off. Some have small screws.
Once the cover is off, you’ll see the wiring terminals.
Important mercury note
Step 2: Take a clear photo and label every wire
Before you loosen a single screw:
- Take a clear photo of where each wire lands
- Label each wire by its terminal letter, not by color
I’m stressing this because wire colors are not guaranteed. I’ve opened walls where:
- the “green” wire was used for heat
- the “white” wire was used as a common
- someone extended wiring with random colors
The terminal letters are what matter.
Step 3: Disconnect the wires (and keep them from falling into the wall)
Loosen each terminal screw and remove each wire one at a time.
Pro tip from my field work: wrap the wire bundle around a pencil or tape it to the wall so the wires don’t slip back into the hole. Fishing thermostat wires out of a wall cavity is a headache you don’t want.
Step 4: Remove the old thermostat base
Unscrew the base from the wall. You may expose:
- old screw holes
- drywall anchors
- a rough paint outline from the old thermostat
This is normal.
Step 5: Mount the new thermostat base (level and secure)
Hold the new base to the wall and feed the wires through the opening.
Then:
- level it
- mark holes
- drill if needed
- install anchors if needed
- screw the base to the wall
A snug, flat mount prevents the thermostat from rocking when you press buttons.
Step 6: Wire the new thermostat (match letters, not colors)
Use your photo and wire labels and move each wire to the same lettered terminal on the new thermostat.
Here’s a quick reference for common low-voltage terminals:
| R or Rh/Rc | 24V power (hot) | Red |
| C | Common (power return) | Blue or black |
| W or W1 | Heat | White |
| Y or Y1 | Cooling | Yellow |
| G | Fan | Green |
| O or B | Heat pump reversing valve | Orange (O) or dark blue (B) |
| AUX/E | Heat pump auxiliary/emergency heat | Often white |
If your new thermostat has Rc and Rh and you only have one R wire
Many systems use a jumper between Rc and Rh. Some thermostats do this internally. Follow your thermostat manual. If your old thermostat had a jumper, that’s a clue.
Step 7: Batteries, C-wire, and power options (the part that surprises people)
Some digital thermostats run on:
- batteries only
- C-wire (common wire) power
- a combination
If your thermostat requires a C wire and you don’t have one connected, you have a few options:
- Use an unused wire in the cable bundle (often tucked in the wall)
- Install a C-wire adapter kit (many thermostat brands sell these)
- Pull new thermostat wire (best long-term, but more work)
- Choose a battery-powered model
If you see extra unused wires behind the thermostat, that’s often your easiest win.
Step 8: Attach the thermostat faceplate and configure settings
Snap the thermostat display onto the base.
Then go through setup. On many models, you’ll need to confirm things like:
- furnace type (gas, electric, boiler)
- heat pump vs conventional
- number of heating/cooling stages
- fan control settings
If you have a heat pump, pay special attention to O/B settings. One wrong setting can cause the system to heat when it should cool.
Step 9: Restore power and test heating and cooling
Turn the breaker back on.
Then test like this:
- Set mode to Heat and raise the setpoint a few degrees
- Wait and confirm the system starts
- Set mode to Cool and lower the setpoint a few degrees (if you have AC)
- Test Fan On (if available)
What you should expect:
- A short delay is normal (many thermostats have compressor protection delays)
- You should hear the equipment respond within a couple minutes depending on system type
If nothing happens, turn power back off and re-check wiring.
Special cases I see all the time (and how to handle them)
Case 1: You only have two wires
Two wires usually means heat-only (common with boilers and older furnaces).
You can still install many digital thermostats, but avoid thermostats that require a C wire unless you plan to add one or use an adapter.
Case 2: You have thick wires and a high-voltage system
That’s likely electric baseboard heat.
You must use a line voltage thermostat rated for 120V or 240V and the correct amperage. If you’re not comfortable working in a junction box environment, hire an electrician.
Case 3: Heat pump systems
Heat pumps often use O and/or B, AUX, and sometimes E.
If your setup is confusing, don’t guess. A wrong heat pump setup can cause comfort issues and higher bills.
Common problems after installation (quick troubleshooting)
Thermostat has no power or is blank
Try this:
- Check breaker and furnace switch
- Confirm batteries are installed correctly (if applicable)
- Confirm R is connected securely
- If the thermostat needs a C wire, confirm C is actually connected at both ends
Heat or AC won’t turn on
- Make sure you’re in the correct mode (Heat vs Cool)
- Some systems have a built-in delay
- Re-check that W controls heat and Y controls cool
- Check that the furnace door panel is fully seated (many furnaces have a door safety switch)
System runs constantly or won’t shut off
This is often:
- a wire short
- a miswired terminal (like W and Y mixed up)
- thermostat configured for the wrong system type
Turn power off and re-check wiring against your photo.
When you should stop and call a pro
I’m all for homeowners learning, but I also want you safe. Call a qualified HVAC tech or electrician if:
- you have line voltage baseboard heat and you’re unsure
- wires are brittle, crumbling, or too short to reconnect safely
- you see damaged insulation or scorch marks
- the system is a complex heat pump with multiple stages and you’re not confident in setup
Cost and value: what to expect
| Basic digital thermostat | 20 to 60 | Great for simple systems |
| Programmable thermostat | 40 to 150 | Good savings if you use schedules |
| Smart thermostat | 100 to 300 | Best features, may need C wire |
| Professional install | 150 to 400 | Varies by region and complexity |
What to do with the old thermostat (especially if it contains mercury)
If your old analog thermostat contains mercury:
- Do not open it
- Do not throw it in the trash
- Search your city or county for “thermostat recycling” or “household hazardous waste”
- Many HVAC supply houses accept them
This is one of those small things that makes a big difference environmentally.
FAQ: Questions homeowners ask me all the time
Can thermostat wires shock you?
Most low-voltage thermostat wires (24V) typically won’t seriously shock you, but they can short and damage equipment if you cross wires. Line voltage thermostat wiring can absolutely shock you and is dangerous.
How do you know if you need to replace a thermostat?
Common signs:
Blank or unresponsive display
Heat or AC won’t turn on
System won’t shut off
Room temperature doesn’t match the setting
You have to constantly “chase” comfort by adjusting the dial
Is replacing a thermostat hard?
Most replacements are straightforward if you:
turn off power
label wires
match terminals carefully
configure settings correctly
The hardest part is usually compatibility and power requirements (C-wire issues).
Final thoughts from the field
Analog thermostats aren’t “bad” because they’re old, but in my experience they’re often less accurate, less consistent, and more likely to drift over time. A digital thermostat gives you tighter temperature control and can reduce how often you feel the need to crank the heat up and down.